


We are huge fans of Bregje and are so excited to be collaborating on this project together! Bregje is the founder of Estona, where she sells her own jewellery line as well as creates weekly video tutorials on her popular YouTube channel. We feel honored to have Bregje feature on our channel and we hope you love the project as much as we do!
Guest tutor Bregje joins us in a collaboration to show you how to make your very own bezel set cabochon earstuds from scratch!
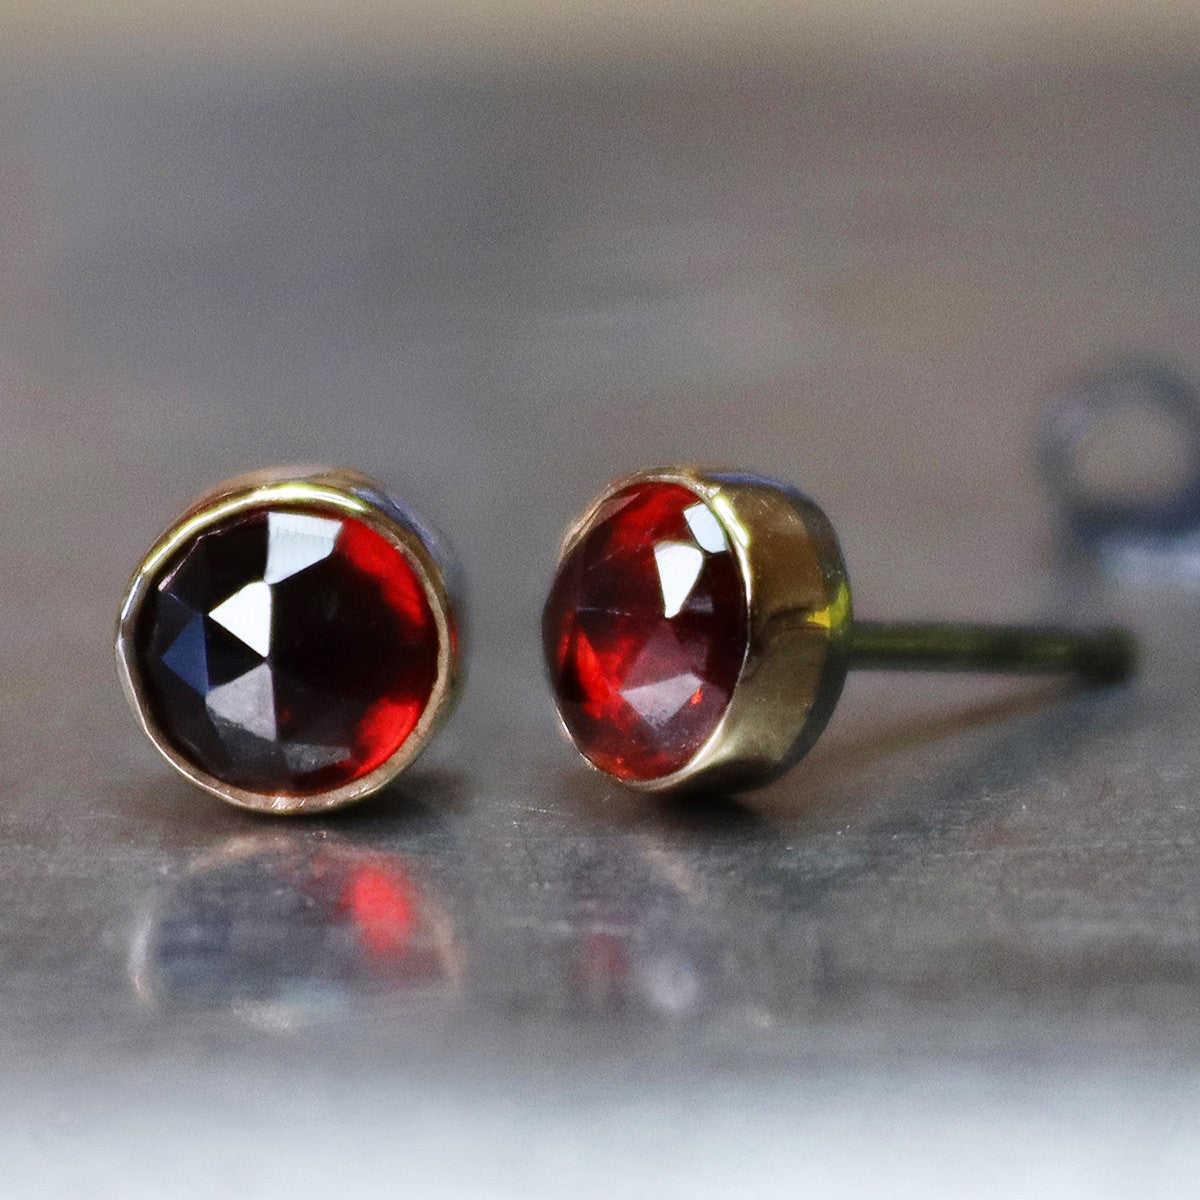
We gifted Bregje these juicy rose cut garnet cabochons and we are so in love with the finished design. This project combines a whole range of jewellery making techniques, using mixed metals of silver and gold, finished with patina for an eye-catching result.
You'll find all the recommended tools and supplies for the project on this page as well as Begje's guest video tutorial, plus step by step photos.
We hope you enjoy watching the process of the design and it gives you the inspiration to recreate an earring design for yourself.

What Gemstone Will You Choose?
This particular project features our African garnet 5mm rose cut cabochons but you can choose any cabochon you like to transform your design!
What Is A Rose Cut Cabochon?
We are loving rose cut cabochons right now, unlike regular cabochon stones which are smooth these offer a gorgeous sparkle. They have a flat bottom with a rounded top covered in triangular facets which come to a point in the middle. You may have guessed that rose cut gems get their name due to how they resemble a rosebud!
Explore our wide range of rose cut and faceted top cabochons to use in your designs here.
Recommended Tools & Supplies
- 2 x gemstone cabochons (featuring 5mm African garnets)
- 0.4mm gold sheet or your choice of thickness (for bezel wall)
- 1mm sterling silver sheet or your choice of thickness (for setting backplate)
- Earring posts x 2
- Earring backs x 2
- Twist drill bit - size depending on your thickness of earring posts
- Ball burr
- Liver of sulphur or your choice of patina
- Bench peg
- Ring sizer/ruler
- Scriber
- Saw frame, saw blade & beeswax / cut lube
- Files (flat & half round)
- Jump ring mandrel
- Rawhide mallet
- Your choice of hammer for using with pusher
- Soldering block
- Flux
- Hard solder strip
- Hard solder paste
- Gas torch
- Caliper gauge
- Dividers
- Shears
- Round nose pliers
- Flat nose pliers
- Wet and dry sanding papers/emery paper
- Sanding and polishing sticks
- Third hand
- Tweezers
- Safety pickle & plastic/brass tweezers
- Ring clamp / jig
- Pusher
- Preferred polishing supplies - examples include polishing papers, using a power tool such as Dremel Multi Tool with tripoli and red rouge or barrelling machine
Watch The Video Tutorial On How To Make Cabochon Bezel Set Earstuds
Follow Step By Step Photos On How To Make Cabochon Bezel Set Earstuds

Inspect Your Stones & Measure
Firstly choose the two stones you would like to use for your earstuds.
Naturally, commercially cut gemstones will have a slight tolerance in size variation so when you have a pair for earrings you will need to inspect your stones to determine the size of your bezel.
As Bregje explains in the video, having two slightly different sized stones is common and is not a problem when making your own settings from scratch. Just don't assume you can make two bezels exactly the same size!
Measure the depth your bezel needs to be using a caliper gauge, measuring from the bottom to just above the curve of the stone. Use the depth measurement to mark the 0.4mm gold sheet. Cut or saw a length longer than you think you will need to go round the perimeter of your stone then repeat for the other bezel.

Shape The Bezels
Use round nose pliers to shape your bezels to fit the shape of your cabochons, test your stones in the bezels to make sure they're a good fit. Mark the correct length using a scriber and cut off the excess wire. Then you need to make sure that the ends of your bezels line up perfectly, ready to be soldered.

Flux & Solder
Next, add flux to the solder join and add hard solder, heat the bezel with your gas torch until the solder flows. Repeat with the other bezel and place them in safety pickle solution to clean.
Be careful here to not apply too much heat or you run the risk of melting the gold.

Form The Bezel Shapes
Place the bezel onto a jump ring mandrel then use a rawhide mallet to round out the bezel shape, turning frequently to form evenly. Then repeat with the other bezel. At this stage, you can add the bezel to the stones to see whether they are a good fit.

File Bezels & Solder Onto Backplate
Sand the bottom of your bezels to make them even. Heat up the sterling silver backplate, add flux and place the bezels to the backplate with the sanded side on the bottom. Place hard solder to the inside of the bezels and gently heat the entire piece until the solder flows. Cool by air and place in the safety pickle solution to clean. If necessary, use a file or ball burr to file away any excess solder.

Cut The Bezels
Carefully saw the excess backplate metal to create your settings with backplate. Then use a large flat file to tidy up and round out the bezel, being careful not to touch the bezel wall. Clean up the bottom using sanding paper and clean up the sides with your large flat file until nice and smooth.
You'll now see two beautiful layers of silver and gold.

Drill A Centre Hole
You can choose to solder your earring post directly onto the backplate, however, another alternative is to drill a hole into the centre of each backplate, which will allow you to create a more durable solder joint. It also has the benefit that you can easily pop out your stone through the hole if you're not happy with how it looks in the setting.
To find the centre, place metal dividers on one side of your backplate, making a little mark with the other end, then turn and continue to make a mark to reveal the centre of the flatplate. Mark the centre with a scriber which shows you wear to drill.
Place your bezel inside a jig or clamp, then use a lubricated ball burr to create a small indentation in the centre ready for drilling - this will prevent your drill from skidding. Next, use a 0.9mm twist drill bit (for 1mm earring post as shown in the video - amend accordingly with your choice of thickness), and drill through the centre of the backplate. Repeat with the other bezel.

File Bezel Bottoms & Check Stones Fit
Use a large flat file to file the top of the bezels, so the metal will reach just above where the cabochon starts to round. Do a test fit to ensure the cabochons fit snuggly in the bezel setting - the bonus of the drill hole is that you can easily pop your stone out! Remove the stones for the next step.

Add Posts To Drill Holes & Solder
Use flat nose pliers to help you push the earring post into the drill hole, enlarging the hole if necessary. Add hard solder paste (no need for flux as it's incorporated in the paste) to the base of the earring post and use your gas torch to heat until the solder flows. Cool by air to allow it to harden and place into safety pickle solution. If the earring post is sticking out in the inside of the bezel, you can file away to excess before continuing.

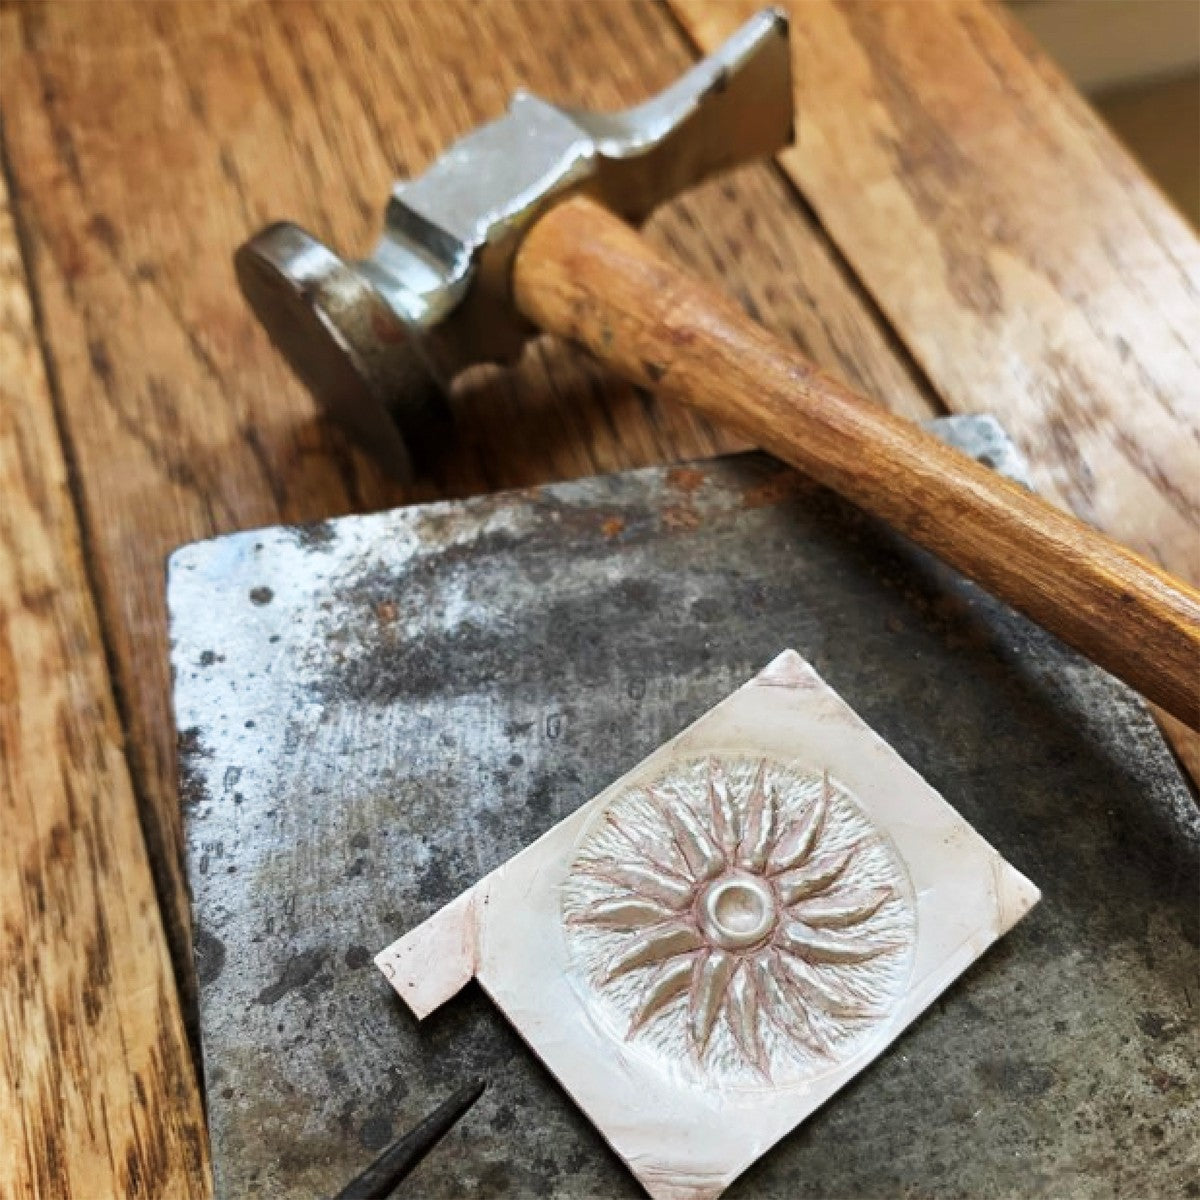
Set The Stones
Place your stones into the bezels, then use a pusher and tap using a hammer to push down the edge of the bezel at about a 45 degree angle, working on opposite sides until the stone is secure. Then work your way around the bezel again to smooth out the edges. You can also use a burnisher to smoothen the setting and remove any marks you have made during the process.
Be gentle at this stage to not touch the gemstone during the setting process.
Bregje uses protoplast to help set her stones, to ensure everything is protected and the earring posts are secure whilst setting.

Polish Earstuds
Use your preferred polishing method to polish your earstuds to a high shine. We recommend using tripoli and red rouge with the Dremel Multi Tool and polishing mops or our popular polishing papers.
TIP: Some stones will not be able to withstand the polishing process, so we usually recommend polishing pre-setting and doing any final polishing after. However in this project, Bregje knows that garnets can withstand this process.

Optional: Add Patina Using Liver Of Sulphur
Place your earring scrolls and earstuds into the patina solution which will blacken the silver. Then put the earstuds into a tumbler to shine them up.
TIP: Again, you may wish to do this before setting your stones as some stones will not withstand patina solution like garnets can.

The Finished Earstuds
And there you have it! A pair of twinkling rose cut garnet earstuds. We hope you enjoyed this tutorial and learned a few tips, tricks and techniques along the way.
If you were inspired by the project, please tag @kernowcraft and @estona.jewelry.tutorials in your social media posts as we'd love to see and share.
About Guest Tutor, Bregje

Bregje is the founder of Estona based in the Netherlands, where she creates her own jewellery lines focusing on personalised engravings, gemstones and heirloom jewellery.
Bregje found a passion for sharing her knowledge and skills through her YouTube channel, where she offers popular free video tutorials and guides each week.
Bregje also offers a free online course under her YouTube playlist 'Online Metalsmithing Class by Estona Tutorials' - so make sure you check that out too for even more inspiration.
Follow Estona
Find More Jewellery Making Inspiration & Shop Supplies With Kernowcraft


Also in this section:
- The Essential Tools For Setting Gemstones
- Your Guide To Stone Setting Burrs For Jewellery Making
- What Is A Bezel Rocker?
- Types Of Settings & How To Use Them
- Types Of Settings For Calibrated Cabochon Stones
- Types Of Settings For Faceted Stones
- Types Of Settings For Free-Form Stones & Crystals
- Calibrated Gemstones & Size Tolerance In Jewellery Making
- Ready Made Settings vs Making Your Own Settings
- 7 Ways To Make Your Own Gemstone Ring
- How To Set Earstuds For Half Drilled Beads
- How to Set Flat Plates and Milled Edge Jewellery Settings
- How To Set Snaptite Settings
- How To Set Gemstones In Gallery Wire Settings
- How To Set Backset Settings
- How To Set Wraptite Settings
- How To Use Huggie Claw Settings For Crystals & Sea Glass
- What Are Bell Caps For Jewellery Making?
- How To Set A Pre-Notched Setting
- How To Set Claw Settings
- How To Make A Decorative Ring Setting For A Free Form Cabochon
- How To Make A Tube Setting For A Faceted Stone
- 4 Drilled Sea Glass Earring Projects
- Jewellery Making With Sea Glass: Drilling & Stone Setting Tutorials
- How To Drill Sea Glass For Jewellery Making
- How Much Bezel Strip/Gallery Wire Do I Need?
- Types Of Bezel Cups
- How to Adjust Bezel Settings to Fit Cabochons
- How To Set A Cabochon In A Bezel Setting
- How To Make A Gemstone Ring With A Bezel Cup
- How To Make A Bezel Set Cabochon Ring With 'Made By Oonagh'
- How To Make A Sea Glass Ring With Bezel Setting
- How To Make Bezel Set Cabochon Earstuds
- How To Make A Sea Glass Necklace With Backless Bezel Setting
- How To Bezel Set A Free Form Cabochon Onto A Textured Silver Pendant
- How To Make A Textured Pendant With A Freeform Gemstone Slice
- How To Make A Claw Set Cabochon Pendant
- How To Make A Prong/Claw Setting For Irregular Shapes Stones
- How to Make A Wire Edged Setting
- How To Make A Balled Claw Ring Setting
- Making An Australian Boulder Opal Pendant With Stardust Mine
- The Process Of Remodelling A Gemstone Ring With 'Honey Bee Design'
HAVE A QUESTION?
If you have any questions, feel free to get in touch with our friendly team who will be more than happy to give you advice over email or on the phone.
You can learn more and find inspiration by visiting our Jewellery Making Tutorials, Jewellery Making Kits and YouTube Channel. Don't forget to follow us on social media and tag us in your designs on Instagram & Facebook, we would love to see!