


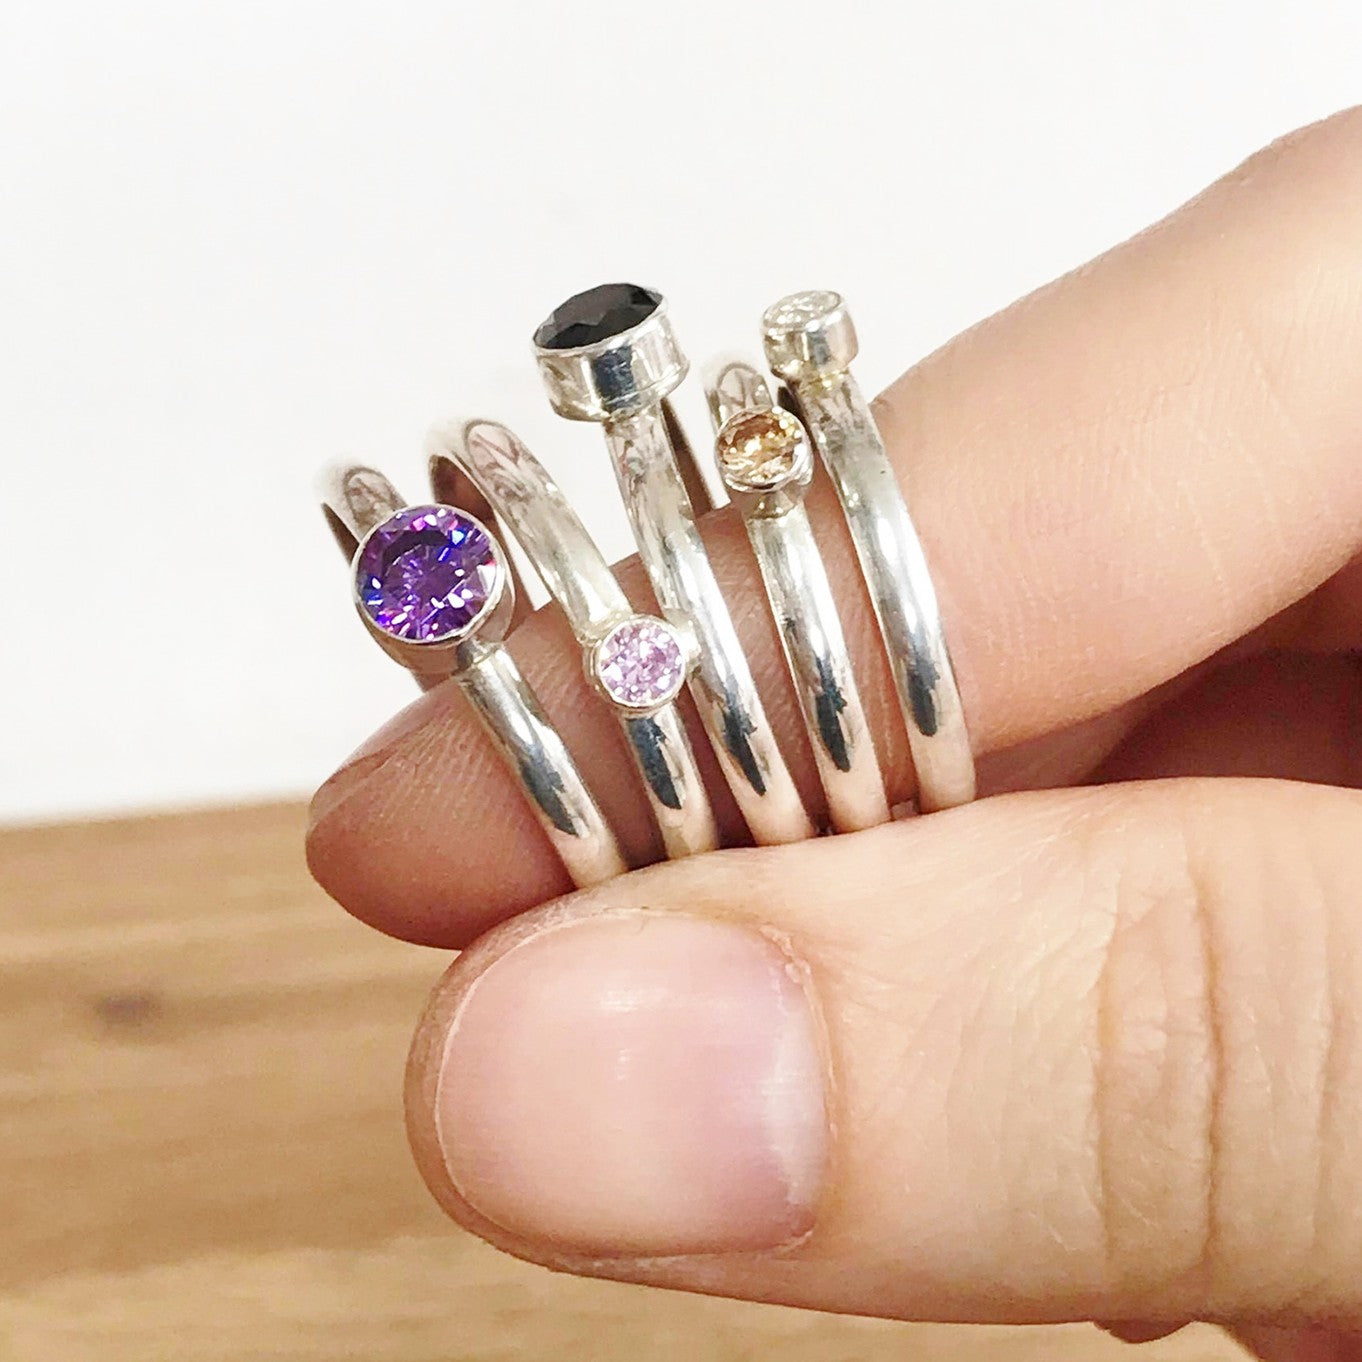
Tube setting is an incredibly versatile stone setting technique used to add round faceted stones to your jewellery designs. It’s a great way to elevate your design with a little sparkle or colour!
Guest tutor, Kim Colette has kindly put together this step by step tutorial to help guide you through making your own tube setting, soldering it onto a ring band and setting your chosen faceted stone. Plus you'll find lots of top tips and diagrams along the way!
As well as step by step photos, you will also find Kim's recommended tool list below with links to the supplies needed, available online with Kernowcraft.
We hope this tutorial inspires you to try this technique and experiment with your own designs.
If you give this project a try don’t forget to tag @kimcolettejewellery and @kernowcraft on social media - we’d love to see and share your tube settings!
Recommended Tools & Supplies
In this tutorial we will be adding a tube setting to a ring band, so you will need to already have a basic ring made and ready to work with. For reference, I have used a 3.2x1.5mm D shape band in this project. Follow Kernowcraft's tutorial on how to make a simple ring band here
Forming Tools
- Sterling silver tube (2.5mm inside diameter, 3.5mmm outside diameter)
- 3mm faceted gemstone
- Caliper gauge
- Anvil & bench peg
- Mitre cutting vice/tube cutters
- Piercing saw and blades
- Flat file and round needle file
- Sandpaper
- 5x5mm sterling silver sheet in desired thickness. (I used 0.7mm)
- Sharpie/permanent marker
Soldering Tools
Stone Setting Tools
- Ring clamp
- 3mm stone setting burr
- Pin vice or rotary pendant motor/drill
- Bezel rocker and/or square pusher
- Burnisher
- Your preferred polishing tools. (I use various grades of sandpaper followed by a polishing mop with rouge compound, or if you're a beginner you can use polishing papers.
Follow Kim's Step By Step Photos Of Making A Tube Setting Below
SELECTING AND PREPARING THE TUBE
Tubes are available in various metals, thicknesses, diameters and lengths. The size tube you use will be dictated by the diameter of the stone you’re using. Remember to check that your stone has an even cut, particularly at the bottom (culet and pavilion). If the stone isn’t even, it may not sit straight in your setting.
In this tutorial, we’ll be setting a 3mm pink cubic zirconia. The internal wall forms a seat for your gem, and therefore needs to be smaller than your stone (2.5mm). On the other hand, the external wall will need to be larger than the diameter of your stone (3.5mm), as it will behave as a bezel, holding the stone in place.
Firstly, ensure the end of your tube is even and flat. You can do this by sanding/filing free-hand, or by inserting the tube into a mitre cutting vice and filing your tube flush with its surface.
When deciding your tube length, you’ll need to allow for a little longer than the height of your stone. My particular stone is 1.8mm tall – so using a caliper gauge (locked in place) I scored this tube at a length of 3mm. This length is allowing quite a lot of room for error, but we can always file the tube shorter at a later time. (Of course, if your design/taste calls for a longer tube, go for it!)


It’s often best to use a tube cutter or mitre cutting vice as tubes can be fiddly, and usually need corrective filing after a wonky piercing.
Secure the tube in the vice (or tube cutter), and use your saw to pierce along your scored line. Keep your blade as straight as possible by using the edge of your vice/cutters as a guide. Once pierced, file the edge to ensure it is flat and even. Gently use a round needle file to tidy up inside the tube if necessary.
If you don't have these tools, you can use your bench peg to support the tube and use your jewellers saw to cut the tube as straight as you can and then tidy up using sanding sheets and a needle file.
SOLDERING TUBE TO SHEET

There are various ways to connect a tube setting to a ring shank. In this tutorial, we’re going to give the tube a base and solder it directly on top of the ring, as it can be a little easier for those just starting out.
The sterling silver metal sheet used for the base in this project is 0.7mm, but don’t be afraid to experiment with different thicknesses - you can use any scrap you have to hand, providing it is smooth and flat. You can flatten your sheet with a rawhide mallet on a steel block, if needed.
Use your jewellers saw to pierce a 5x5mm square from your metal sheet. Use a brass brush to clean the metal and remove any greasy fingerprints – solder flows best when the metal is clean.
Check your tube sits directly upright and flush against the sheet; if it doesn’t, use fine sandpaper to finish the edge of the tube until it does.
When you are happy with how the tube fits with base; grab a paintbrush and cover both parts with your preferred flux. Snip a pallion of hard solder and set it aside.
TOP TIP...
Hard solder is typically best to use in cases where there will be multiple joints in one piece, as it is less likely to melt/flow while you’re adding other soldered elements

Ignite your gas torch and gently heat both pieces until the flux starts to bubble and become tacky. With tweezers, place the pallion of solder inside the tube, sitting flat on the sheet.
TOP TIP:
By adding solder at this tacky stage rather than before heating, it can prevent the solder flying away during firing.

Heat the pieces evenly until they glow cherry red, and the solder flows around the base of the tube. Leave to cool or quench, and then use tweezers to submerge the piece in a warm pickle to remove any fire-stain.
Don't forget to use plastic tweezers for removing your piece from the pickle, inserting steel into the pickle solution can create a chemical reaction that can cause your silver to copper plate.
PREPARING THE SHANK FOR A TUBE


Once out of the pickle and dry; use your saw to pierce the excess sheet around the tube.
Although you want to pierce close to the tube to minimise any metal wastage; it is best to leave a little room. You’d rather have to clean up a little with a file, than accidentally piercing the tube and ruining your work.
Your tube is going to sit on top of the ring. Grab a sharpie and note where your solder seam is on the shank – we want to work opposite this joint.
If you find it easier, print out a circle divider template to help you determine the direct opposite of the solder seam, and mark it. Then lock your caliper gauge to your outer tube measurements, and use it to score two lines on either side of the mark you just made.
TOP TIP:
Working opposite a solder seam on a ring is pretty much always good practice, in case it needs to be resized. You also shouldn’t have joints underneath your tube or bezel due to the risk of overheating the setting, which could cause the solder to run or the joint to come apart.


Now we have determined that our tube will sit between the two scored lines, use a flat file to file between them. You may find it helpful to secure the ring in place using a ring clamp. Keep checking that you are filing straight and even.
Regularly place the tube onto your filed surface and take the ring out of the clamp to check the overall look. Once you are happy that the tube sits flat and central on the shank; smooth the filed area with sandpaper – this is to ensure we get a really clean and close connection between the shank and the tube when soldering.
SOLDERING THE TUBE TO THE RING


Flux your shank and hold it upright with a third hand. Then, flux your tube and carefully place it on your filed section.
Check your piece from all angles to make sure the tube sits straight and central (unless your design calls for otherwise!). Again, heat until tacky and then use a solder probe or tweezers to place two small solder pallions on the shank, at either side of the tube. Using your gas torch, heat until solder flows, then quench or allow to cool, and pop the ring in the pickle.
TOP TIP:
This is just one way you could go about the soldering process – there are plenty of alternatives. For example, you could sweat solder, or place the ring upside down and solder from underneath the tube. The approach you take will depend on your design and your personal preference.
MAKING A SEAT FOR THE STONE

File away any excess solder, and ensure you are happy with your tube's height – I filed mine down a little.
Then finish the ring with your preferred sanding and polishing methods.
As a beginner with limited tools, you may find working your way through the grades of polishing papers a good choice for bringing your piece to a high shine. Otherwise, you can use a rotary tool with your choice of attachments such as polishing mop with rouge compound.
It is better to finish the ring now, rather than risk catching a set stone during filing/sanding stages.
Also, remember that once we set the stone, you cannot add anything else to the ring, make sure your design is completely finished before moving on.
In this process, a setting burr is used to create a stone-shaped seat for your faceted stone to sit on. The size burr you need will be equal to the size stone you are setting.


Place your piece in the ring clamp, and secure your setting burr into your pin vice or rotary tool. I personally like to use a pin vice. Although it takes a little longer to hand drill, I feel I have more control over the tool, and am less likely to slip or drill too far by accident.


Next, place the setting burr directly upright in the tube, and vertically twist/drill the burr into the tube. Every now and again, place your stone inside to see how it fits. The girdle (widest point of the stone) should be tucked inside of the tube, with just enough metal protruding past the girdle, but not past the top of the stone.
Once you’re happy with the depth of your seat, use a dry paintbrush to remove any metal dust in the setting, and place the faceted stone inside the tube. You can use a square pusher to tap the top of the stone to ensure the stone is level and firmly in its seat.
TOP TIP:
Use a loupe if you have one to check your stone is sitting straight from all angles.
SETTING THE STONE
DON'T FORGET:
Many gemstones cannot withstand heat or torch firing. You will need make sure stones are the LAST additions to your design, as you will not be able to do any further soldering once your stone is set.


Hold the square pusher in your dominant hand, and the ring clamp in the other.
Rest the edge of the tube against your bench peg, and push the opposite side of the tube with your square pusher. We’ll be pushing the metal in at the top half of the tube, at about the height of the girdle.


We’re going to work in a kind of ‘compass’ method – you may be familiar with this if you have ever made a bezel/rub over setting.
The premise is that once you’ve pushed one side of the stone (1. North), you’ll need to rotate the ring and push the side that was directly opposite (2. South). Then rotate the ring again and push the West, before pushing East etc. You can then work on the spaces in between until all sides have been pushed in and the setting appears circular and relatively smooth.
Take a look at the diagram above to visualise working with opposing pairs. So long as you continuously check your stone isn’t moving as you set - this pushing strategy means the setting should be completely even the whole way round.


Next, you want to repeat this process, this time using your square pusher or bezel rocker to push the top of the setting down onto and over the stone. You can do this by rolling your pusher up and over the side of the tube. This will make sure your stone stays in place.
FINISHING THE SETTING

Using a fine sandpaper or emery stick, gently buff any marks your tools may have left on the sides of the tube.
Burnishers are invaluable for stone setting. By firmly running a burnisher along the sides of the tube and top edges of your setting, you will enhance the security of your stone. This is because silver is soft and malleable, and therefore will slightly splay and harden when worked with a steel burnisher. It will also straighten and smooth out any uneven edges there may be.
TOP TIP:
Some jewellers craft and edit their own burnishing tools, or improvise with spoons etc. I actually like to use a nail dotting tool as a burnisher. If it’s steel, and it’s smooth and shiny, it can burnish your precious metal!
The Final Touches
Finally, give your ring one last gentle polish to remove any remaining marks. You now have a beautiful tube set ring.

The Finished Result!
Now that you’ve mastered the basics, you can push the technique even further. Why not try setting a larger stone or combining multiple settings?

Choose A Faceted Stone >
Choose from Kernowcraft's huge range of faceted gemstones in a range of shapes and sizes to use in your jewellery designs.
Meet The Jeweller & Guest Tutor

Hi! I’m Kim, I’m 26 and from Kent.
Since 2012 my life has completely revolved around jewellery. I’ve completed a Jewellery and Silversmithing Degree, worked in a high-street jeweller as a sales assistant, and am now a full time bench jeweller for a local business.
Alongside my full time work I run Kim Colette Jewellery, where I hand-make and sell pieces that are feminine, glitzy and a little bit witchy.
If you’d like to see more from me, you can find me on Facebook and Instagram @kimcolettejewellery and at www.etsy.com/shop/kimcolettejewellery
You May Also Like

How To Make A Ring Band >
This tube setting tutorial does not include how to make the ring band. You can follow guest tutor, Jordan's tutorial with step by step instructions with a list of supplies needed on our website.

More Stone Setting Tutorials >
Learn more about stone setting with our advice pages and more step by step tutorials including how to make a bezel setting, claw setting and more.

Soldering Tutorials >
Learn more about the soldering process and metalsmithing techniques, with our helpful advice pages and tutorials to guide you.
Also in this section:
- The Essential Tools For Setting Gemstones
- Your Guide To Stone Setting Burrs For Jewellery Making
- What Is A Bezel Rocker?
- Types Of Settings & How To Use Them
- Types Of Settings For Calibrated Cabochon Stones
- Types Of Settings For Faceted Stones
- Types Of Settings For Free-Form Stones & Crystals
- Calibrated Gemstones & Size Tolerance In Jewellery Making
- Ready Made Settings vs Making Your Own Settings
- 7 Ways To Make Your Own Gemstone Ring
- How To Set Earstuds For Half Drilled Beads
- How to Set Flat Plates and Milled Edge Jewellery Settings
- How To Set Snaptite Settings
- How To Set Gemstones In Gallery Wire Settings
- How To Set Backset Settings
- How To Set Wraptite Settings
- How To Use Huggie Claw Settings For Crystals & Sea Glass
- What Are Bell Caps For Jewellery Making?
- How To Set A Pre-Notched Setting
- How To Set Claw Settings
- How To Make A Decorative Ring Setting For A Free Form Cabochon
- How To Make A Tube Setting For A Faceted Stone
- 4 Drilled Sea Glass Earring Projects
- Jewellery Making With Sea Glass: Drilling & Stone Setting Tutorials
- How To Drill Sea Glass For Jewellery Making
- How Much Bezel Strip/Gallery Wire Do I Need?
- Types Of Bezel Cups
- How to Adjust Bezel Settings to Fit Cabochons
- How To Set A Cabochon In A Bezel Setting
- How To Make A Gemstone Ring With A Bezel Cup
- How To Make A Bezel Set Cabochon Ring With 'Made By Oonagh'
- How To Make A Sea Glass Ring With Bezel Setting
- How To Make Bezel Set Cabochon Earstuds
- How To Make A Sea Glass Necklace With Backless Bezel Setting
- How To Bezel Set A Free Form Cabochon Onto A Textured Silver Pendant
- How To Make A Textured Pendant With A Freeform Gemstone Slice
- How To Make A Claw Set Cabochon Pendant
- How To Make A Prong/Claw Setting For Irregular Shapes Stones
- How to Make A Wire Edged Setting
- How To Make A Balled Claw Ring Setting
- Making An Australian Boulder Opal Pendant With Stardust Mine
- The Process Of Remodelling A Gemstone Ring With 'Honey Bee Design'
HAVE A QUESTION?
If you have any questions, feel free to get in touch with our friendly team who will be more than happy to give you advice over email or on the phone.
You can learn more and find inspiration by visiting our Jewellery Making Tutorials, Jewellery Making Kits and YouTube Channel. Don't forget to follow us on social media and tag us in your designs on Instagram & Facebook, we would love to see!