


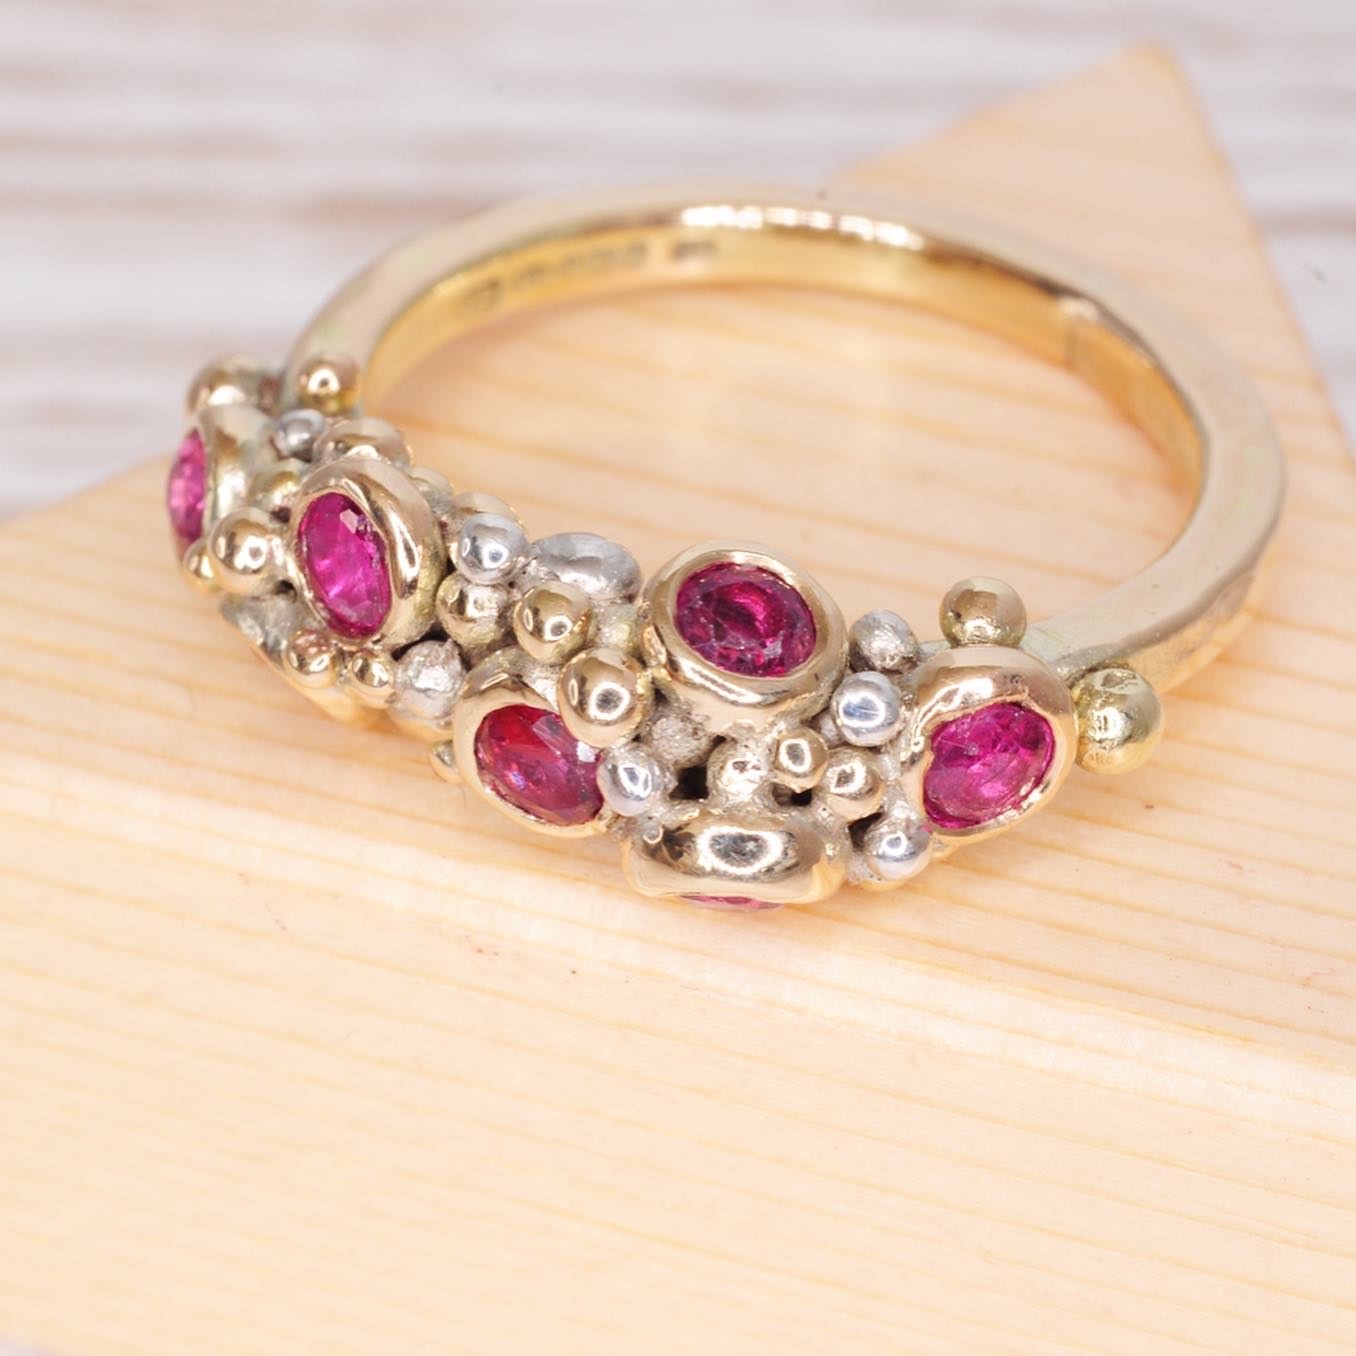
When we saw Zoë stunning ruby ring over on Instagram, we had to find out more! We invited Zoë to share the design process below, from the initial customer brief, sketches, budget, design process to the finished design along with the customer's review. We hope this is an inspiring project, which gives you the confidence to remodel a ring for yourself!
"One of the rubies was a little too damaged so needed replacing and Kernowcraft did a fabulous job of finding the perfect stone for the job!"
The project
My customer contacted me with an opportunity to re-design two heirloom rings that she had inherited from her Grandmother. They were sentimental pieces but not in the style she would wear so sat unworn in her jewellery box.
The brief was quite simple, she wanted one slim ring made with the gold from both rings, with the seven 3mm rubies set around the band and a bit of added granulation detail. She also requested a pair of silver star earrings to be made using the 4mm sapphires from the other ring.
We discussed styles she liked and I created a board on Pinterest with inspiration for the ring. I then used these to create some simple sketches and descriptions which I sent to her for feedback.
Once she chose a design she liked, I worked out the pricing based on how long the work was likely to take and how much any extra material costs might be. Obviously with remodelling work material costs are much lower but the production cost will be higher as you need to account for the time it takes to rework the metal.
One tip for any bespoke design project but especially for remodelling work is to be very open with your customer about costs. Find out what their budget is at the start and make sure they are aware that there may be extra material costs involved if the metal they provide isn’t enough for the redesigned piece.
I tend to work to an estimate cost with a min-max price range for remodelling work as it gives the customer a price bracket that they are happy with and no risk of nasty surprises when the piece is finished!

The planning and design process
Once my customer was happy with the design and we had confirmed the details, I got to work on carefully removing the stones from the rings. I then weighed the metal to see exactly what I had to work with (I had done this at the first stage of discussion and design but until you remove the stones you cannot determine an exact weight).
I then cut the rings into smaller pieces and worked out how much gold I would need for each of the stone settings. These were made from little nuggets of gold which I flattened slightly and would eventually be burred out to create the seat for the stones. You can get scientific in your working out how much metal you need but with practice you start to judge by eye how much you need to make a certain size granule! Once I had made the nuggets for the settings, I then melted the remaining gold and milled into the correct gauge wire I needed for the ring shank. Any left-over gold once the shank was made was milled again to smaller gauge wire and snipped into pieces to make the smaller granules.
Then came the fun part: building the granulation is my favourite technique by far. Starting with the first nugget setting, bit by bit each granule was soldered into place creating an organic structure, giving the ring a three-dimensional feel yet keeping it light and comfortable to wear. We decided to add in some extra silver granules to add contrast but also to keep costs down. This also allowed the precious gold to shine through rather than be buried away underneath. Once everything was in place, I then tidied the piece up and burred out the settings ready for the mammoth job of setting the stones! One of the rubies was a little too damaged so needed replacing and Kernowcraft did a fabulous job of finding the perfect stone for the job! Before setting any stones, the ring was finished to a final polish and sent off to the Birmingham Assay Office for Hallmarking.
"One tip for any bespoke design project but especially for remodelling work is to be very open with your customer about costs. Find out what their budget is at the start and make sure they are aware that there may be extra material costs involved if the metal they provide isn’t enough for the redesigned piece..."
Process photos


Sketching
Initial design sketches, the final design evolved from this. We opted for a slimmer 2mm band as the original 3mm band proposed would’ve meant adding a lot more gold. It also gave a more delicate feel to the finished ring.

Remove & Replace
Carefully removing the stones without them flying around my workshop! Unfortunately, one of the rubies had a small crack and didn’t survive being re-set so Kernowcraft came to the rescue with the perfect replacement!


Ready To Solder
The shank, nuggets for the settings and some of the gold granules ready to be pieced together. Extra gold and silver granules were used to fill out the spaces between the settings.

Solder Nuggets & Granules
Starting to place the nuggets and granules. This was a slow process as each one was placed and soldered individually. Once I’d got a couple of the settings in place, I could then solder groups of smaller granules at once. It was quite an organic process and the ring evolved with each addition of granules.

Structuring
Building the structure and adding the final granules, filling any gaps and ensuring the settings blended in.

Preparing Each Setting
Cutting the settings for the rubies. Each setting was cut individually to suit each stone as each ruby was a slightly different size and shape, some had a shallower depth and others had a flatter culet meaning I couldn’t use the ‘one size fits all’ approach for stone setting.

Stone Setting
Testing each ruby’s fit before setting them one by one. Each setting had to be adjusted to suit each individual stone.
Finished design
Finishing this ring was rather bittersweet! I absolutely loved working on this project and after setting the final stone I was so pleased to have finished the ring but also sad that the job had come to an end! This commission definitely contained a lot of my heart and soul and I felt extremely honoured to be asked to create it for my customer. I was so happy to see the ring returned to its rightful owner and was over the moon that she was so pleased with its transformation.
The project was completed at the height of the Covid-19 lockdown crisis so we had to do a ‘socially distanced’ handover which was certainly a first and definitely a little strange!

Response from my customer
"I had two very special rings that were my Grandma’s - both eternity rings that I loved but that didn’t fit me and the style of the setting didn’t look right on me or sit with her wedding ring that I wear every day. They had sat sadly in a box for over 20 years.
I started a process of thinking about remodelling them in to jewellery that I could wear lots and that would be something unique and able to be enjoyed instead of in a drawer. I knew I wanted a new eternity band making with the stones spread round a different type of band, and initially had thought of having the stones all the way round the new ring.
After lots of research, a love of granulation detail and a recommendation from a friend I met with Zoë. She was able to translate what was in my head into ideas and sketches and advise on the stone placement to best look after these precious old stones and we decided the stones would be safer all on the front of the ring. I know Zoë took amazing care of the rings, taking them apart with extra special love and attention, I knew they were in safe hands.
The result, which was a combination of all of the gold from the original rings together with a little extra and the 7 rubies set with granulation design, was better than I’d ever imagined. It’s just stunning. I loved the progress pics I received throughout the process showing me its journey so I knew how it was transforming. It certainly is a one-off unique piece that I now wear proudly all the time, it has a whole new life. It gets compliments everywhere I go and most importantly I think my Grandma would love it, she would be so pleased it is now something beautiful worn every day."

Meet the jeweller
I have always loved making jewellery ever since I was a child, from collecting beads at markets during holidays to France to crafting earrings from FIMO on the kitchen table with my sister.
I first dipped my toe into silversmithing at night school at the 6th form college I attended when I was 17. My teacher was actually my Uncle and I had always been in awe of the jewellery he made for my Aunty every Christmas so the chance to learn the craft from him was like hitting the jackpot. I carried on with the classes for a few terms until they stopped running and I no longer had the workshop space to create in.
Over the next few years, due to the lack of tools and space for a workbench, I delved into beading and wirework, creating designs to sell to friends and family but mainly to satisfy my cravings to make. Bit by bit I built up my tool collection (which is always growing!) and set up my workbench at home where I currently work from. I began selling my work at Artisan Markets around the North West and over the last 10 years I have continued to build my business and hone my skills as a metalsmith, experimenting with many of the different techniques that metalwork has to offer.
Since having my twins two years ago I gave up my part time office job to concentrate on growing my jewellery business which meant I could work from home around the boys and also be there for the school run for my older son, something I wouldn’t have been able to do with my previous job.
My jewellery style has definitely evolved over the years but I have always been inspired by textures and shapes found in nature and my surroundings, particularly the coast and the sea. I love using reticulation and granulation techniques which to me resemble the organic textures of the rocks and the bubblin foam of the sea.
Learn Granulation With Kim's 12 Months Of Metal Series