


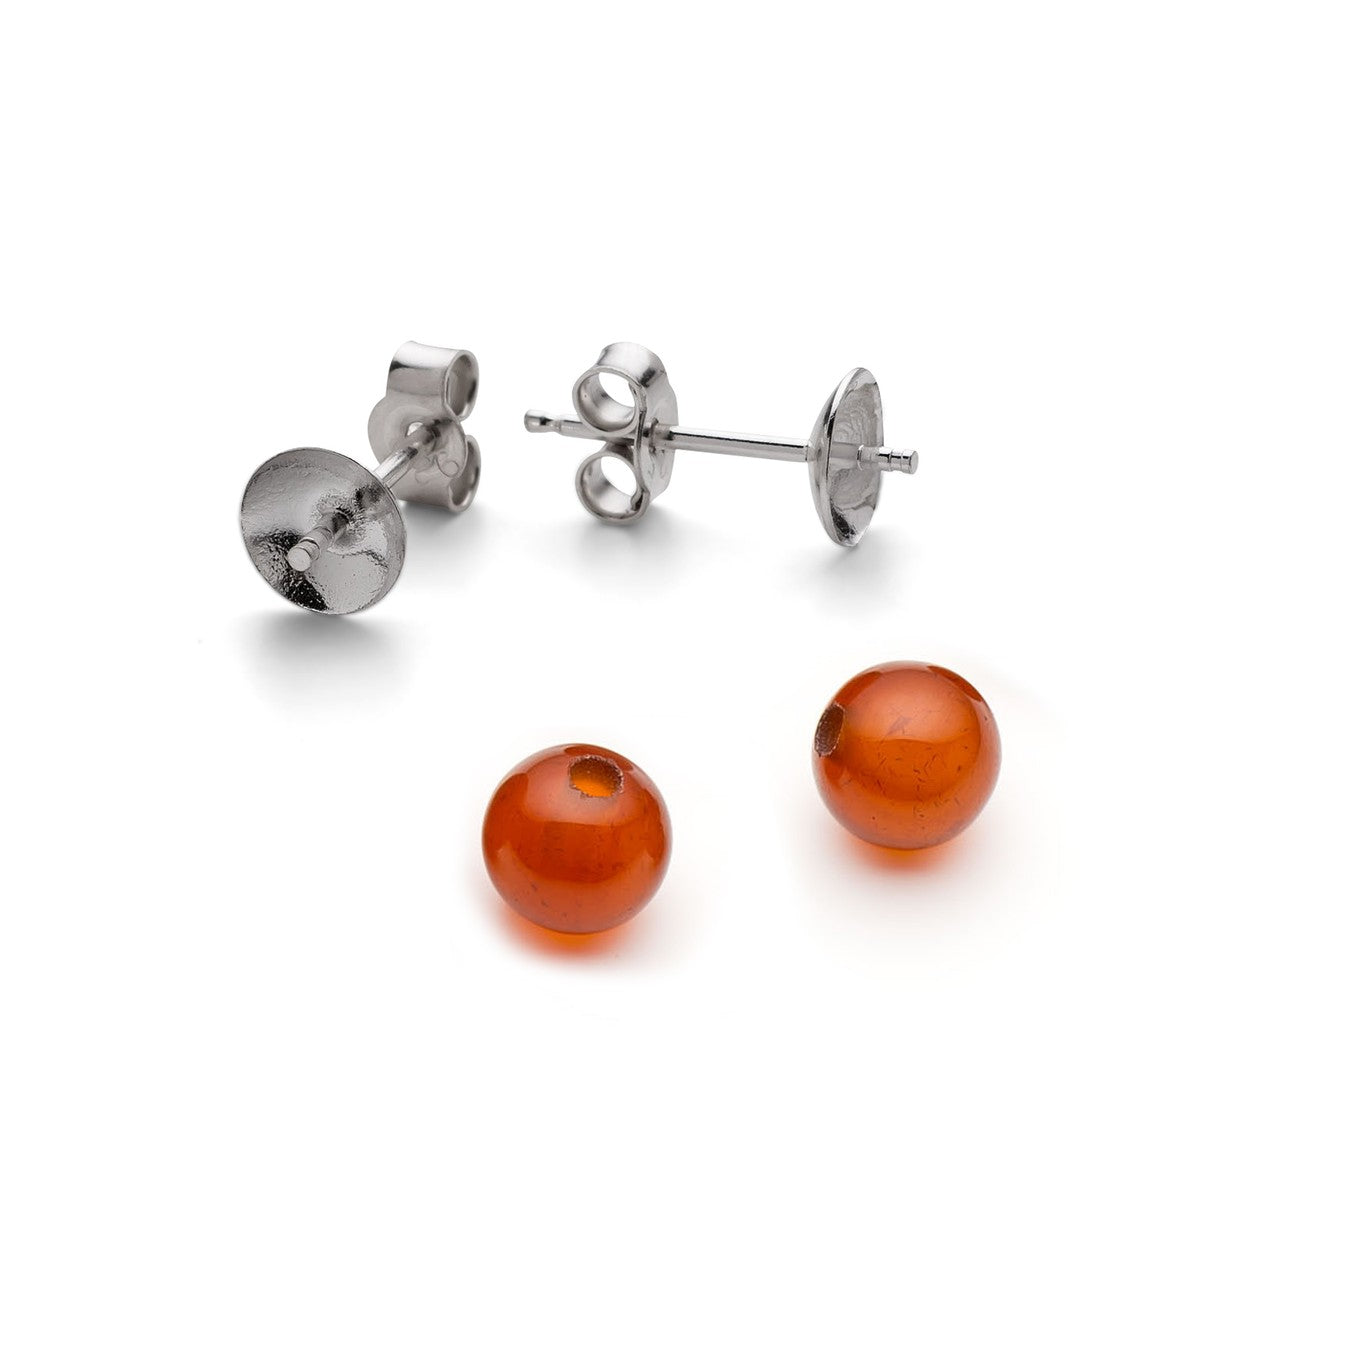
Ear stud settings for half drilled beads are a great way to make half-drilled beads into classically styled earrings. The studs have a shallow cup with a little peg in the centre which fits into the hole in the half-drilled bead ensuring they sit securely and centrally on the setting. We have ear stud settings in both sterling silver settings and 9ct gold and these come in a range of sizes for different sized beads. The following step-by-step tutorial shows the best was to set half drilled gemstone beads on to these settings.
Tools Needed
You can find all these items around your house! You'll need a matchstick or similar for mixing the glue, a pin or sharpened matchstick for applying the glue, a disposable surface to mix it on, and
Components Needed
Step 1
First check your chosen beads sit correctly on the post. You may find you need to snip a little off the end of the post with side cutters if the bead sits too high up.
To ensure the most secure setting, you can if you like lightly scuff or sand the post a little to give the glue better grip (using sanding sheets or a file).
Also check the bead holes are clean and free from any dirt or debris.

Step 2
Mix up a small amount of devcon 5 minute epoxy glue (don't be tempted to use superglue as it is not suitable for jewellery assembly).
The duo syringe packaging makes mixing equal amounts super easy as it dispenses equal amounts of resin and hardener. Simply mix a small amount with a cocktail stick or similar.
Don't worry if you've not done this before, it's really simple and comes with clear instructions on the pack!

Step 3
Carefully apply the glue to the post with a pin, a sharpened end of a matchstick or similar and sit the beads onto the posts.
Check they are on straight before allowing to dry.
A handy tip is to push the post of the earstud into some blu-tack to keep it upright whilst the glue is drying!
You can wipe away any excess glue with a tissue. Alternatively, you can wait for it to dry and then scrape away the excess scrape away - be sure to do this carefully, so you don't scratch the gemstone bead!. Once dry you're earrings are complete and ready to wear!
Make Your Own Earstuds With Half Drilled Beads


Try Our Half Drilled Earring Projects
All of our beginner-friendly jewellery making kits comes with step by step instructions, recommended tool list and a handy one-click shopping list that you can customise yourself.


Also in this section:
- The Essential Tools For Setting Gemstones
- Your Guide To Stone Setting Burrs For Jewellery Making
- What Is A Bezel Rocker?
- Types Of Settings & How To Use Them
- Types Of Settings For Calibrated Cabochon Stones
- Types Of Settings For Faceted Stones
- Types Of Settings For Free-Form Stones & Crystals
- Calibrated Gemstones & Size Tolerance In Jewellery Making
- Ready Made Settings vs Making Your Own Settings
- 7 Ways To Make Your Own Gemstone Ring
- How To Set Earstuds For Half Drilled Beads
- How to Set Flat Plates and Milled Edge Jewellery Settings
- How To Set Snaptite Settings
- How To Set Gemstones In Gallery Wire Settings
- How To Set Backset Settings
- How To Set Wraptite Settings
- How To Use Huggie Claw Settings For Crystals & Sea Glass
- What Are Bell Caps For Jewellery Making?
- How To Set A Pre-Notched Setting
- How To Set Claw Settings
- How To Make A Decorative Ring Setting For A Free Form Cabochon
- How To Make A Tube Setting For A Faceted Stone
- 4 Drilled Sea Glass Earring Projects
- Jewellery Making With Sea Glass: Drilling & Stone Setting Tutorials
- How To Drill Sea Glass For Jewellery Making
- How Much Bezel Strip/Gallery Wire Do I Need?
- Types Of Bezel Cups
- How to Adjust Bezel Settings to Fit Cabochons
- How To Set A Cabochon In A Bezel Setting
- How To Make A Gemstone Ring With A Bezel Cup
- How To Make A Bezel Set Cabochon Ring With 'Made By Oonagh'
- How To Make A Sea Glass Ring With Bezel Setting
- How To Make Bezel Set Cabochon Earstuds
- How To Make A Sea Glass Necklace With Backless Bezel Setting
- How To Bezel Set A Free Form Cabochon Onto A Textured Silver Pendant
- How To Make A Textured Pendant With A Freeform Gemstone Slice
- How To Make A Claw Set Cabochon Pendant
- How To Make A Prong/Claw Setting For Irregular Shapes Stones
- How to Make A Wire Edged Setting
- How To Make A Balled Claw Ring Setting
- Making An Australian Boulder Opal Pendant With Stardust Mine
- The Process Of Remodelling A Gemstone Ring With 'Honey Bee Design'
HAVE A QUESTION?
If you have any questions, feel free to get in touch with our friendly team who will be more than happy to give you advice over email or on the phone.
You can learn more and find inspiration by visiting our Jewellery Making Tutorials, Jewellery Making Kits and YouTube Channel. Don't forget to follow us on social media and tag us in your designs on Instagram & Facebook, we would love to see!