


In this metalsmithing tutorial, you will learn how to make your own textured pendant with a stone setting, featuring a beautiful gemstone slice. This is a great design for showcasing a freeform stone but the process can be used with calibrated cabochons too.
Follow guest tutor Beth from Fitzearle Jewellery's step by step photos and have a go for yourself! This project features various techniques including soldering, adding a patina to stone setting - plus you'll find a list of all the recommended tools and supplies needed available to shop on our website.
Share your pendant designs with us on social media and tag @kernowcraft & @fitzearle_jewellery for a chance to feature!

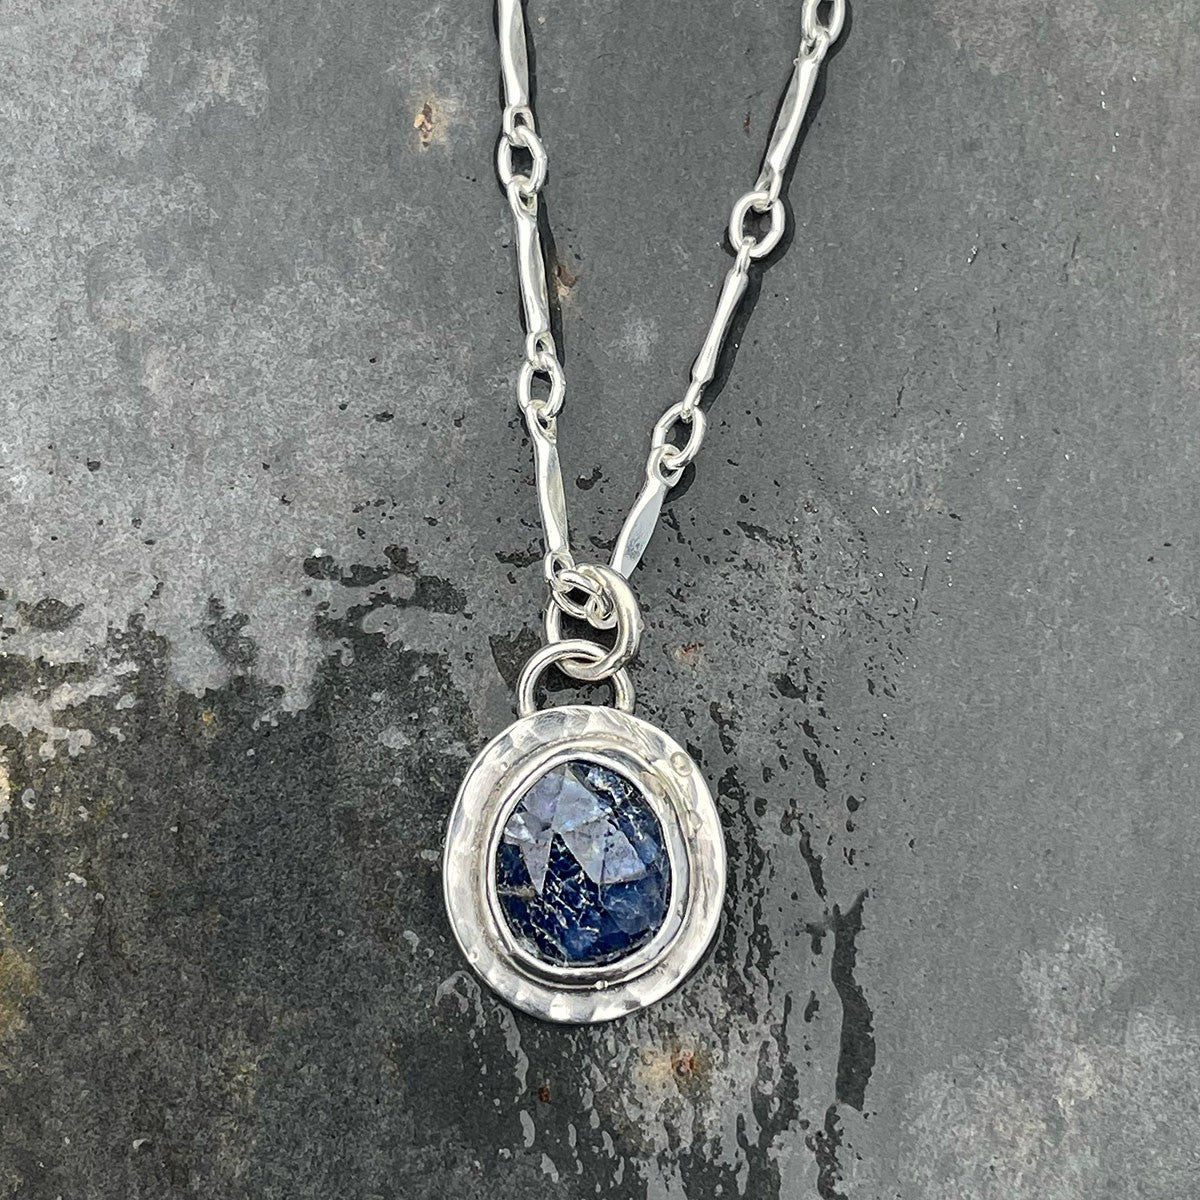
Irregularly shaped stones can often seem like a challenge to set but with patience and practice, you will be able to create some beautiful and unique designs. This design features one of our stunning sapphire slice cabochons, they are also rose cut which gives them their beautiful sparkle.
At Kernowcraft, we often add unique lines of one-of-a-kind gemstone slices and freeform stones to our website. As you can imagine, they often sell out fast but do keep an eye on Just Arrived and our limited edition category to see if we have any currently in stock.
For more inspiration on how to use freeform stones, read our advice page: Types Of Settings For Freeform Stones or take a look at our full range of stone setting advice pages.
Recommended Tools & Supplies
- Gemstone cabochon slice (I’ve chosen a small feeform sapphire slice)
- Fine silver bezel strip 0.3mm
- 0.8mm sterling silver sheet for setting backplate (or your choice of thickness)
- Anvil & bench peg
- Scriber
- Pen
- Saw frame, blade and beeswax/cut lube
- Files
- Your choice of hammer, for texture
- Wire mesh
- Flux
- Hard & easy solder (paste and strip)
- Gas torch
- Water for quenching
- Wet and dry sanding sheets/sanding sticks
- Shears/wire cutters
- Third hand
- Reverse action soldering tweezers
- Charcoal block or soldering block
- Safety pickle and plastic tweezers
- Dremel, wire brush attachment
- Liver of sulphur & paintbrush
- Jump rings x2
- Burrs
- Bezel rocker or pusher
- Burnisher
- Polishing papers
- Barrelling machine
- Your choice of necklet chain

Step 1: Measure & Cut Bezel Strip
Firstly, use a scriber to measure the thickness of the cabochon slice. You can also run the scriber along the bezel strip to mark where to cut - this will allow you to get the right thickness for the stone and save you time on sanding the bezel to achieve the required thickness.

Step 2: Prepare The Bezel Setting
Wrap the bezel strip around the gemstone slice, mark with a file where the two ends join. Cut to the right length and make sure the fit around the stone is snug and the ends fit together with no gaps. Add flux to the joint and a pallion of hard solder - ensuring the solder is touching the bezel.

Step 3: Solder The Bezel Setting
Now it's time to solder the ends of the bezel setting together. At this stage, I like to use a charcoal block and use my torch to heat the block rather than putting too much heat on the bezel, as it can melt very quickly. Move the torch around the bezel then concentrate at the joint until the solder melts and runs.

Step 3: Sand
Using a 180 grit wet and dry sanding sheet, move the bezel in a figure of 8 motion on the sheet to ensure the top and bottom of the setting are level. Here you can check that you have a good fit by placing the stone into the bezel. At this stage, yu can sand off any excess solder with sanding sticks.

Step 4: Prepare The Flat Plate
Next, we're going to prepare the flat plate, which is a piece of sterling silver sheet that will be underneath the setting. Place the bezel with the stone on a piece of 0.8mm sterling silver sheet, mark with a pen your desired shape around the stone and ensure you have excess as it will be shaped later.

Step 5: Lubricate & Saw The Metal
Run the beeswax along your saw blade to lubricate and help the blade glide through the metal. Following your pen line, cut the shape required using your jewellers saw and bench peg for support. Once cut, use wet and dry sanding sheets on one side to remove any dirt or oil.

Step 6: Add Texture
Use a ball pein hammer to leave a small hammered pattern on the back plate, this adds a decorative element to your design.
You can choose from Kernowcraft's range of jewellers hammers, with each hammer allowing you to achieve different patterns for your design.

Step 7: Solder The Bezel Setting Onto The Flat Plate
Place the bezel and backplate together ready to be soldered. Flux the back plate and place a small piece of medium solder on the INSIDE of the bezel, this is so the solder doesn't run into the hammered texture. I use a wire mesh on top of a charcoal block to be able to heat the piece from underneath. Use your torch to heat around the plate from underneath to help the solder run and reduce the risk of melting the bezel.

Step 7: Quench & Pickle
Once quenched in water, place the piece into pickle to remove any fire stain caused by the heat during soldering. Don't forget to remove any pieces from the pickle pot with plastic tweezers as inserting steel tweezers into the solution can create a chemical reaction that can cause your silver to copper plates.

TIP!
If you have excess solder on the inside of the bezel, a stone setting burr will help remove this so the stone will sit flush and flat.

Step 8: Remove Excess Metal
Cut away any excess metal from the back plate and file by eye to get the desired shape that you have in mind. Sand the back again to remove any dirt or oil.

Step 9: Attach Jump Rings
Use a third hand for precision to place a small jump ring (the size will depend on your design) in the desired place on the back of the back plate. Apply easy solder paste - there is no need to add flux with paste as it is already mixed in with the paste. Use your torch to heat the third hand and backplate at the same time until the solder melts and runs. Attach another jump ring for the chain to run through and solder to close the joint so the design is secure.

Step 9: Add A Patina & Polish
I like to use a wire brush with my Dremel rotary tool to achieve a matte finish.
I also like to add a patina to my designs to make textures pop and add another decorative element. You can do this by applying liver of sulphur to the textured part of the pendant using a paintbrush. Clean the setting in water and use a separate rag to clean.
Now it's time to polish your piece with your preferred polishing methods, I like to work my way through the grades of polishing papers and then pop the piece into the barrelling machine for a final polish.
Read more about applying liver of sulphur to your designs on our advice page

Step 10: Set The Cabochon Slice
Now you ready to set the stone! Place the stone in the bezel setting and use a bezel rocker or pusher to push the bezel over the stone. Start at opposite corners, then work your way around the setting until it is flush. Using a burnisher, burnish around the edge of the setting to make it smooth, removing any marks left in the silver. You can achieve a final polish by using a silver polishing cloth for a shiny finish.

Step 11: Add A Chain To Complete!
All that's left is to add your desired necklet chain to your pendant and it's ready to wear. I hope you enjoyed this tutorial and it's given you some great techniques to use in your next design, don't forget that although this is a great project for freeform stones, you can also use the same design with calibrated cabochons too. Have fun experimenting!

About Guest Tutor, Beth
I'm a Cornish girl living by the coast, inspired by the beauty of my surroundings. My workbench is my happy place, sitting at my bench is where time flies and I’m at my happiest. I take as long as necessary with each and every piece to make it feel perfectly completed.
I am primarily self-taught and constantly experimenting with new hammering, silverwork, and stone-setting techniques - I use silver sterling and gold, I love the combination of both materials.
I take my inspiration from the beautiful gemstones themselves and my surroundings. Cornwall is an amazing place to live and only minutes away from some of the most beautiful coastlines in the UK, what more could I want? All of my collections are inspired by the incredible beauty found in nature.
Follow Fitzearle Jewellery Online
Also in this section:
- The Essential Tools For Setting Gemstones
- Your Guide To Stone Setting Burrs For Jewellery Making
- What Is A Bezel Rocker?
- Types Of Settings & How To Use Them
- Types Of Settings For Calibrated Cabochon Stones
- Types Of Settings For Faceted Stones
- Types Of Settings For Free-Form Stones & Crystals
- Calibrated Gemstones & Size Tolerance In Jewellery Making
- Ready Made Settings vs Making Your Own Settings
- 7 Ways To Make Your Own Gemstone Ring
- How To Set Earstuds For Half Drilled Beads
- How to Set Flat Plates and Milled Edge Jewellery Settings
- How To Set Snaptite Settings
- How To Set Gemstones In Gallery Wire Settings
- How To Set Backset Settings
- How To Set Wraptite Settings
- How To Use Huggie Claw Settings For Crystals & Sea Glass
- What Are Bell Caps For Jewellery Making?
- How To Set A Pre-Notched Setting
- How To Set Claw Settings
- How To Make A Decorative Ring Setting For A Free Form Cabochon
- How To Make A Tube Setting For A Faceted Stone
- 4 Drilled Sea Glass Earring Projects
- Jewellery Making With Sea Glass: Drilling & Stone Setting Tutorials
- How To Drill Sea Glass For Jewellery Making
- How Much Bezel Strip/Gallery Wire Do I Need?
- Types Of Bezel Cups
- How to Adjust Bezel Settings to Fit Cabochons
- How To Set A Cabochon In A Bezel Setting
- How To Make A Gemstone Ring With A Bezel Cup
- How To Make A Bezel Set Cabochon Ring With 'Made By Oonagh'
- How To Make A Sea Glass Ring With Bezel Setting
- How To Make Bezel Set Cabochon Earstuds
- How To Make A Sea Glass Necklace With Backless Bezel Setting
- How To Bezel Set A Free Form Cabochon Onto A Textured Silver Pendant
- How To Make A Textured Pendant With A Freeform Gemstone Slice
- How To Make A Claw Set Cabochon Pendant
- How To Make A Prong/Claw Setting For Irregular Shapes Stones
- How to Make A Wire Edged Setting
- How To Make A Balled Claw Ring Setting
- Making An Australian Boulder Opal Pendant With Stardust Mine
- The Process Of Remodelling A Gemstone Ring With 'Honey Bee Design'
HAVE A QUESTION?
If you have any questions, feel free to get in touch with our friendly team who will be more than happy to give you advice over email or on the phone.
You can learn more and find inspiration by visiting our Jewellery Making Tutorials, Jewellery Making Kits and YouTube Channel. Don't forget to follow us on social media and tag us in your designs on Instagram & Facebook, we would love to see!

