


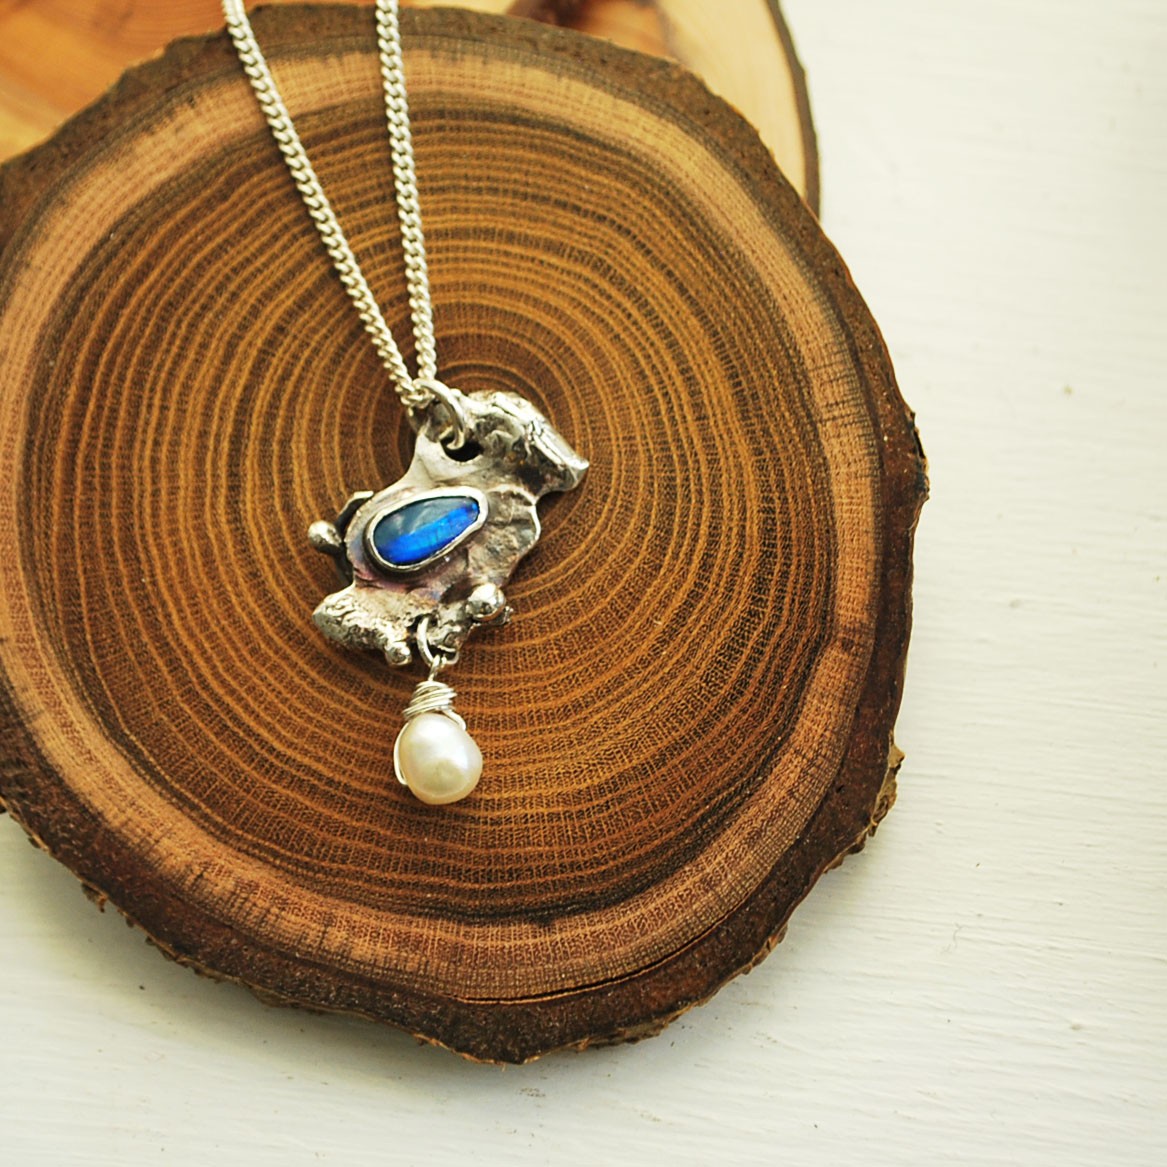
This beautiful free form bezel setting features one of our stunning Australian doublets. This design however can be used with various gemstones, such a calibrated ovals, opal triplets or any free form gemstone you desire.
On this particular design, Hayley, Kernowcraft's Buyer has created a spectacular textured silver pendant, with a wire-wrapped pearl incorporated into the design. You can embellish your design with whatever you like, perhaps you'd like to leave it plain or maybe add twisted wire? The choice is yours!
Project Tools & Supplies
- Opal doublet or any cabochon of your choice
- Bezel strip
- Sterling silver sheet
- Metal cutters
- Scriber
- Tweezers
- Solder paste and needle
- Files
- Wet and dry sanding sheets
- Pickle
- Pusher
- Bezel rocker
- Burnisher
Step 1: Design

We would advise to sketch out your design before making, as this helps visualise your design and help you through the process.
Within this particular design, Hayley is creating a pendant using silver sheet where the bezel set will be attached along with a beautiful opal doublet.
Step 2: Measure Bezel Strip

Start your project by selecting the piece of bezel strip you need. You do this by wrapping the bezel strip around your chosen stone, leaving enough room to push over the stone during setting. You want to ensure that the beauty of your stone isn't hidden away.
Step 3: Wrap & Cut

Now wrap the measured bezel strip around the stone, use a scribe to then mark on the strip where you need to cut the strip with metal cutters.
Step 4: Join The Ends

It's important that the ends match perfectly as this will make it easier to solder them together, if they are not you can always use a file to neaten the join.
Step 4: Does The Stone Fit?

Before continuing, check that your stone fits nicely inside the bezel setting and that the ends meet.
Step 5: Solder & Pickle

If you are using pallions, you need to flux the join of your setting. If you are using solder paste, this already has flux incorporated in it so you don't need to use flux. Now solder the ends together, then pickle to remove any fire stain.
Clean up you join by using files and wet and dry papers before attaching to the sheet.
Step 6: Attach To Sheet

Now it's time to place the bezel onto your pendant made out of sterling silver sheet.
Place the bezel on the silver sheet that you are using within your design and use easy solder to join. The bezel must touch the sheet all the way around and there must be no gaps. Flux the area (only if using pallions) where you are going to solder the bezel onto the silver sheet and place the solder on the inside of the bezel, place onto your design where desired.
Solder the two together and pickle.
Step 7: File & Final Check

In the next step, it's time to clean up your design - you can do this by using files, wet & dry papers or silicon polishers/bench polisher. While doing so, check that the depth of the bezel setting is where you would like the stone to rest against.
Remember that once you pop the stone in, it's going to be difficult to remove again. Here, you are aiming to have little bezel protruding above the stone, so that when you push the bezel over, you won't be covering your lovely stone.
Don't worry if that is the case, you can always use your files to reduce the thickness.
Tip - lay dental tape across the setting so that you can remove the stone easily, while also checking that you are happy with the depth.
Step 8: Push Your Bezel

Grab your pusher or bezel rocker and gently push the bezel over the stone.
Please be careful if you are using a soft stone such as an opal, as if you touch the stone while doing this it may cause damage such as marking the stone.
Begin pushing at an awkward section, slowly move around the stone and with each movement push in the opposite direction to the section you were just working on. Continue doing this until you have pushed the bezel setting over the entire stone.
Step 9: Polish

One final step!
It's time to use a burnisher on your bezel setting to give it a beautiful polished look.
More Pages In This Category
- The Essential Tools For Setting Gemstones
- Your Guide To Stone Setting Burrs For Jewellery Making
- What Is A Bezel Rocker?
- Types Of Settings & How To Use Them
- Types Of Settings For Calibrated Cabochon Stones
- Types Of Settings For Faceted Stones
- Types Of Settings For Free-Form Stones & Crystals
- Calibrated Gemstones & Size Tolerance In Jewellery Making
- Ready Made Settings vs Making Your Own Settings
- 7 Ways To Make Your Own Gemstone Ring
- How To Set Earstuds For Half Drilled Beads
- How to Set Flat Plates and Milled Edge Jewellery Settings
- How To Set Snaptite Settings
- How To Set Gemstones In Gallery Wire Settings
- How To Set Backset Settings
- How To Set Wraptite Settings
- How To Use Huggie Claw Settings For Crystals & Sea Glass
- What Are Bell Caps For Jewellery Making?
- How To Set A Pre-Notched Setting
- How To Set Claw Settings
- How To Make A Decorative Ring Setting For A Free Form Cabochon
- How To Make A Tube Setting For A Faceted Stone
- 4 Drilled Sea Glass Earring Projects
- Jewellery Making With Sea Glass: Drilling & Stone Setting Tutorials
- How To Drill Sea Glass For Jewellery Making
- How Much Bezel Strip/Gallery Wire Do I Need?
- Types Of Bezel Cups
- How to Adjust Bezel Settings to Fit Cabochons
- How To Set A Cabochon In A Bezel Setting
- How To Make A Gemstone Ring With A Bezel Cup
- How To Make A Bezel Set Cabochon Ring With 'Made By Oonagh'
- How To Make A Sea Glass Ring With Bezel Setting
- How To Make Bezel Set Cabochon Earstuds
- How To Make A Sea Glass Necklace With Backless Bezel Setting
- How To Bezel Set A Free Form Cabochon Onto A Textured Silver Pendant
- How To Make A Textured Pendant With A Freeform Gemstone Slice
- How To Make A Claw Set Cabochon Pendant
- How To Make A Prong/Claw Setting For Irregular Shapes Stones
- How to Make A Wire Edged Setting
- How To Make A Balled Claw Ring Setting
- Making An Australian Boulder Opal Pendant With Stardust Mine
- The Process Of Remodelling A Gemstone Ring With 'Honey Bee Design'