


Today guest tutor, Mareike shows you the step by step process of making your own hoop earrings as well as 4 simple ways to make metal charms to complete the look!
These projects cover a range of techniques including wire work, texturing and forming metal without the need for any soldering, making it perfect for a jewellery making beginner.
You'll also discover and understand popular jewellery making tools including a disc cutter, doming block and pliers.
Included on this page are video tutorials and photos to make it easy for you to follow along at home. You can make these hoops and charms with any metal you like, we personally love this mixed metal look but it's down to you to get creative and make something unique!
If you have a go at this project don't forget to post your design on social media and tag @Kernowcraft & @ByMaraca for a chance to feature.
Watch Part 1: Making The Hoops
Scroll down for part 2 where Mareike shows you 4 ways to make metal charms!
Recommended Tools & Supplies For Making The Hoops
- 0.8mm round wire (sterling silver was used in this project but you can choose any metal you like)
- Rawhide mallet
- Steel block
- Bangle or ring mandrel (or an alternative with your preferred diameter)
- Ball pein hammer
- Optional: a piece of flat wood for work hardening - take a look at Kernowcraft's top tools for work hardening wire here
- Wire cutters
- Flat nose pliers
- Round nose pliers
- Wet and dry sanding sheets
- Preferred polishing products - we recommend polishing papers
- Optional: renaissance wax for protecting the metal from tarnishing
Follow Hoop Step By Step Photos Below

1. Work Our The Length Of Wire
Let’s start with the round wire. 0.8mm is the ideal diameter for earrings as that fits earholes perfectly. To work out the length, you can either go by eye or find something like a rolling pin that has the diameter you want your hoops to be in the end. If you know you’d like 5cm diameter earrings, you can also work out the circumference of a 5cm circle. Alternatively, you can wrap the wire around the object you have chosen.

2. Cut & Smoothen Edges
Cut the wire with a slight overlap of roughly 0.5cm. This is also a good time to using sanding sheets to smooth the ends of the wire so that they don’t have any sharp edges – we want the earrings to be comfortable!

3. Work Harden
I find it easiest to work harden the wire first before continuing with the next steps. Work hardening means that the metal is worked – hammered, rolled, bent, so that it becomes denser and as a result springy rather than bendable.
Although be mindful that overworked wire can snap! So work harden it enough so that is has a nice springiness to it. For this, use the steel block and roll the wire with the flat piece of wood back and forth until it straightens and becomes harder. Wood won’t mark the metal, so it’s best to use this rather than steel. Alternatively, you can tap it with a rawhide mallet.
For more work hardening tools and advice, read Kernowcraft's page.

4. Shape
Now it’s time to shape the hoop. Through work hardening, the metal will not wrap easily around your object without jumping back a little. However, this also means that once it is shaped, it will be beautifully round. A trick is to use another object with a slightly smaller diameter and wrap the wire around that. When it springs open, it will ideally have the diameter we want it to be. To make it even, we can now tap the wire with the rawhide mallet. It’s best if you have a mandrel or other steel object for this, but another hard object will also do (beware of marks in your favourite rolling pin, though! Metal is stronger than wood!).

5. Flatten
To work harden the wire even more and to make sure the hoop stays in shape, I recommend flattening (most of) it. This step is not necessary, though I find that it gives extra stability to the piece. To achieve this, use the flat side of a ball pein hammer to hammer about 4/5 of the hoop flat, leaving the top bit where the eye and hook will be. You will notice how sturdy it becomes.

6. Form The Eye
For the eye, use the tip of round nose pliers and wrap the wire around it. Once you’ve formed a circle, grab by the point where the end of the wire meets the rest and push back a little. This makes the eye sit central at the end of your hoop.

7. Form The Hook
For the hook, use flat nose pliers to grab the other end of the wire with about 1-2mm overlap and bend upwards. Eye and hook should meet with a little but not too much tension.

This is how your earring hoop and eye should look!

8. Polish
I like to use Brasso to rub and polish the hoops gently, and then a cloth to bring out the shine. Alternatively, you can use Kernowcraft's popular polishing papers to make your hoops shine! Another great tip is to use renaissance wax on your finished piece of jewellery to protect it and prevent it from tarnishing too quickly.

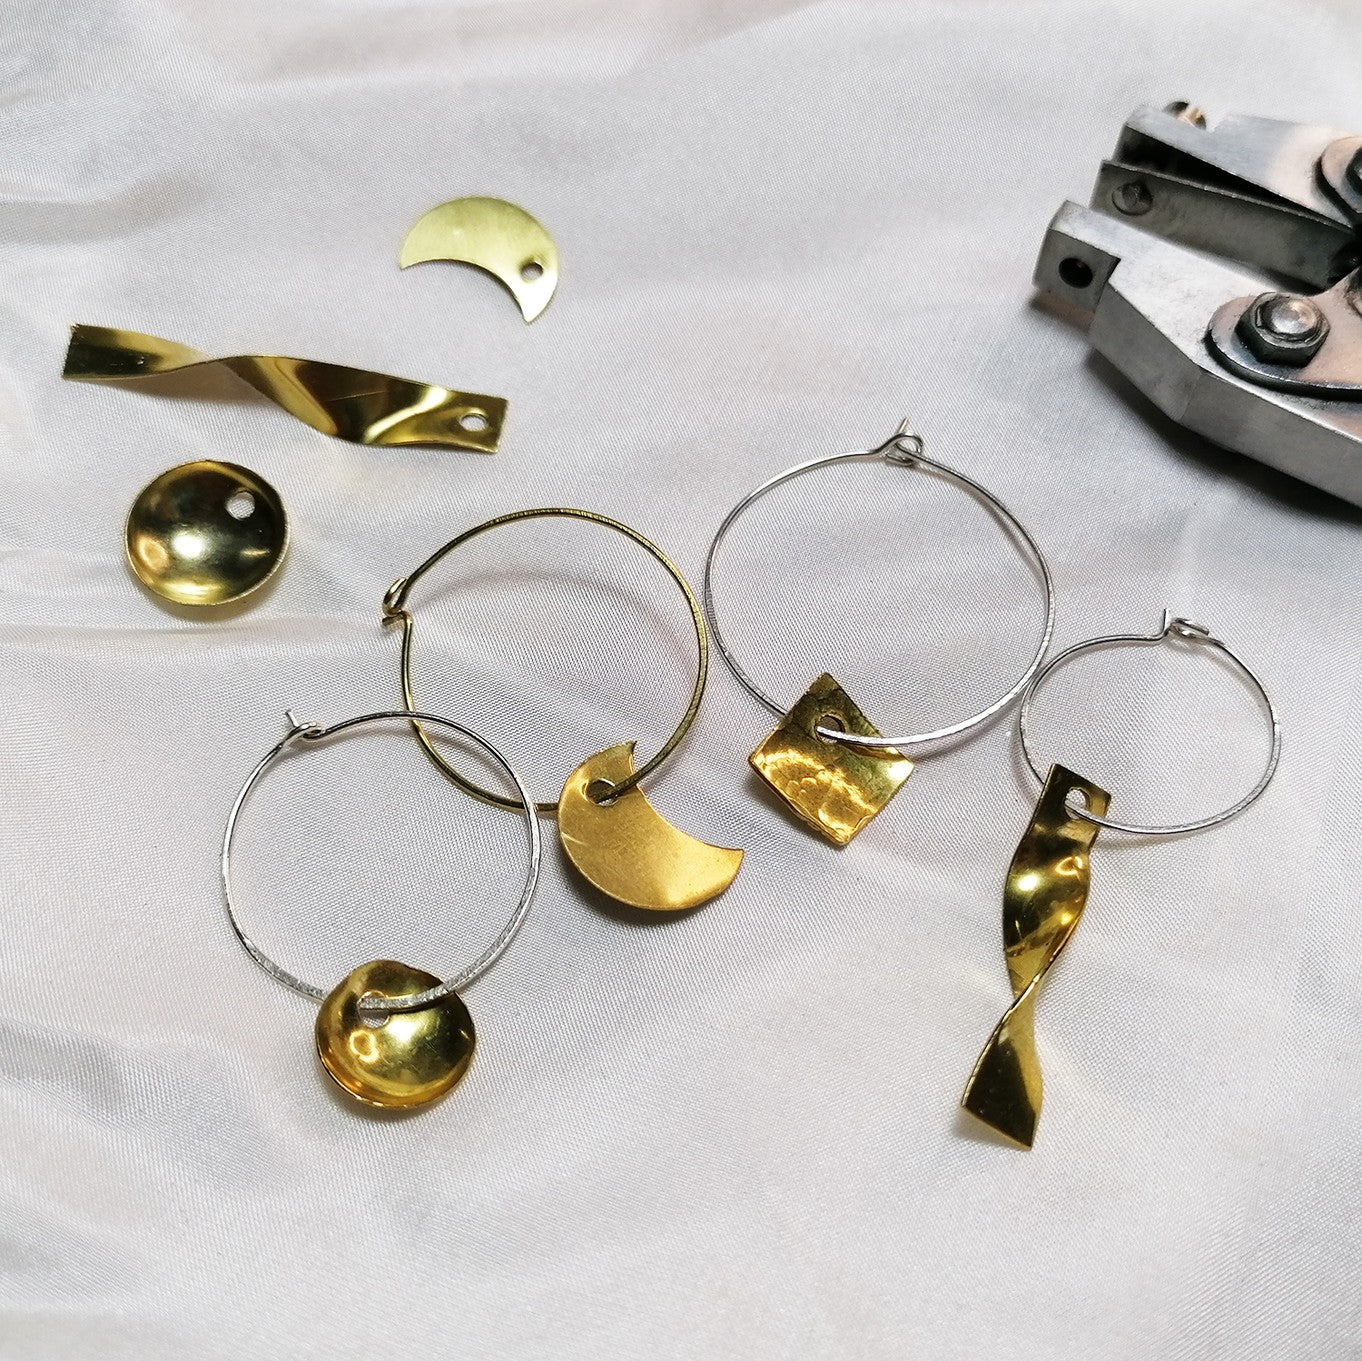
9. Get Creative With Your Charms!
And that’s your hoop! Now you can get as creative as you want with the charms you put on. I like geometric forms cut from brass, but you can add whatever you like whether that's clay charms, ready-made charms or gemstones. There’s no end to the possibilities.
Watch part 2 of the tutorial below where I show you how to make charms with various techniques.
Watch More Tips & Tricks For Work Hardening Wire
Watch Part 2: 4 Ways To Make Metal Charms
Keep scrolling for step by step instructions and recommended links to project tools and supplies
Recommended Tools & Supplies For Metal Charms
- 0.5mm metal sheet (Mareike uses brass)
- Metal & wire cutters (aka shears) OR saw frame, blades, beeswax, anvil & bench peg
- Metal hole punch OR hand drillstock (also known as archimedes drill) with 1mm twist drill bit
- Wet & dry sanding sheets
- Polishing papers
- Optional: renaissance wax for protecting the metal from tarnishing
Optional Tools For Specific Shapes/Techniques
- Square charms: ball pein hammer & steel block
- Dish charms: doming block & punches
- Moon charms: disc cutter
- Twist charms: pair of flat nose pliers
Use Metal Shears For Cutting Metal Sheet (Up to 0.6mm)
Or check out our sawing advice page if you fancy making more intricate shapes!


1. How To Make Hammered square charms


Recommended Tools & Supplies
- 0.5mm sheet metal
- Metal & wire cutters (aka shears)
- Ball pein hammer
- Steel block
- Metal hole punch or hand drillstock (also known as archimedes drill) with 1mm twist drill bit
- Wet & dry sanding sheets
- Polishing papers
Instructions
- Cut out squares from sheet metal, for example, 0.5mm brass.
- Sand the edges and corners - be careful! These can be very sharp!
- Hammer the surface to add texture.
- Punch or drill a hole at the top approximately 1mm into the charm rather than right at the edge.
- Polish your charms and add renaissance wax to add a protective layer.
- Slide the charm on the hoops and enjoy!
2. How To Make Dish charms


Recommended Tools & Supplies
- 0.5mm metal sheet (Mareike uses brass)
- Metal & wire cutters (aka shears) or disc cutter
- Doming block & punches
- Metal hole punch or hand drillstock (also known as archimedes drill) with 1mm twist drill bit
- Wet & dry sanding sheets
- Polishing papers
Instructions
- Cut out discs approximately 1.5cm diameter from the metal sheet, using either the shears (you can draw a circle on the metal with a sharpie first) or a disc cutter. When using the disc cutter, make sure not to cut too close to the edge of the metal as it might get bent and stuck in the cutting tool. Leave at least 1mm around the hole. Punch with a hammer until the disc comes out the other side.
- Sand the edges and corners - be careful! These can be very sharp!
- To make the disc into a dish, use your doming block. Start with a large dome and work your way towards the size you’d like your dish to be – this way, the metal gets stretched slowly and won’t get creases or folds which can happen when there’s too much stress on the sheet – and who likes stress?!
- Punch or drill a hole in the top of the disc. Should this misshape the dish, give it another punch in the dapping block. You could create the hole first before doming, though because the metal gets stretched when being domed, the hole won’t be round but an ellipsis. Adding the hole at this stage will prevent this from happening.
- Polish your charms and add renaissance wax to add a protective layer.
- Slide the charm on the hoops and enjoy!
3. How To Make Twist Charms


Recommended Tools
- 0.5mm metal sheet
- Metal & wire cutters (aka shears)
- Metal hole punch or hand drillstock (also known as archimedes drill) with 1mm twist drill bit
- Flat nose pliers - x2
- Wet & dry sanding sheets
- Polishing papers
Instructions
- Cut two strips of about 0.5 x 3cm from the metal sheet using the straight shears.
- Sand the edges and corners - be careful! These can be very sharp!
- Grab the short ends of the strip with one plier on each side and twist them carefully against each other – this needs some practice to get it even, so don’t despair if the first try comes out wonky! Maybe wonky is exactly right anyway.
- Punch or drill a hole at the top approximately 1mm into the charm rather than right at the edge.
- Polish your charms and add renaissance wax to add a protective layer.
- Slide the charm on the hoops and enjoy!
4. How To Make Crescent Moon Charms


Recommended Tools
- 0.5mm metal sheet
- Metal & wire cutters or disc cutter
- Metal hole punch or hand drillstock (also known as archimedes drill) with 1mm twist drill bit
- Wet & dry sanding sheets
- Polishing papers
Instructions
- Either use shears to cut the moon shapes or use a disc cutter. If using the disc cutter, lay the metal in such a way into it, that – looking through the hole at the top – the overlap shapes a moon. Hammer the punch into the cutter, and what comes out the other end should be a perfect moon.
- Sand the edges and corners - be careful! These can be very sharp!
- Punch or drill a hole at the top approximately 1mm into the charm rather than right at the edge.
- Polish your charms and add renaissance wax to add a protective layer.
- Slide the charm on the hoops and enjoy!
Check Out This Handy Tool For Creating Holes In Metal
Mareike uses a metal hole punch in this tutorial, however this isn't something we stock at Kernowcraft! We do have this brilliant hand drillstock, also known as an archimedes drill which has a simple spring system to easily create a hole in your metal designs. Simply use a fingertip from one hand to apply gentle downward pressure to the top of the drill (the top is indented to ensure your finger will not slip) and then use the other hand to grip the collar and slide it up and down the shaft rotating the drill bit. We recommend using it with our 1mm twist drill bit for charms like these.


Meet Guest Tutor, Mareike
Mareike founded byMaraca as a little lockdown success story. Having moved from Germany to Bristol in 2016, she’s always been creative and even had a printmaking business, but just before the first UK lockdown, after having had several courses with Kim from MakeItWithKim and watching the 12 Months Of Metal tutorials, she set up her little silversmithing studio. Perfect timing really, as making her unusual jewellery was the ideal distraction.
ByMaraca jewellery is mostly made from brass and silver, and due to Mareike’s creativity and want to experiment, new lines are constantly added to her shop. She loves a good market, though, so hopes to meet lots of her lovely customers there in the future.
Mareike is also proud to have won the #KernowcraftChallenge in October, as both tutorials and the shop with the most beautiful tools and materials is a constant inspiration for her.
Follow Mareike
Also in this section:
- How To Make A Wire Wrapped Nest Necklace
- How To Make Your Own Teardrop Bead Earrings
- Tools For Making Jewellery Using Wire
- Your Guide On Choosing Wire For Jewellery Making
- Compare Jewellery Designs Using Different Sized Wire
- Wire Gauge Coversions
- How To Work Harden Jewellery Making Wire
- How To Use Nylon Jaw Pliers For Jewellery Making
- How To Use A Thing-A-Ma Jig For Jewellery Making
- How to Wire Wrap a Bead With a Headpin
- How To Wire Wrap A Bead
- How To Make A Wire Wrapped Bead Chain
- How To Wire Wrap A Briolette
- Wire Wrapped Cluster Briolette Earring Tutorial
- How To Make Wire Wrapped Bead Necklace With Handmade Clasp
- How To Wire Wrap A Rough Crystal
- How To Make Valentine's Day Earrings: Wonky Wire Hearts
- How To Make A Wire Wrapped Crystal Necklace
- 6 Wire Wrapped Ring Projects & Essential Tools
- How To Make A Wire Wrapped Bead Ring
- How To Make An Anxiety Ring
- How To Make A Wire Wrapped Gemstone Ring
- How To Make A Wire Wrapped Cabochon Pendant
- How To Make A Tree Of Life Pendant
- How To Wire Wrap A Gemstone Donut
- How To Make Christmas Tree Earrings
- Simple Sterling Silver Wire Scroll Earrings
- Soldered Circle Hoop Earrings With Beads Tutorial
- How To Make Wire Hoop Earrings & Customise Them
- Metal Charm Hoop Earring Tutorial
- How To Make A Wire Word Necklace
- 4 Wire Wrapped Gemstone Tube Bead Projects
- Festival Inspired Crystal Necklace Tutorial
HAVE A QUESTION?
If you have any questions, feel free to get in touch with our friendly team who will be more than happy to give you advice over email or on the phone.
You can learn more and find inspiration by visiting our Jewellery Making Tutorials, Jewellery Making Kits and YouTube Channel. Don't forget to follow us on social media and tag us in your designs on Instagram & Facebook, we would love to see!

