


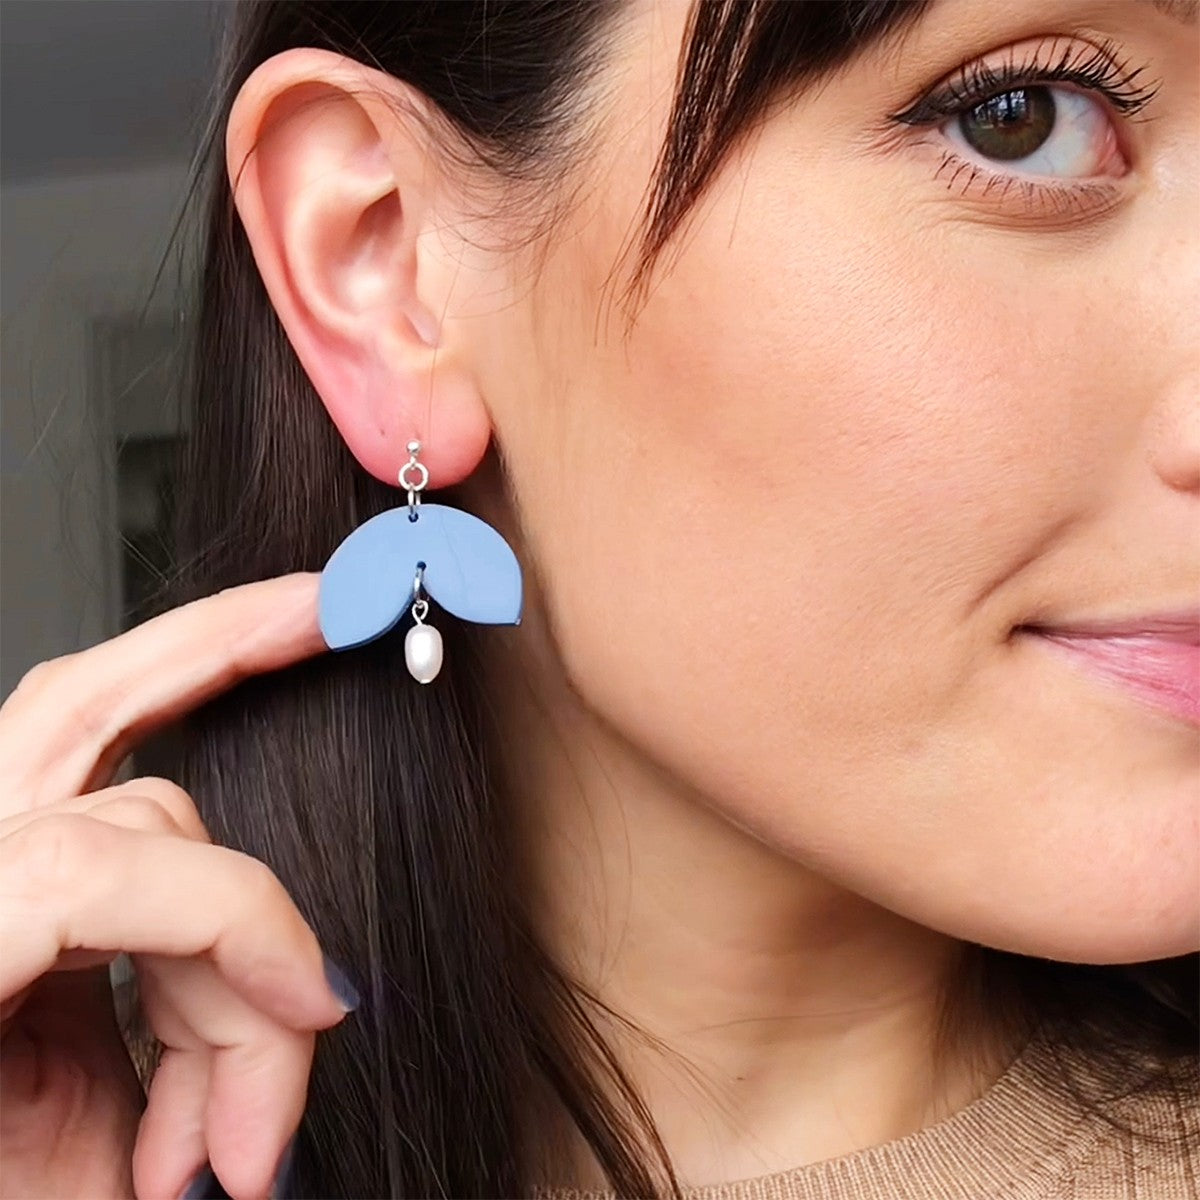
Polymer clay earrings are becoming hugely popular within the jewellery making world and we're so excited to team up with a talented jeweller to show you how to make your own!
They are a beautiful and affordable way to make your own jewellery and gives you the chance to get creative with materials and designs.
In this beginner-friendly step by step video and photo tutorial, guest tutor and designer, Polly from CANDID walks you through how to make your own polymer clay earrings.
Covering a range of techniques, from conditioning, sculpting to baking polymer clay. You’ll also learn the additional skills of how to add pins onto beads to make charms and how to put them all together using jump rings to create some elegant and unique earrings.
Although we don't stock polymer clay at Kernowcraft, we do stock a range of findings to complete your designs - plus lots of beautiful gemstone beads you can feature.
Share your polymer clay designs with us on social media and tag @kernowcraft & @candid_clay for a chance to feature!

Recommended tools & supplies
- Polymer clay – I recommend using Sculpey Souffle, Sculpey Premo or Fimo Soft clay
- Clay cutter – you can use any shape you like, and if you don’t want to buy a cutter then you can use anything from the home such as bottle caps, lids, food containers – just use your imagination!
- Rolling pin – plastic or acrylic, not wood. You can put these in the baking section of most large supermarkets.
- Tissue blade – if you don’t have one of these, then a sharp kitchen knife will do (if you’re careful!)
- 2x ceramic tiles – these are really inexpensive and can be found at your local DIY shop
- 2x pieces of cardstock – computer paper or greaseproof paper will also work as long as it’s not textured
- Wet & dry sanding sheets
- Side cutters or scissors
- Round nose pliers & pair of snipe nose pliers
- Pair of ball & loop stud earstuds (including earring backs) – mine are from Kernowcraft and they are sterling silver so perfect for those who need hypoallergenic findings - see more earring findings & options here
- 2x pearls/beads – I’m using cultured freshwater pearls from Kernowcraft
- Two flat-head headpins
- 4x medium jump rings and 2x smaller jump rings
Recommended but not essential:
- Large tile, piece of glass or acrylic to work on
- Pasta machine
- Rotary tool such as Dremel 4000 Multi Tool & twist drill bit
- Oven thermometer
Watch Polly's Video Tutorial On How To Make Your Own Polymer Clay Earrings Below
Or keep scrolling for step by step photos and instructions
Follow Step By Step Photos

1. Cut, Knead & Roll
To begin, cut about a quarter of the clay from the block and set the rest aside. Using a rolling pin, roll the cay out and then fold it, then roll it again. Keep repeating this process, kneading the clay until the texture changes from cracked and dry, to supple and flexible. If you have a pasta machine, I recommend using it here and repeatedly folding and passing the clay through the machine on the thickest setting. Little tip: always put the clay in the pasta machine fold-side down to avoid air bubbles.
Once you’re happy with the conditioning of your clay, use your rolling pin to flatten the clay into a slab that’s about 2-3mm in depth. If you have a pasta machine then I recommend rolling it through on the thickest or second thickest setting.

2. Cut Desired Shape
Using your rolling pin, make sure your slab is slightly stuck to the surface you’re working on.
Using a clay cutter (you can also use a lid, shot glass or whatever you like to cut your desired shape) firmly press the cutting edge down into your slab, being careful not to poke the clay with your fingers.
Then carefully pull the cutter back out, and repeat.

3. Prepare For Baking
Take one of your ceramic tiles and place a piece of cardstock or computer paper on the top. Then, using your tissue blade almost parallel to your work surface, gently slide the blade under the raw clay pieces to free them from the surface.
If you don’t have a rotary tool, then at this stage using a needle or cocktail stick, carefully push through the clay to make holes for your jump rings. You need two holes, one at the top and one at the bottom of the clay piece. Please wait until step 7 to drill your holes if you have a rotary tool!

4. Bake
Use your fingers to clean up any rough edges and place the clay pieces onto the paper. Place the second piece of paper on top, followed by the second tile, smooth side down.
Pop in the oven for one hour I recommend using an oven thermometer to ensure the temperature is accurate.

5. Make Pearl Charms
While your clay bakes, let’s make your charms! Take a flat-head headpin and thread the wire through your pearl or chosen bead. Then, using round nose pliers, start bending the free end of wire into a hook as close to the bead as you can. Use your side cutters to cut the excess wire off the headpin. Then continue to twist the wire around with your pliers until you form a secure loop. Repeat on both beads.

Alternative Option: Wire Wrap Your Headpin
You can keep it simple by using a loop/hook which can be easily opened and closed as featured in this project. If you would like to add extra security to your piece as well as a decorative element, instead of cutting the headpin at the loop, you can use the excess wire to wrap it around the stem of the wire. This will depend on the type of headpin you're using, some may be too hard to wrap.

6. Cool & Sand
Once your earrings are done baking, let them cool COMPLETELY. The clay remains in a semi-soft state until cooled. If you’re impatient, add them to an ice bath and you can dry them off and use them instantly. If you want to sand your earrings, now is the time - I'm using wet and dry sanding sheets in this project. Take a look on Youtube for detailed sanding tutorials if you’d like to do this step, but it’s not essential!

7. Drill Holes
If you didn’t add your jump ring holes while the clay was soft, use a rotary tool such as the Dremel 4000 Multi Tool with twist drill bit on a chopping board to do this now. You need two holes in the clay piece, one at the top and one at the bottom.

8. Assemble Components
Now to assemble the components to complete your earrings. Using a pair of snipe nose pliers in each hand, open one of the smaller jump rings by clasping either side of the split and twisting them apart in a parallel motion, rather than outwards. If you pull jump rings apart outwardly then they lose their nice round shape.
Loop the jump ring through the loop on the earring post and then close the jump ring by clasping either end of it with your pliers and pulling the ends back together.
Then take the first larger jump ring, open it, and loop it through the clay piece as well as the small jump ring you just attached to the stud. Close the larger jump ring, and you just attached the stud!
Open the second larger jump ring and put it through the second hole in your clay, and then through the loop you made on the bead charm. Close the jump ring to complete.
And there you go! Repeat on the other earring and you’ve got yourself a DIY pair of polymer clay earrings with a beautiful pearl charm!

Featuring...
Don't forget to check out Polly's recommended shopping list for this project at the top of the page. Although we don't stock polymer clay, we sell many of the findings needed to complete your designs as well as beautiful gemstone beads to choose from.


About the maker, Polly from CANDID
I’m Polly, the owner and maker behind CANDID. This little venture was born from a desire to use my artistic passion and crafting skills to create wearable art that is eclectic, stylish and affordable.
Each piece is meticulously designed and slow-made with high quality artistry, while still embracing the candidness and raw individuality of homemade design (which, if you hadn’t guessed, is where my brand name comes from). The result? Perfectly imperfect jewellery, accessible for people from all walks of life.
My products are all thoughtfully handcrafted at my studio in Cornwall, UK. I design, mix, sculpt, bake, sand and package every piece by hand with the utmost love and care. I find inspiration in everything and anything: from interior design and fashion trends, to nature and the rugged Cornish coast.
CANDID has given me a creative outlet and a purpose that I never expected it would, and nothing makes me happier than packing up an order and sending it off to its new home.
Also in this section:
- Macrame Bead Bracelet Tutorial
- Your Guide To Bead Stringing Materials For Jewellery Making
- The Essential Tools For Beading
- Beading: How To Start Jewellery Making With Lyndsey
- Answering Commonly Asked Beading Questions
- Types Of Beads For Jewellery Making
- The Difference Between Half Drilled, Top Drilled And Head Drilled Beads
- How To Use Top Drilled Beads
- Jewellery Making With Half Drilled Beads
- What Are Briolette Beads & How To Use Them
- Stringing Beads With Small Holes
- How To Make Your Bead Holes Bigger With A Bead Reamer
- Types Of Clasps For Jewellery Making
- 8 Reasons You Need A Bead Board
- How To Make A Sliding Knot
- Advice On Knotting Elastic Stretch Magic Thread
- How To Use Flex-Rite Jewellery Wire
- How To Use Crimps
- How To Make A Silkon Thread Briolette Necklace
- How To Use Beading Chain
- 4 Ways To Use Gemstone Donuts
- 4 Gemstone Chip Bead Project Ideas
- How To Use End Caps For Jewellery Making
- How To Make Earwires With Gemstone Beads
- How To Make A Memory Wire Bracelet
- How To Make Gemstone Bead Earrings
- How To Make A Bead Bar Necklace
- How To Make Beaded Bracelet With Flex-Rite Wire & Wire Guardians
- DIY Gemstone Friendship Bracelets
- How To Make A Beaded Bracelet With Knot Covers
- How To Make Polymer Clay Earrings
- How To Make Felt Jewellery
- DIY Mini Tassels & Jewellery Projects
HAVE A QUESTION?
If you have any questions, feel free to get in touch with our friendly team who will be more than happy to give you advice over email or on the phone.
You can learn more and find inspiration by visiting our Jewellery Making Tutorials, Jewellery Making Kits and YouTube Channel. Don't forget to follow us on social media and tag us in your designs on Instagram & Facebook, we would love to see!