


Make Your Own Beautiful Bracelet Using Your Favourite Gemstone Beads
Guest tutor, Cat Birch Jewellery shares with you a beginner friendly beading jewellery making tutorial on how to make your own beaded bracelet featuring wire guardians and extender chain.
Watch Cat's video tutorial below and find all the recommended tools and supplies so you can easily recreate your own unique bracelet for yourself.

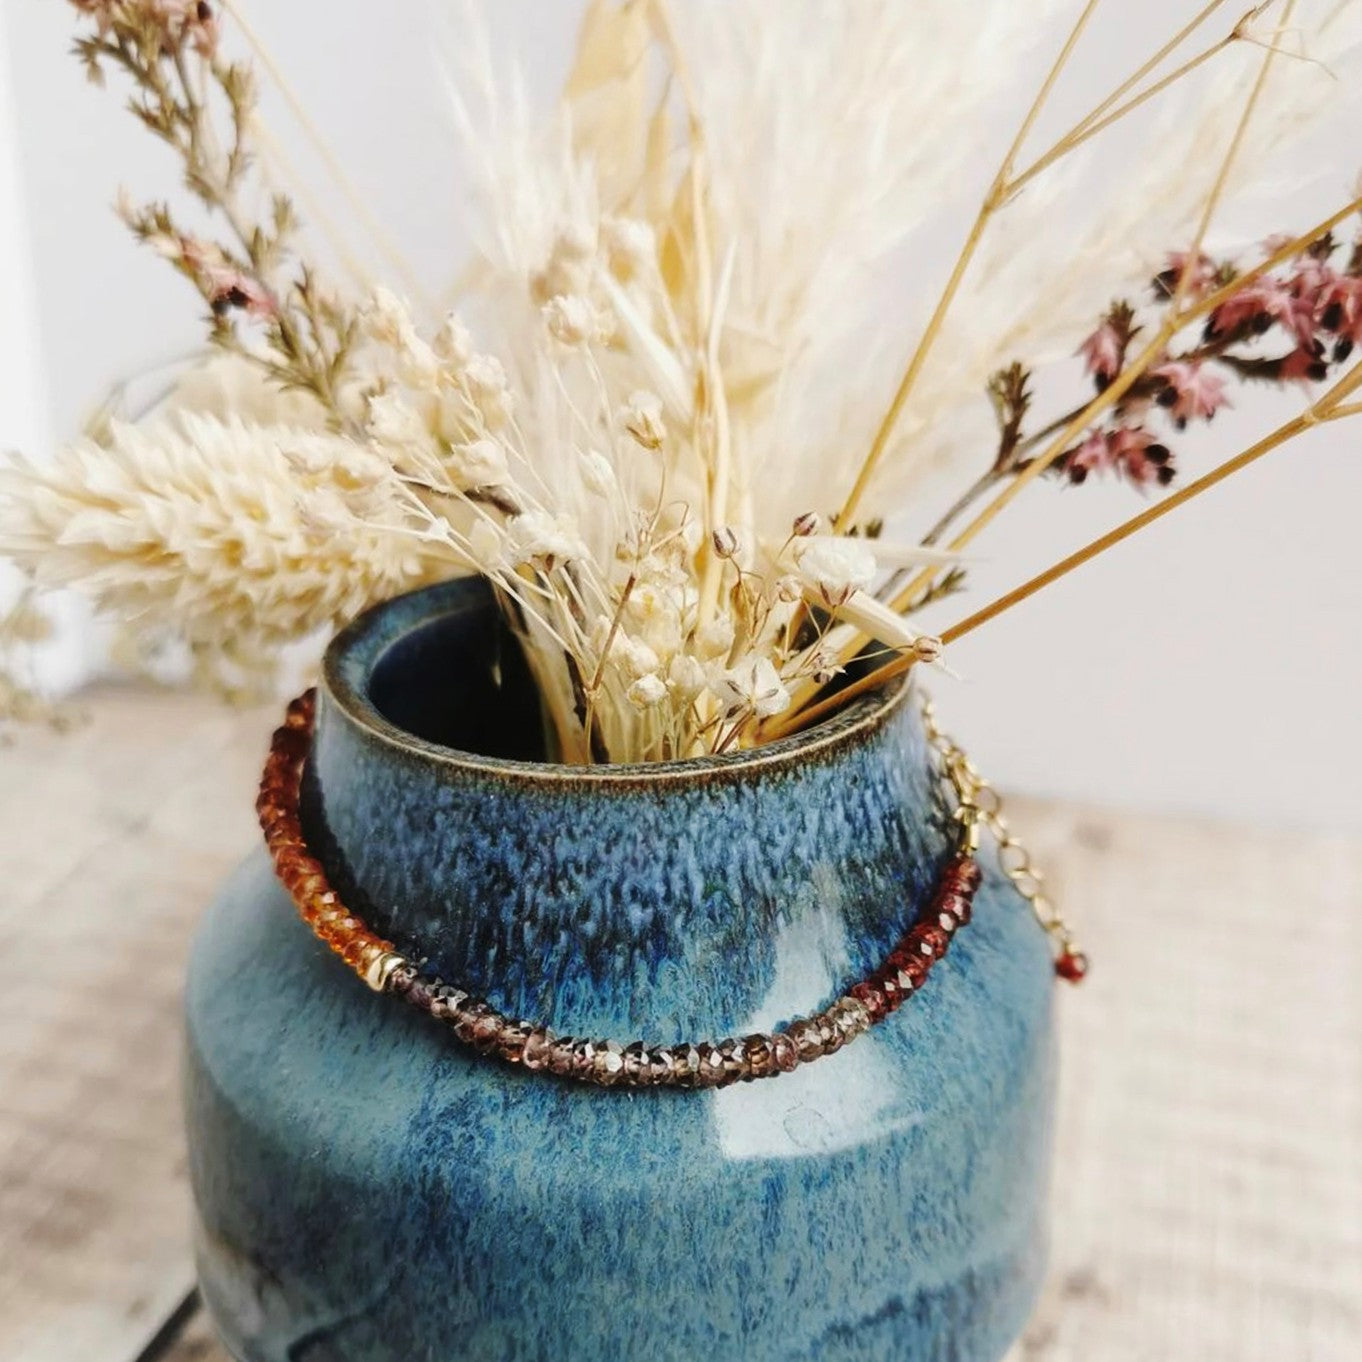
Featuring Turundu 'Sapphire' Rondelle Beads
This beautiful bracelet features our incredible Turundu 'Sapphire' rondelle beads, they have the most stunning sparkle with autumnal colours.
This stone is actually from the garnet family which is produced in Tundure near Tanzania, hence the name. Many companies will be selling Turundu simply as sapphire when in actual fact it is a type of garnet (which would be the reason for the excellent price tag!). None the less these are absolutely beautiful and the twinkle of the beads will charm you just the same.
Explore our wide range of gemstone beads to choose your favourite to use in your bracelet design.
Watch Cat's Tutorial On How To Make A Beaded Bracelet Using Wire Guardians
Recommended Project Tools & Supplies
You can customise your bracelet with your choice of metal, clasps, crimps and beads. Use the supplies and tools below as a guide:
- Gemstone beads – (featuring one strand of Turundu ‘Sapphire’ 3x2mm rondelles)
- Metal accent beads of your choice (featuring 3mm gold filled beads)
- Flex-Rite Jewellery Wire - ensure it fits through your chosen beads (featuring 0.24mm / 0.010 inch)
- Small clasp (Featuring 5mm gold filled spring ring clasp)
- 2 wire guardians (featuring 0.021” size, gold filled)
- 2 crimp beads (featuring 1mm gold filled - 2x2mm would also be suitable)
- Round nose pliers
- Snipe nose pliers
- Bent nose pliers - available in our pliers pack
- Side cutters
- Bead mat
- Ruler
Optional if you want to include an extender chain:
If you choose not to use an extension chain as shown in the video tutorial and steps below, simply add a jump ring to the loop of the bracelet end which you can then fasten to the clasp.
- 1 inch of loose chain (featuring gold filled, 1 inch length of 3.5mm cable/trace chain or similar)
- Open jump ring (featuring 3mm)
- Closed jump ring (featuring 5mm)
- Oval open jump ring (featuring 4.5x3mm)
- Headpin (featuring 1 inch 26 gauge gold filled with ball end)
- 1 x gemstone bead - featuring one of the Turundu Sapphire rondelle beads
Learn About Featured Products

What Are Wire Guardians?
Wire guardians are findings to use on bracelets and necklaces to prevent your stringing material from wearing against your other findings, prolonging the life of your jewellery pieces. It also offers a professional looking result for your designs.

What Is Flex Rite Jewellery Wire?
Flex-Rite Jewellery Wire is a popular choice of threading material for your handmade jewellery designs. It consists of multiple strands of stainless steel, with a nylon coating, providing the best strength and resists kinking with no compromise on flexibility. We love using Flex-rite wire as it's great for both small and heavy beads, plus it provides a lovely flexible drape, perfect for those simple, modern jewellery designs.
Step By Step Instructions
1. Lay out your chosen beads on a bead mat in your desired design combination.
TIP: Ensure the first and last 5 (approx) beads to be threaded have a hole large enough to accommodate two strands of Flex Rite Wire.
2. Cut your Flex Rite Wire to the required size – allow an extra 4 or 5 inches for ease of handling.

3. Start threading the findings onto the Flex-Rite Wire – first thread one crimp tube, then one wire protector (thread through the open end, around the bend and back down through the other side), then the clasp.
4. Now poke the loose end of the Flex-Rite Wire back through the crimp. This will create a kind of ‘loop’. You should have a double thickness of flex wire through your crimp tube, and both ‘ends’ sticking out from the same side of the tube.
5. Adjust the Flex-Rite Wire if necessary so that the shorter loose end is approx 1-2 inches long and the other loose end is the rest of the full length (this will become the main strand for the bracelet).

6. Take hold of these two strands of Flex-Rite Wire with your finger and thumb of one hand, and using the other hand holding the crimp/clasp/wire protector, pull gently to carefully pull the crimp up against the protector, and tighten the wire around the protector at the same time. The clasp will now be threaded onto the wire protector.
7. Once you’re happy that the Flex-Rite Wire is sitting tight in the wire protector, and that the crimp tube is close up to the ends of the wire protector, carefully use your snipe nose pliers to squeeze the crimp tube closed. This will grip and secure the flex wire and findings in place.

8. Thread on the next 4 or 5 beads that you know have large enough holes, and thread both lengths of Flex-Rite Wire through them.
9. Use your wire cutters to snip the short length of Flex-Rite Wire as close as possible to this last bead.
10. Continue threading all of your beads on the long length of flex wire
11. Double check the final length of beads is correct, taking into consideration the additional findings to be added.
12. Make sure the last 4 or 5 beads threaded on have a hole large enough to accommodate the two lengths of flex wire as before.
13. Thread on your last crimp tube and wire protector just like before, and thread the loose end of Flex-Rite Wire back down through the crimp tube. Also keep threading it through the last few beads on your bracelet.
14. Carefully pull the Flex-Rite Wire tight so that it is sitting snuggly around the wire protector with the crimp sitting close between the protector and the beads.

15. Allow a small amount of ‘give’ – so when everything is pulled fairly tight, you make sure there’s still 1mm or 2mm gap between the beads and the crimp tube. This ensures the bracelet moves freely. Straight sided beads like some rondelles will need more ‘give’ than round beads, so move your bracelet in your hands until you are happy with the level of tension and fluidity of movement.
16. At this point you can then use your snipe nose pliers to carefully squeeze your crimp tube closed to secure your bracelet.
17. Use your wire cutters to snip the excess length of Flex-Rite Wire as close to the bead as possible and make sure any little tail is tucked in and not sticking out.
18. If you choose not to use an extension chain as shown in the video tutorial and steps below, simply add a jump ring to the loop of the bracelet end which you can then fasten to the clasp.

Adding An Extension Chain & Wire Wrapped Bead To Finish
1. Open a 3mm round open jump ring (using your bent and snipe nose pliers), attach the last wire protector and add the larger closed 5mm round jump ring before twisting closed.
2. Open an oval open jump ring and attach to the 5mm closed jump ring and add on the extension chain before twisting closed. Your extender chain should now be attached to your bracelet.
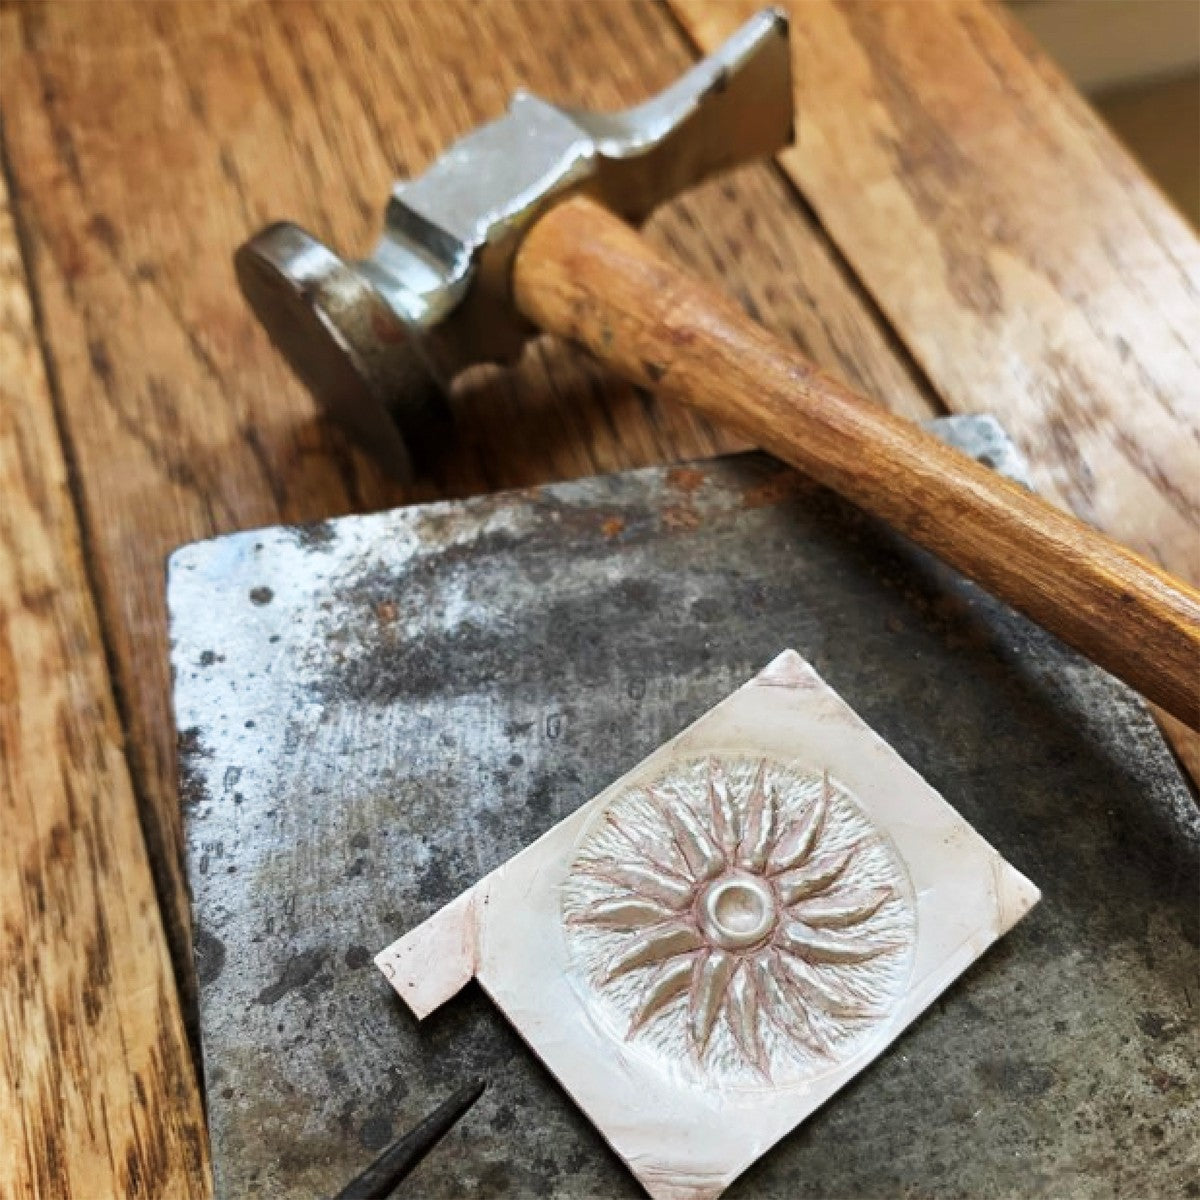
3. To finish with a focal bead, thread a single bead onto a headpin and using the tips of your round nose pliers, grip the wire close to the bead. Bend the wire over the pliers at a right angle, adjust your pliers by 90 degrees so that the side of the pliers on the outside of the bend you’ve just made is now on the top of this bend. Wrap the wire back up and around this ‘prong’ of the pliers to create a full loop with the wire.

4. Slide the end of the extension chain onto the wire so that it sits inside the loop you’ve just made.
5. Securely grip the loop with your bent nose pliers or snipe nose pliers and complete the wrap by winding the ‘tail’ of the headpin around the ‘neck’ until it’s snug up to the bead.
6. Snip the excess wire as close to the bead as possible. Tuck in the tail using your snipe nose pliers.
Congratulations, your bracelet is now finished!

Meet Guest Tutor, Cat Birch
I have been making jewellery for over 10 years, and in 2019 I made the decision to take it officially from hobby to business. My jewellery has been an intrinsic part both my personal life and my customers’ lives, accompanying through the ups and downs, bringing strength and grounding through the tough times, celebrating the achievements and the highs, and cherishing the people we love and the memories once they’re gone.
My jewellery is to celebrate and mark these moments – and people – that make our lives so rich and multifaceted. I believe jewellery should be made with love – because jewellery is always given with love.
Follow Cat
Discover More of Cat's Guest Tutorials With Kernowcraft

How To Make Gemstone Bead Earrings
Cat shares with you a beginner friendly beading and wire work jewellery making tutorial, on how to make your own sparkling earrings. This project requires minimal tools and supplies to create this beautiful design.

How To Make Scrap Silver Earstuds
This fantastic tutorial is a great one to follow if you have lots of silver scrap hanging around! Gather it up because you're about to turn them into something beautiful. Cat has taken the time to share with you the step by step process of making these gorgeous silver scrap earstuds with photos for you to easily try for yourself.
Also in this section:
- Macrame Bead Bracelet Tutorial
- Your Guide To Bead Stringing Materials For Jewellery Making
- The Essential Tools For Beading
- Beading: How To Start Jewellery Making With Lyndsey
- Answering Commonly Asked Beading Questions
- Types Of Beads For Jewellery Making
- The Difference Between Half Drilled, Top Drilled And Head Drilled Beads
- How To Use Top Drilled Beads
- Jewellery Making With Half Drilled Beads
- What Are Briolette Beads & How To Use Them
- Stringing Beads With Small Holes
- How To Make Your Bead Holes Bigger With A Bead Reamer
- Types Of Clasps For Jewellery Making
- 8 Reasons You Need A Bead Board
- How To Make A Sliding Knot
- Advice On Knotting Elastic Stretch Magic Thread
- How To Use Flex-Rite Jewellery Wire
- How To Use Crimps
- How To Make A Silkon Thread Briolette Necklace
- How To Use Beading Chain
- 4 Ways To Use Gemstone Donuts
- 4 Gemstone Chip Bead Project Ideas
- How To Use End Caps For Jewellery Making
- How To Make Earwires With Gemstone Beads
- How To Make A Memory Wire Bracelet
- How To Make Gemstone Bead Earrings
- How To Make A Bead Bar Necklace
- How To Make Beaded Bracelet With Flex-Rite Wire & Wire Guardians
- DIY Gemstone Friendship Bracelets
- How To Make A Beaded Bracelet With Knot Covers
- How To Make Polymer Clay Earrings
- How To Make Felt Jewellery
- DIY Mini Tassels & Jewellery Projects
HAVE A QUESTION?
If you have any questions, feel free to get in touch with our friendly team who will be more than happy to give you advice over email or on the phone.
You can learn more and find inspiration by visiting our Jewellery Making Tutorials, Jewellery Making Kits and YouTube Channel. Don't forget to follow us on social media and tag us in your designs on Instagram & Facebook, we would love to see!
