


This guide walks you through how to use the popular bangle forming die tool! It is so easy to use to form consistent decorative bangles every time. We share with you two options on how to use the tool as well as guide you through the steps for achieving a perfect bangle.
You'll also find a list of recommended tools and supplies you will need to complete the bangle, plus you can choose from two designs depending on the style you like! If you have any questions, please contact our small team who will be more than happy to assist you.
Recommended Tools & Supplies
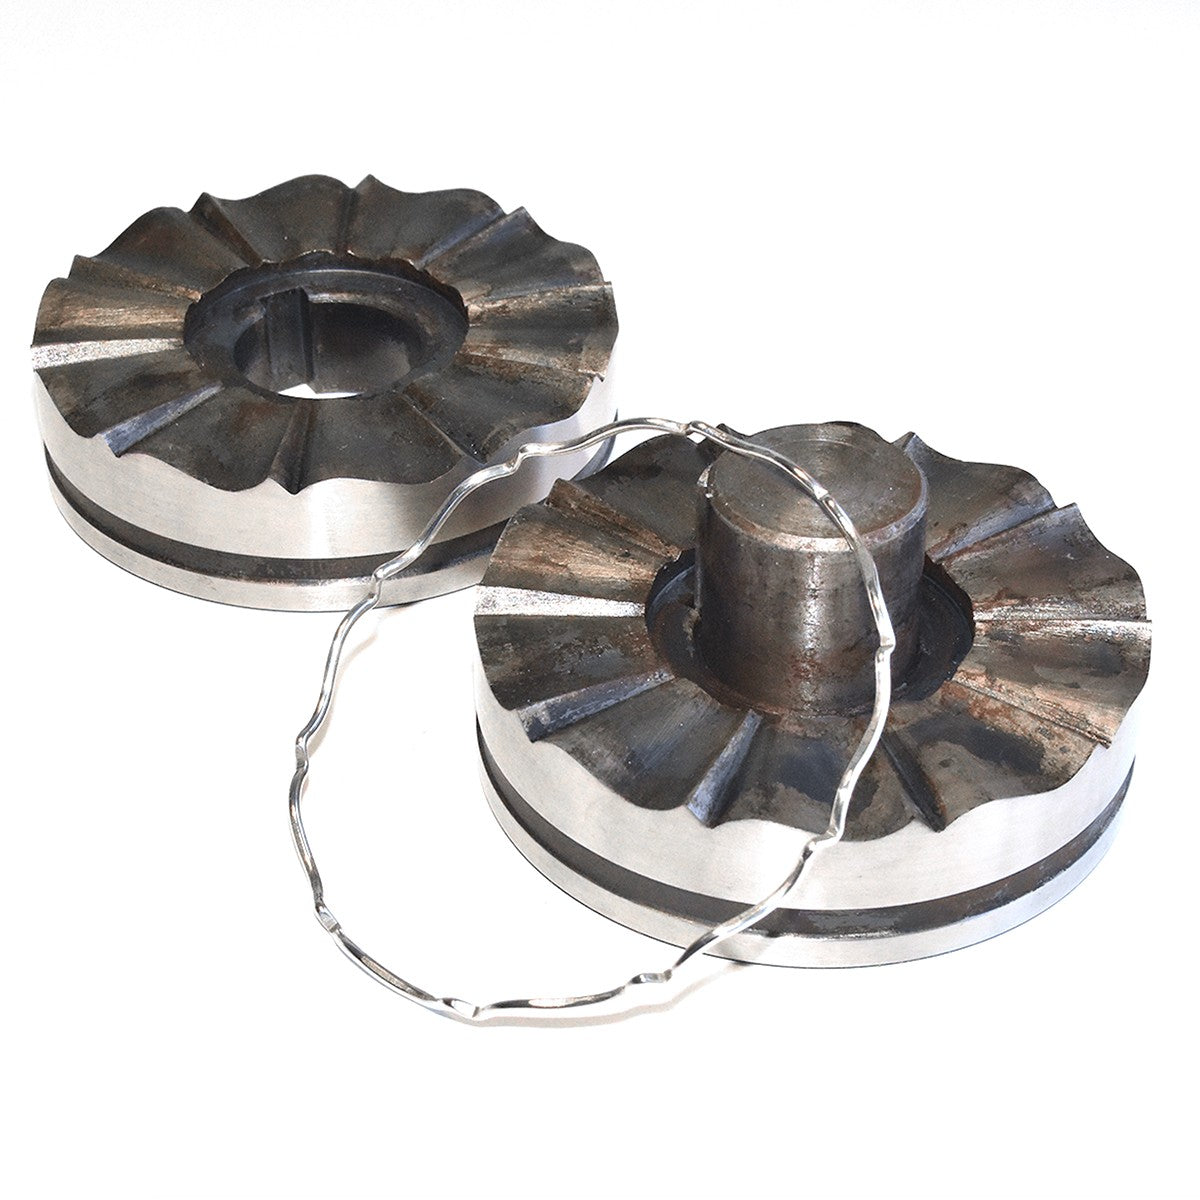
- '10 Fancy Waves' bracelet forming die tool
- Wire of your choice - this project features 1.5mm round sterling silver wire. You can use wire up to 1.8mm (15 gauge) but don't forget that the thicker the wire, the harder it will be to shape!
- Soldering equipment if making a closed bangle - you may wish to check out our soldering kit & metalsmithing kit for our recommended tools, we also have some brilliant guides and tutorials on soldering on our website
- Weighted non-steel mallet or hammer
- Rubber mat to place the die on when hammering to absorb sound and vibrations

Choose Your Wire
You can create bangles with any metal wire you like! We personally love using sterling silver wire as it's a soft and durable metal to work. You may however find it useful to practice on copper wire first before moving on to sterling silver as it's a more affordable option. This particular project features 1.5mm round sterling silver wire.
With the bangle forming die tool you can use wire up to 1.8mm (15 gauge) but don't forget that the thicker the wire, the harder it will be to shape!
Read our advice pages: Your Guide To Metals For Jewellery Making / Your Guide On Choosing Wire For Jewellery Making / Compare Different Sized Wires

Choose The Size Of Your Bangle
Firstly, separate the dies. You might find the first time you use the due you may need to wipe off any excess oil that may be on the die. The oil is there to help stop the die from rusting. There are also three aluminium spacer discs included in the box.
Now you need to decide what size you want your bangle to be. If you are making a closed bangle, the diameter of the bangle must be no larger than 7.5cm or the bangle will not fit onto the die. To make a bangle that is approximately 7.5cm in diameter from 1.5mm round wire you will need approximately 23cms.

Option 1 For Using The Bangle Forming Die Tool: Solder First
The first method is to create your bangle and solder the ends together to form a complete circle. You then need to place the bangle centrally on the die.
You can use the aluminium spacers to help centre up your bangle if you wish, these will get deformed during use.
Then place the other half of the die on top and place it on a rubber mat on a firm surface. Then strike the die firmly around the top. The wire will gradually start to take on the form of the die. Try not to over hit the die as this may deform the wire.
Before & After Using The Bangle Forming Die Tool


Option 2: Solder Or Finish After Forming
The other way is to form your wire into a circle and then place it onto the die.
Once formed, you can then adjust the length of the finished bangle and then solder the ends together or alternatively, you can finish off the ends to create an open style bangle.

How Your Finished Bangle Should Look!
We love how modern and stylish this bangle design is and it's so easy to achieve by using the bangle forming tool. Will you be giving it a go? Shop the tool online now with Kernowcraft and don't forget to tag us in your finished designs on social media by tagging @Kernowcraft, we'd love to see.
Shop Bangle Forming Die Tool With Kernowcraft With 2 Designs To Choose From
This project features our fancy waves design but we also have a plain wave design you can choose from too depending on which style you prefer.


Create Beautiful & Consistent Bangles Every Time Using The Bangle Forming Die Tool...


Wavy sterling silver heart charm bangle by Silverpickle

Sterling silver garnet bangle by Malibu Jewel

Organic textured wavy bangles stacked together by Victoria Williams

Shop Charms
Charm bangles are so popular! Make your own designs or explore our wide selection of sterling silver and gold vermeil charms, with so many styles to choose from to complete your designs

Shop By Gemstone
Whether you want to attach gemstone beads to your bangle or solder a gemstone to your design, we have so many stunning gemstones to choose from.
You May Also Like

Shop Soldering Kit
Our tool kits showcase a range of recommended tools for various jewellery making kits. Each kit has a shopping list so you can pick and choose what you need from our list to suit your needs and budget.

Textured Cuff Bracelet Tutorial
Gest tutor, Harriet shares with you this brilliant step by step tutorial on how to make a textured cuff bracelet. No soldering is required, so this is a great beginner project to practice forming and texturing wire.
A Quick Tip On How To Measure Your Bangle Size With Jeweller Cyrilyn
Also in this section:
- Metalsmithing and Soldering General Advice
- How To Make Granulated Hoop Earrings
- Wax Carving & Granulation Process With Rockpool Jewellery
- Common Soldering Problems & Solutions For Jewellers
- The Essential Jewellery Tools & Supplies For Soldering
- Types Of Tweezers For Jewellery Making & Their Uses
- 10 Jewellery Tools For Supporting Your Work
- Using A Third Hand For Jewellery Making
- Using A Charcoal Block For Jewellery Making
- How To Use A Jewellers Piercing Saw
- How To Use Needle Files For Jewellery Making
- Soldering Flux For Jewellery Making Explained
- How To Use Safety Pickle & The Importance Of Using Plastic Tweezers
- How To Prevent & Remove Fire Scale & Fire Stain
- What Is Thermo-Gel Heat Barrier?
- What Is A Multi Chuck & Essential Accessories For Your Dremel Multi Tool
- How To Use Your Scrap Silver For Jewellery Making
- How To Make Scrap Silver Earstuds
- What Is A Ring Mandrel & How To Use It
- How To Adjust Ring Sizes
- How To Make A Ring Band
- How To Make A Wishbone Ring
- How To Make A Spinner Ring
- How To Make A Spaghetti Ring With Kim Thomson
- How To Make A Textured Ear Cuff With Searose Jewellery (No Soldering!)
- How To Use A Bangle Forming Die Tool
- How To Make Bezel Set Heart Cabochon Earrings
- 10 Reasons You Need A Headband Magnifier For Jewellery Making
- What Is Alligator Tape & How To Use It For Jewellery Making
HAVE A QUESTION?
If you have any questions, feel free to get in touch with our friendly team who will be more than happy to give you advice over email or on the phone.
You can learn more and find inspiration by visiting our Jewellery Making Tutorials, Jewellery Making Kits and YouTube Channel. Don't forget to follow us on social media and tag us in your designs on Instagram & Facebook, we would love to see!