


Make personal jewellery for someone special...
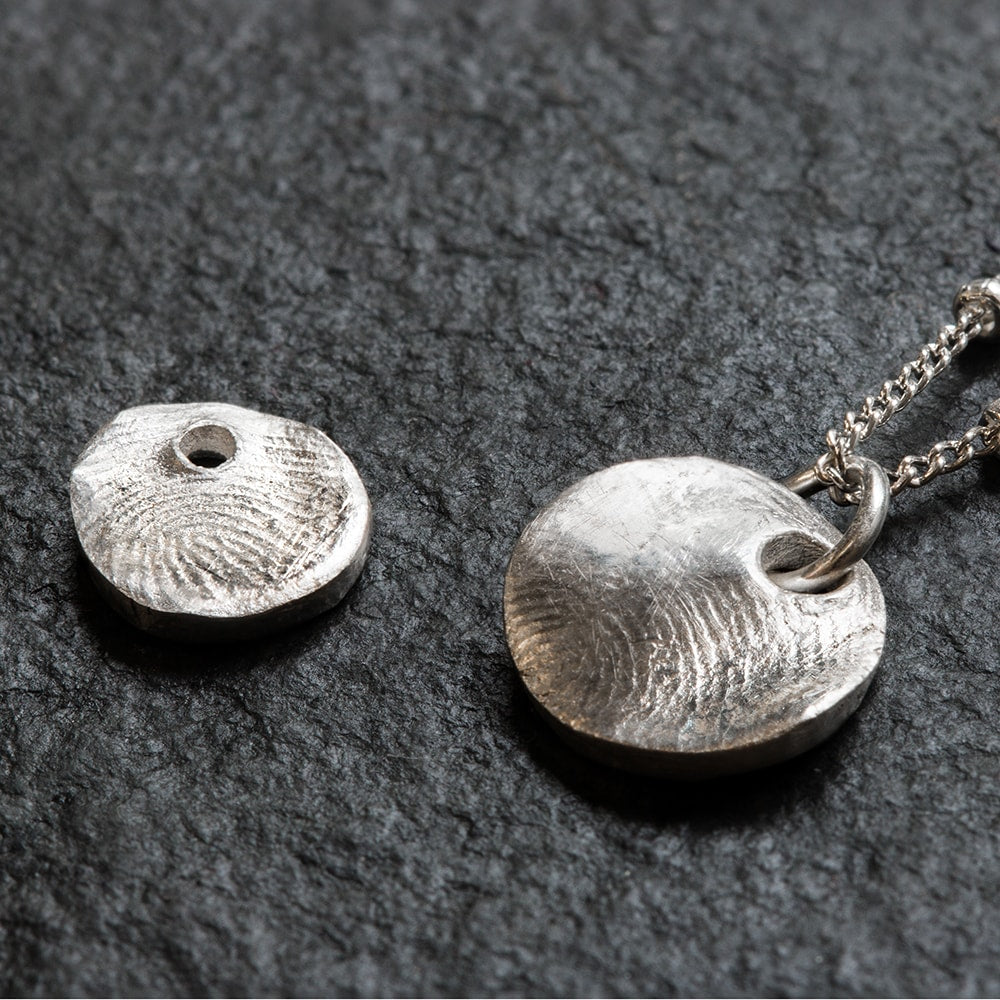
Adding fingerprints into the metal of your jewellery designs using metal clay is a lovely way to create personal and sentimental jewellery designs.
Fingerprint jewellery is surprisingly easy once you have the right equipment. On this page you will find everything you need plus a video and step by step instructions on how to create your own fingerprint jewellery.
Have a question? Get in touch with our friendly team, we'd be happy to help.
Recommended Tools & Supplies
- Art Clay Silver Clay
- Olive oil
- Rolling pin
- Cocktail straw
- Gas torch
- Soldering block
- Sanding stick & sandpaper
- Tweezers
- Burnisher
- Brass brush
- Polishing papers
- Jump ring
- Necklet chain
Watch our video tutorial below
We show you how easy it is to create a fingerprint pendant using metal clay and how you can turn it into a necklace you can give as a sentimental gift.

Shop Metal Clay Tool Kit
This customisable kit contains everything you need to make metal clay jewellery.
The kit includes Art Clay Silver Clay, gas torch, soldering block, brass brush, burnisher, tweezers, sanding and polishing sticks, pack of polishing papers and our handy metal clay leaflet to help you get started.
Or follow step by step instructions with photos...

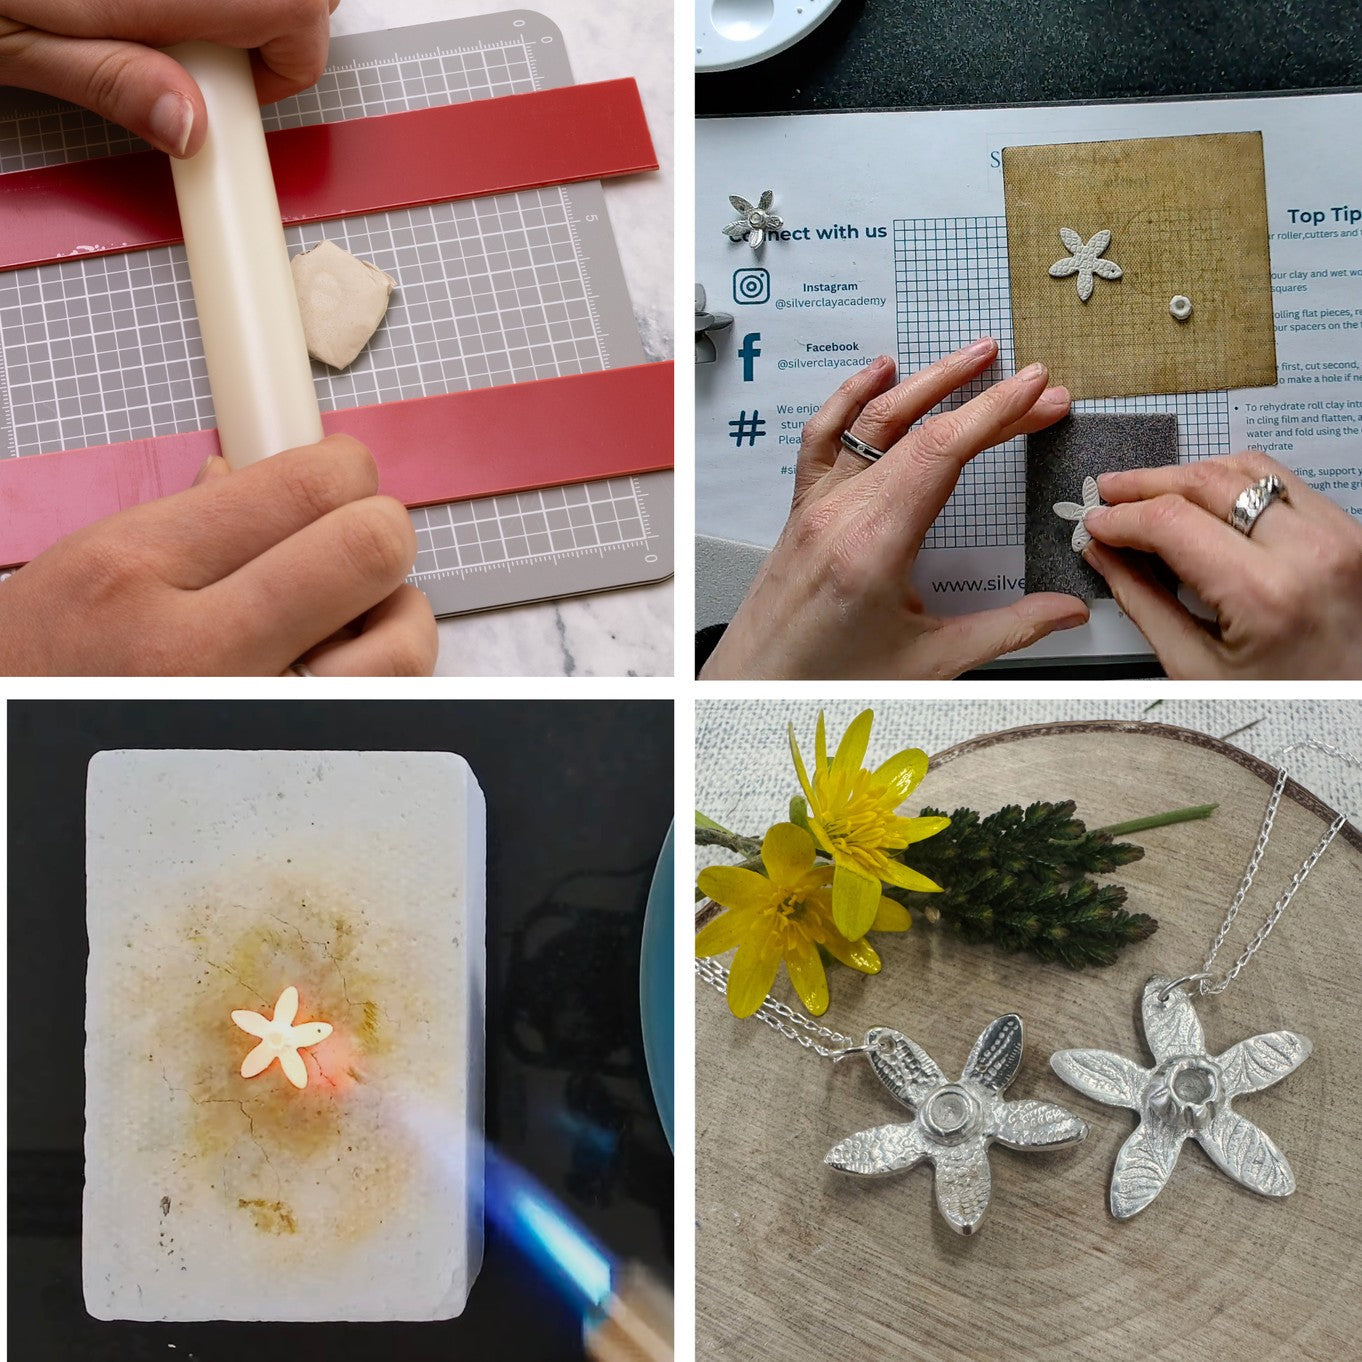
Find a flat surface without any grain or texture, we often use a plain piece of paper. Get your clay and roll a small piece out using your plastic rolling pin. It's worth remembering that metal clay shrinks when it is fired by around 10-15% so add a little extra size for shrinkage.
TIP: A great way to ensure that our clay is rolled out evenly is to use a pack of playing cards or sheets of card - stack a pile of cards either side of your piece of clay to the thickness you want to roll your piece to and then use this to rest your rolling pin on.

When you are ready to add your fingerprint, ensure that the finger is clean, grease free and completely dry. Gently push your finger into the clay remembering your design and where you need the fingerprint to be.
Push gently down and slowly rock side to side to ensure all the fingerprint is taken. Now remove your finger from the clay and check you are satisfied with the print.

Next use a cutter or knife to cut out the shape you want around the fingerprint. Remove the excess clay and keep for another project. If you are making a pendant or charm make a hole to hang the piece from when finished.
Now leave your clay piece to dry. The clay needs to be completely dry before firing otherwise your piece may crack or be ruined in the firing process, if you are leaving it to dry naturally we recommend leaving the clay overnight. Using the wet and dry sanding sheets or a polishing stick, gently file the edges of your piece until smooth and ready for firing.

On a heat proof surface (we recommend using a soldering block) use a gas torch to heat the clay. At first you will see a smoke-like substance burning off, this is the binder in the clay. Your piece will then begin to glow at a faint pink/red colour, you need to keep your piece at this temperature for a couple of minutes and then remove the heat. It's important to remember that it won't look silver at this point. Drop your piece of silver using the reverse action tweezers into a cup of water to cool it.

Using the brass brush under water to gently scrub the white layer which is over your silver. If the silver isn't appearing it may be that you haven't fired your piece for long enough and you can dry it and fire it again. You can now use the polishing papers to polish your piece up to a high shine.
Your piece is now ready to incorporate into your design!

Metal Clay
Both Art Clay Silver, Precious Metal Clay (PMC) and Art Clay Copper are all suitable for making fingerprint jewellery. What's the difference? They're the same product from different brands so it's your choice.

Gas Torch
Metal clay can be heated using a gas torch, kiln or on a gas hob with a firing mesh with cover.

Soldering Block
It's important that you have a suitable workspace to create fingerprint jewellery using metal clay. A soldering block is a safe surface for you to use and keeps the heat exactly where you want it - an essential part of your kit.

Tweezers
These tweezers are made from sprung steel so they open when you squeeze the handle, meaning that they grip pieces without any effort. They're especially great to use on small items.

Brass Brush
A brass brush is great for pre-polishing metal clay after firing and for achieving a 'brushed metal' or satin finish by hand. Once fired, your metal clay design will be frosted white and this brush will clean it right up!

Sanding & Polishing Sticks
Our sanding and polishing sticks are great for neatening edges of your metal clay and also for pre-polishing them once fired.

Polishing Papers
These popular polishing papers are brilliant for gaining a high sheen on your finished metal clay design, if you don't have power tools for polishing. Simply work through the grades to gently polish you design.
Also in this section:
- A Beginner’s Guide to the Magic of Silver Metal Clay
- Your Questions Answered On Working With Metal Clay
- Essential Tools For Working With Metal Clay
- 6 Months Of Silver Clay With Emma Roy
- Three Ways To Fire Metal Clay
- How To Use Two Part Moulding Compound For Metal Clay
- Working With Art Clay Copper
- Making Metal Clay Pendants Using Flowers With Silver Nutshell
- How To Make Fingerprint Jewellery With Metal Clay
- Metal Clay & Enamel Flower Earring Tutorial
- Copper Clay Pumpkin Pendant Tutorial
- Create Charms & Pendants With Metal Clay Moulds
HAVE A QUESTION?
If you have any questions, feel free to get in touch with our friendly team who will be more than happy to give you advice over email or on the phone.
You can learn more and find inspiration by visiting our Jewellery Making Tutorials, Jewellery Making Kits and YouTube Channel. Don't forget to follow us on social media and tag us in your designs on Instagram & Facebook, we would love to see!
