


Discover the three ways to fire your metal clay and silver clay designs with step by step instructions.
Once your design has dried thoroughly, it will be ready to fire. The advantage of PMC3, PMC+ and Art Clay is that you can fire it with either a kiln, a gas torch or even on your hob. On this page, we go into detail about each process so that you can decide which one will work best for you and your design.
Products & Supplies Mentioned in this Guide
- Jeweller's gas torch
- Gas torches
- Soldering block
- Gas hob firing mesh with cover
- Reverse tweezers
- Small brass brush
- Burnisher
- Barrelling machine
- Silver clay tool kit
- Metal clay tools and supplies
We Recommend Experimenting First
To get used to the firing process, we recommend that you first try a little experiment. Take a small pea-sized piece of metal clay and roll it out into a rod. On one end of the rod concentrate the heat in an effort to melt it. This will allow you to recognise the signs so you don't damage an important piece later on.
Tips Before You Start
Ensure your silver clay is completely dry before firing. If it isn't, you might find it may break or explode during firing, resulting in injury or burns. Use a hairdryer, dehydrator, warming plate, or kitchen oven to dry the clay.
To check if the piece is completely dry, place the warm piece on cold stainless steel or a cold mirror. After about 10 to 20 seconds remove the piece. If there is no water condensation on the plate you are using, the piece is probably dry. Please note this test isn't 100% reliable but should give you some indication.
To help see if your piece has fired successfully, trace the outline of the unfired piece on a sheet of paper. Compare the fired piece with the traced size. Art Clay Silver contracts 8-10% in volume after firing, so you should see a slight shrinkage.
Tips For After Firing Silver Clay
Prepare a stainless steel or glass bowl of water to cool off the piece after firing.
Watch Us Fire Silver Clay Using A Gas Torch

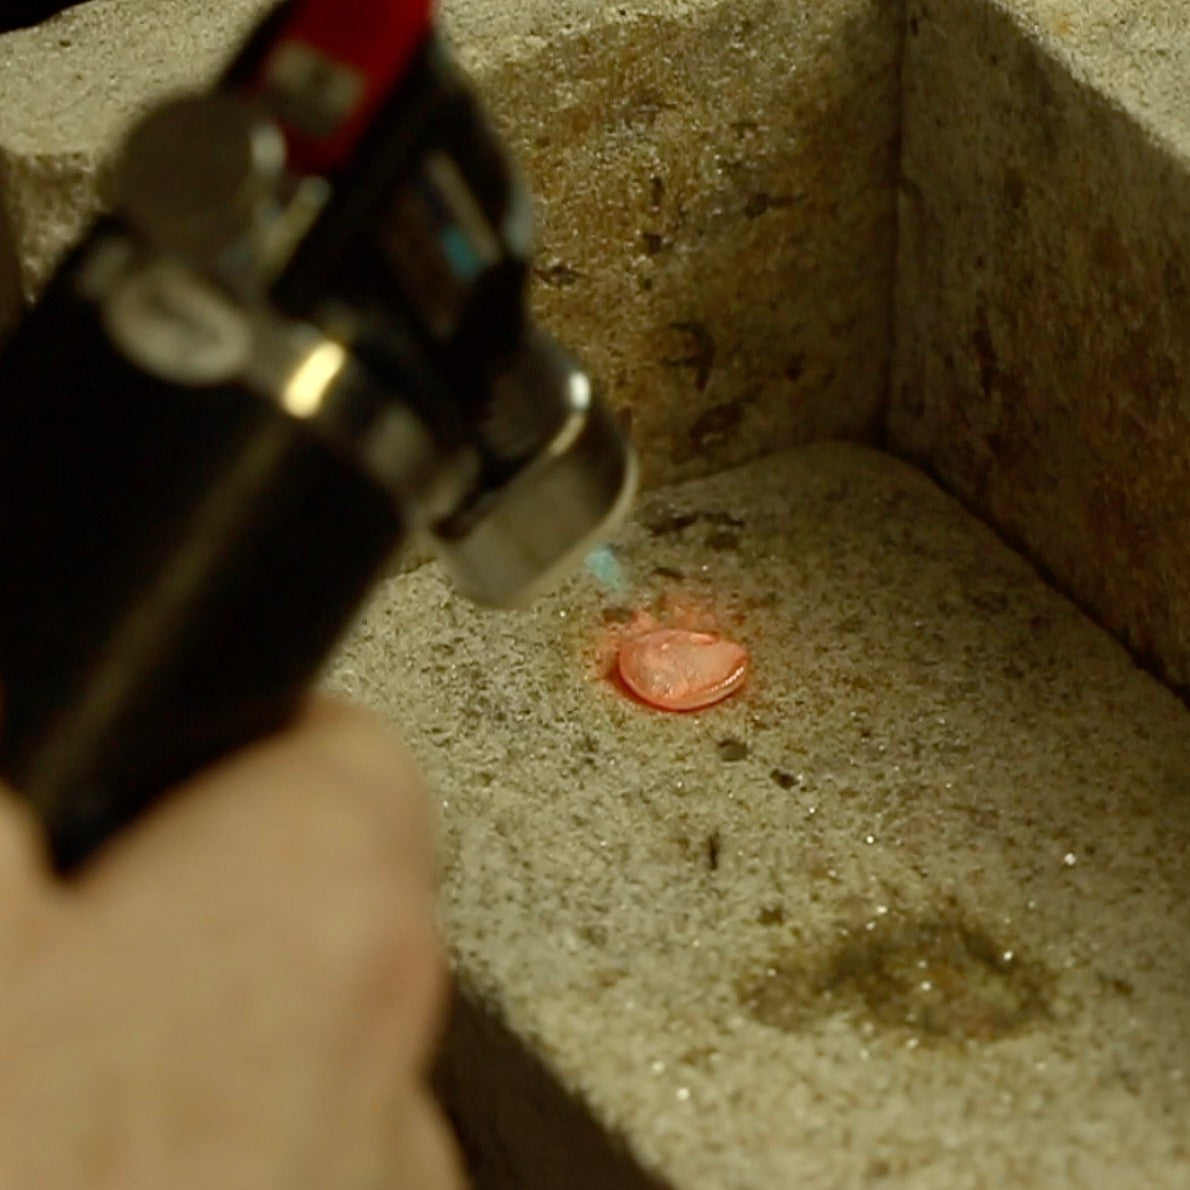
Firing Option 1: Gas Torch
Tim McCreight, author and experienced metalsmith, recommends the following method for firing silver clay with a gas torch. We have used this method successfully and found it easy to follow.
1. Place your work on a soldering block on a fireproof surface.
2. Light the torch and hold the flame about 2cm away from your work, depending on the size of your piece and heat of the flame.
3. Within a minute the piece will be enveloped in a soft flame as the binder burns away. The flame will soon go out by itself. Within another minute, the piece will start to glow red. You will only be able to see the change of colour in dim light.
4. Continue heating until this becomes a bright and luminous colour. At this point glance at a clock.
5. Hold this colour as uniformly as possible. Continue to heat while moving the flame, keeping the glow for the recommended time that the metal clay you are using requires.
6. When the time is up, turn off the torch and allow to cool.
Estimated Firing Times
This will also depend on the size of your piece.
- For PMC+, hold for at least 5 minutes.
- For PMC3, hold the temperature for about 2 minutes.
For Art Clay Silver:
- Up to 5g: 1-1.5 minutes
- 6-15g: 1.5-2 minutes
- 16-25g: 2-4 minutes
If the piece gets shiny across the surface it is too hot, so move your flame further away and continue moving the flame.

Firing Option 2: Kiln
The Paragon SC2 kiln is one of the most popular and recommended kilns for using with all types of metal clay. It gives you lots of control in terms of setting temperatures, allowing you to take more time over heating your metal clay, which helps to make it stronger in the long run.
The digital programmer allows you to easily control the temperature, ramping and the time the temperature is held. It heats up in approximately 15-20 minutes. The elements are embedded in ceramic fibre and heat the kiln from both sides, minimising the front-to-back temperature difference common with smaller kilns.
The amount of time you decide to heat your design for will depend on how strong you need the piece to be. A good general rule for firing pieces comprising only of metal clay is 900°C for two hours. Any higher than this and the metal clay begins to distort. This will make your design really strong.
If you are including any gemstones in the piece, a different program is needed. The shortest time and heat that can be used for PMC3 is 10 minutes at 650°C, but firing at a higher temperature for longer will improve the strength.
Watch Tutorial On Using A Kiln For Firing Metal Clay

Firing Option 3: Gas Hob With Firing Mesh With Cover
For this method you will need a Gas Hob Firing Mesh With Cover. The mesh sheet measures approximately 16 x 16cm, large enough for most projects. It comes with a smaller piece of mesh, ready shaped for you to make a cage to cover your piece during firing for extra safety. Fold this into a box shape by bending the edges over prior to starting the firing process.
Read the following method thoroughly before starting to ensure correct and safe firing.
1. Place the stainless steel mesh over the gas hob. Make sure it is stable and secure. Turn on the hob and find the hottest area by checking where the glow is the strongest. It is easier to see this if you dim the lights. Turn the hob off.
2. Immediately place your design on the hottest part of the firing mesh using a pair of tweezers. Place the protective cover over the metal clay.
3. Turn the hob back on. Your metal clay will flame for a few seconds as the binder in the clay burns off. Soon the piece will begin to glow. Fire for 5 minutes. For safety, don't move or touch your piece or the mesh.
4. After firing for 5 minutes, turn off the hob and let the piece cool on the mesh for about 15 minutes. If you try to remove the piece before it is cool it may stick to the mesh. When the piece is cool it will easily detach from the mesh.
5. Once your design has cooled on the mesh, pick it up with tweezers and dip into water to ensure it is completely cool. Then dry the piece.
6. Check the size of the fired piece against the outline of the unfired piece. If it hasn't contracted, the piece has not been successfully fired. Repeat steps 2-5.
7. Brush your piece with a brass brush to bring out the silver shine. You can also burnish it or tumble it for a better finish.

Important Notes When Using A Gas Hob
- Only fire pieces under 25g of clay, max 5cm x 3cm and 2cm high.
- Don't use supporting material such as fibre blanket or vermiculite.
- Dim the lights slightly to see the glow properly.
- Don't fire hollow pieces with burnable cores, like cork clay, on the gas hob.
- You can't fire Art Clay Gold with this method.
- Make sure the piece is completely dry before firing. It is best to dry it overnight in a warm place.
- If firing Art Clay containing fireable gemstones, it is safer to let the piece cool slowly between two pieces of fibre blanket to avoid cracking, especially if the stones are large.
- Please keep children and pets away while firing.
- Don't lean over the flame, or move the silver or mesh while it is hot.
- Tie back long hair, and avoid wearing loose clothing or jewellery which could catch on the mesh.

Shop Silver Clay Tool Kit
At Kernowcraft, we have a great range of metal clay tools and supplies, including Precious Metal Clay (PMC) and Art Clay in clay, paper, syringe and paste form as well as a range of metal clay tools and accessories including metal clay moulds, moulding compound, texturing plates and more.
If you're a metal clay beginner, you may be interested in our Silver Clay Tool Kit which contains all the tools you need to complete your first project.
Also In This Section
- A Beginner's Guide to the Magic of Silver Metal Clay
- Your Questions Answered On Working With Metal Clay
- Essential Tools For Working With Metal Clay
- Three Ways To Fire Metal Clay
- How To Use Two Part Moulding Compound For Metal Clay
- Working With Art Clay Copper
- How To Make Fingerprint Jewellery With Metal Clay
- Create Charms & Pendants With Metal Clay Moulds
Have A Question?
If you have any questions, feel free to get in touch with our friendly team who will be more than happy to give you advice over email or on the phone.
You can learn more and find inspiration by visiting our Jewellery Making Tutorials, Jewellery Making Kits and YouTube Channel. Don't forget to follow us on social media and tag us in your designs on Instagram and Facebook, we would love to see!

