The Ultimate Guide To Photographing Jewellery
One of the most important parts of selling any product is good photography. The more amazing your items look, the more people will want them! But it's not always so simple. Jewellery photography can be quite a challenge at times and it's difficult to determine exactly what steps to take to improve your pictures. So we've created this article to try and help anyone who wants to improve their photography. Whether you're just starting out and using your phone, or you have a big professional DSLR camera, there's something here for everyone to learn.
We've seen people ask lots of questions about jewellery photography, such as:
What camera should I use for jewellery photography?
Why does my jewellery look orange?
What lights should you use to take pictures of jewellery?
How do I stop reflections in my silver jewellery?
How do I take better pictures of my jewellery?
We hope to answer all these questions and more in the article below, with some animations and comparisons to help you troubleshoot and learn how to take the best possible pictures!
As always, we'd love to hear your opinions on the article, if there's anything else you'd like us to help with, and of course all of your amazing pictures! So make sure to get in touch.
Lighting your jewellery for photography
The most important part of photography! It doesn’t matter what you’re photographing, or what camera you’re using, if the light isn’t perfect, your picture won’t be.
Lighting is often overlooked when people start photographing their jewellery, but it’s so important to bring out all the pretty details in your work. Many cameras struggle with low light, especially if you’re using a phone. Make sure you’re flooding the scene in brightness, otherwise you might end up with blurry, grainy, or dull images! The lights you have in the house may seem like enough to your eyes, but to a camera, it appears very dim. This is why you'll often get great pictures outside, but they come out blurry or grainy when you go indoors. This doesn't mean you should go and shoot out in bright sunlight though - although the brightness is fantastic, you'll have a very harsh light, with a dark shadow, because the light is coming directly from the light source (in this case, the sun!). In the perfect photography environment, your light needs to be diffused through or reflected off something to soften it up a bit.
So if indoor lights are too dull, and bright sunlight is bad - what do you do?
As I said before, the best light is diffused - so if you're outside on a sunny day, shoot in slight shade. Although you'll have less light, it will look much nicer. Or if you could shoot indoors with the sun coming through the window: if you cover it with a thin sheet or net curtain. As the light streams through your veiled window, it will be softened and give you a lovely natural studio!
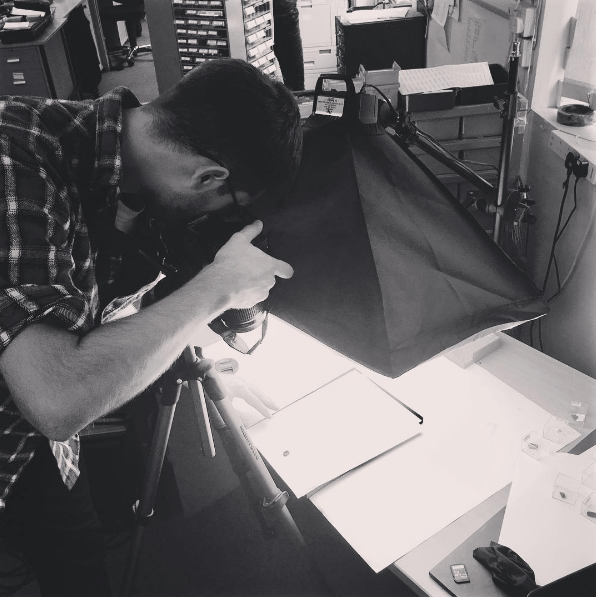
But the sun can be unreliable, so most people rely on artificial studio lighting. Our favourite here at Kernowcraft is a nice big softbox. They're big lights on a stand inside a pyramid-shaped enclosure covered in
If you don’t have the budget or the room for a softbox, you can even use desk lamps and diffuse the light by shining the lamp through a sheet of paper or a sheet. The best experience will come with practice - so try different lights, different ways of softening them, and different directions to point them.
Positioning your lights will depend on how many you have and how big they are. At Kernowcraft we currently use one large softbox for our photos, allowing us to shine from overhead or at the side of our jewellery, depending on the piece! If you have more than one light, try positioning one on each side of your jewellery to light up both sides. A torch or phone light shone at the side of your gemstone can even help bring out the stone's flash in your picture!
Using flash
Don't ever use the small flash on the camera pointing at your jewellery, It looks unnatural, as the light is coming from right next to the lens. Imagine this when you look at things with your eyes, it's very rare you'll see them lit up by a light shining from your face!
If you are using a flash, make sure you don't point it at your jewellery and point it at a wall or ceiling instead. The light will bounce off and you'll get a more soft, professional looking light.
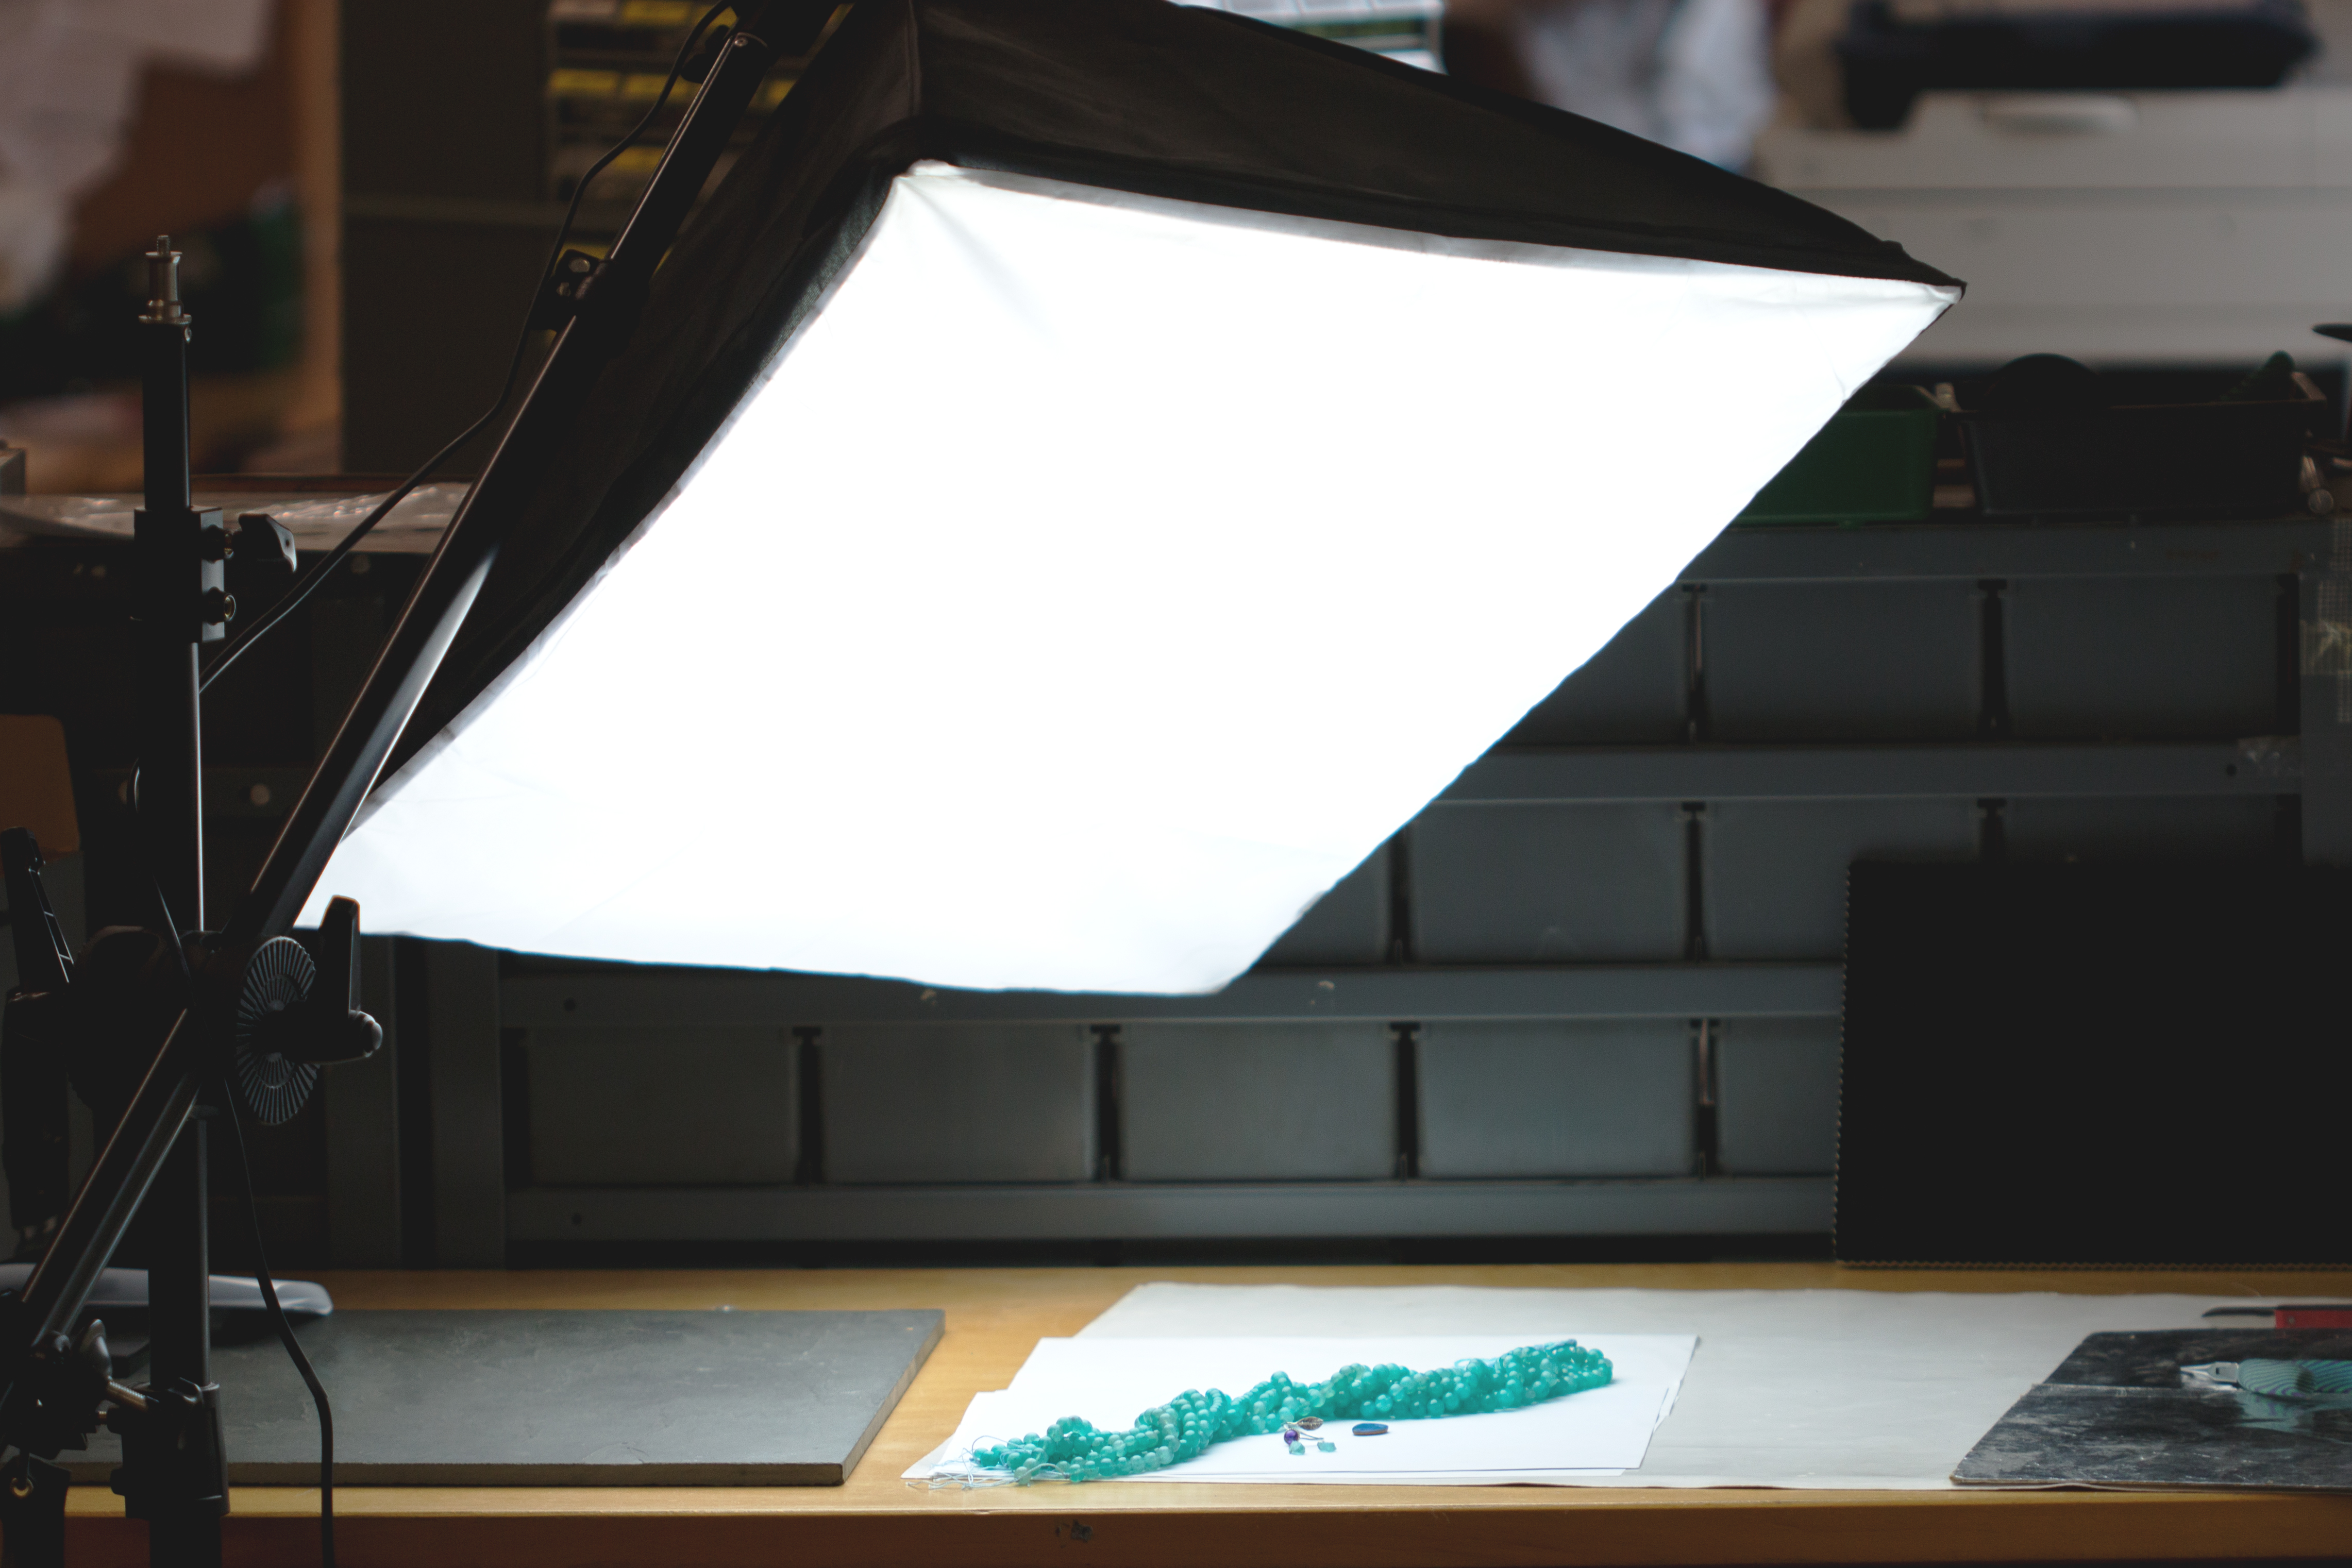
This softbox is all we usually need to photograph jewellery in the Kernowcraft office!
Which camera is best for jewellery photography?
As long as your lighting is good you can get amazing pictures on any camera. It doesn't matter as much as you think, most modern camera phones are incredible!
There's much more to photography than having a good camera but if you think you've reached the limits of your current equipment, there's a huge selection to choose from. Don't worry about the megapixels, it doesn't matter how big your picture is unless you're displaying your jewellery on the side of a building!
The sensor and the lens are the most important part of any camera and the bigger the camera, the larger you can go on both of these things. This is why a compact camera will usually be much better than a smartphone, and a DSLR will be ever better still. The biggest advantage of buying a DSLR is being able to buy a lens made for small-scale photography such as jewellery.
Controlling reflections on your jewellery
When your light looks good, don't forget about the highlight. These are the brightest, whitest bits of your jewellery, and can be hard to control with light alone. You also don't want distracting reflections all over your lovely shiny jewellery. It can be especially noticeable on polished metals such as silver, and even worse if you have spherical elements such as domes in your design. We use a reflector to shine the light back towards the jewellery and black or white card to block out any reflections we don't want. You can do the same at home simply with tin foil and sheets of paper or card. If you fold them in half so they stand upright, you can position them nearby your jewellery and see how it affects the reflections in different way's before you start taking pictures.
Like light, the positioning will change depending on what suits each piece you're photographing, and what's in your environment. If you're wearing bright colours, or next to a window, or there's anything nearby your jewellery, it's going to be more likely to reflect. The closer something is to your jewellery, the more it will be reflected! You can even cut a hole in a large piece of card to put your camera (or phone) lens through. This will stop your jewellery from reflecting...you!
Checking your white balance
Have you ever taken a picture where one part looks blue, and the other part looks orange? or noticed in the evening, a lot of your indoor pictures have an orange look to them?
One thing that could ruin your jewellery photography (especially with silver!) is the white balance being wrong. The white balance is how red or blue the image appears in a picture. We used to find that in some of our images the white balance hasn't been quite right and in the worst cases, can make your silver appear gold!
There's some very complicated science behind what makes your pictures appear more blue or red but it all comes down to do the type of light you use. Daylight appears nice and blue in images, whilst indoor bulbs can look very orange. Our cameras try to guess the correct colour of the image but can only white balance to one type of light. This means if you have an indoor light and sunlight in one image, the camera can't adjust to both, so you get with that orange-and-blue picture!
Many cameras automatically adjust this white balance, but they often get it wrong! You may need to manually adjust your white balance in your phone or camera settings to get a more realistic looking picture. There are also editing options available to tone down those yellows.

Here is an example of a white balance being too warm. The only difference in these pictures is that I turned the softbox off! The warm image is the colour of our indoor bulbs is a mistake a lot of people make!
Try and adjust your camera setting before shooting, or try to edit the temperature afterwards, for example, the iPhone has a 'cast' setting when you edit your pictures that helps to neutralise any colour balance issues.
Composition of your image & finding the perfect camera angle
Composition is one of the key factors that make a picture stand out. It's the name for the placement of everything in your picture and the camera's angle. With one small item of jewellery, it's simple to pop it in the middle of the frame but when there are more things in the picture, you need to think a little harder!
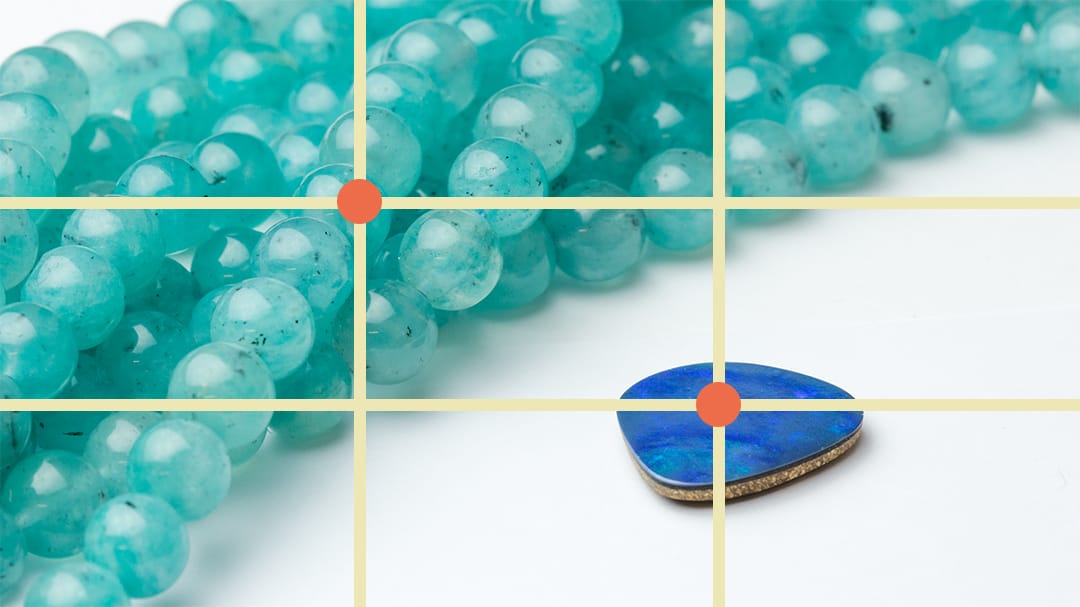
The most common way of helping with composition is the rule of thirds. This is a way of seeing the image in 9 different sections and is used as a template to create eye-pleasing pictures. The theory is: if you make sure you place interesting things along the lines, on the intersections between the lines or within the 9 sections, you'll have a great looking picture!
This applies to everything in the picture, not just your jewellery. If you're using any interesting props in the image, you can place them so they fill one of the sections and place your jewellery opposite. Again this is an area for experimentation, every picture calls for something different
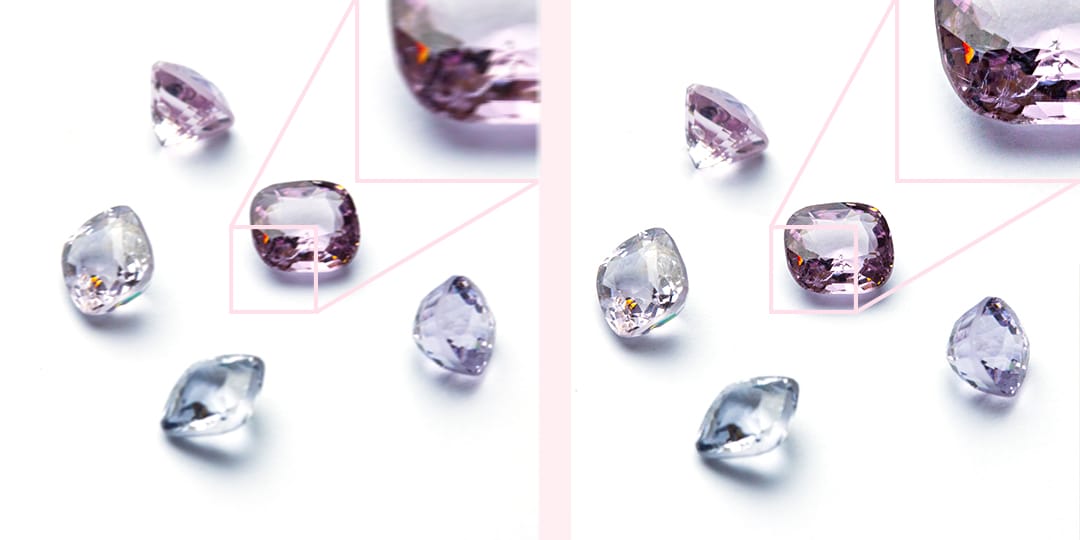
The only difference in the images above is the position of the gemstones. The image on the left however is arguably better and more appealing. It's considered more eye-catching because of one reason: The rule of thirds.
The image below demonstrates how this works. The two key elements in the image are situated on two of the intersections on the rule of thirds, balanced nicely at a diagonal. Try to imagine these lines when shooting, to help make your images more appealing. Some apps and cameras actually have a rule-of-thirds overlay you can enable to visualise it better!
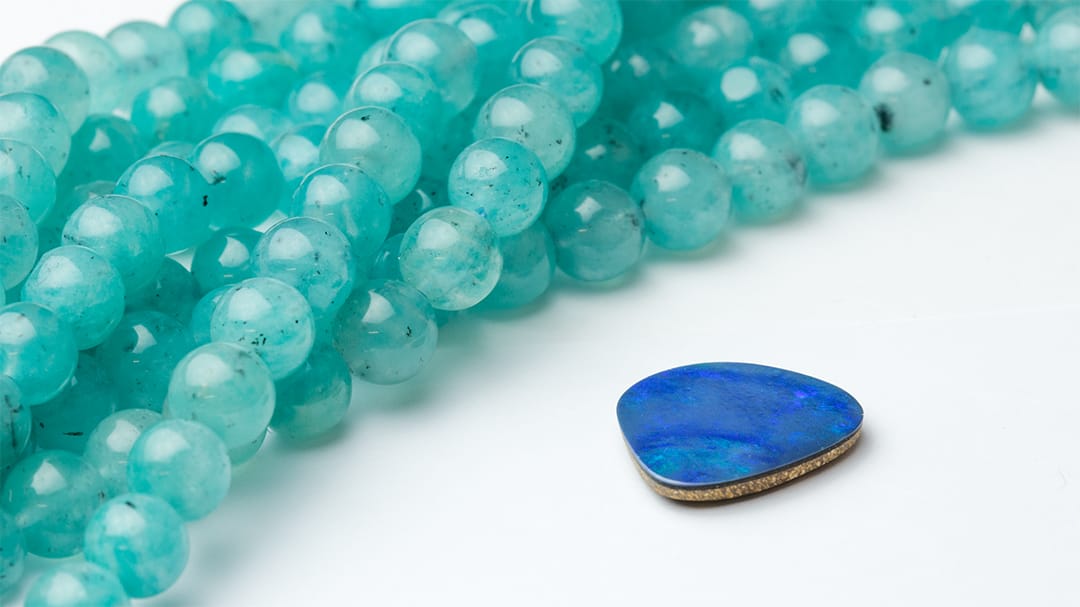
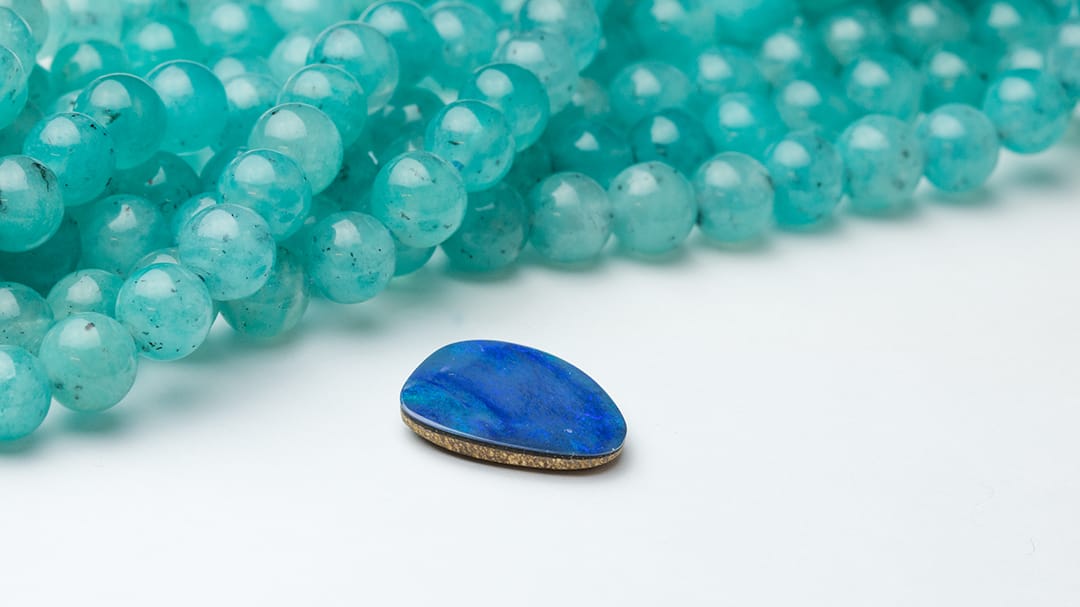
The height of your camera in relation to the jewellery can make a lot of difference too. If you are too low, you might not be able to visualise the shape of your jewellery properly and if you go too high, the picture may not look as nice! We try to keep the camera at a 45-degree angle to keep a happy, nice looking medium. Flat lay shots can be good, to show the exact shape of your piece. We often shoot directly overhead for our freeform stones to make sure the customer knows exactly what they're getting!
The images above are of the exact same opal gemstone . As you can see, the image on the left gives a good perspective for the depth of the gemstone, but the shape is a mystery! The image on the right does the opposite job. The shape is clear now, but the depth isn't shown. It's important to choose the best angle to show important details, and even better to show more than one angle to cover all bases!
Getting your focus perfect
How close should you get the camera to your jewellery? As close as you can!
If you're using a phone this could be difficult, as they can focus at different distances and often don't get close enough. The best thing to do in this case is start as close as you can, hold down on the screen to try and focus and if it doesn't work, move slowly back until it does! The amount of light in the picture helps here - if the picture is too dark, the camera won't be able to see the thing you want it to focus on.
Close-up pictures of smaller items is called macro photography, and there are lenses made specifically for this purpose. We use a macro lens to capture everything we shoot at Kernowcraft. It's recommended to get that extra step closer to your jewellery for a nice sharp picture! Although we use a big DSLR camera here, if you're limited on budget, you can get cheap macro lenses for phone cameras too.
You need to have at least one picture that shows your whole piece in focus. After you've taken your picture, zoom in and make sure it's not blurry. With an automatic camera, more light gets more in focus, so again, lighting is very important! If you're using something more complicated, the aperture controls how much is in focus. A high number means more is in focus, but less light enters the camera. For example, we try to shoot in the f/11 aperture for a happy medium.

If you're using a DSLR, or can change the aperture on your camera, this is the difference in aperture sizes. As you can see in the leaf ring picture above, f/32 gets a LOT more in focus!
Minimising any camera movement
Jewellery photography is on such a small scale that every little movement makes a huge difference. If your pictures look a little blurry and you're sure it's in focus, the problem could be camera shake. This is the reason professional photographers use those big tripods. If the camera moves while it's taking a picture, you get blurry pictures.
The brighter a picture is, the less chance you'll have of camera shake. This is because the camera takes slightly longer when it's darker, so there's more chance your hand will move very slightly as it's capturing the moment. If you can't go any brighter with your lights, you have to keep the camera very still instead!
Try resting your arms on a table to steady yourself as you take the picture and take lots of pictures quickly, especially is you have a burst mode: one of them will hopefully be shake-free! If you're still seeing that blur, you may need a tripod.
Make sure you get one that's strong enough for your camera but remember tripods don't have to be huge things. There's actually some very small and lightweight ones available, even tiny pocket-sized tabletop ones for a smartphone, which are relatively low-cost due to their small size!
The example above shows exactly what camera motion blur looks like. It can be difficult to tell at a distance, but the zoomed in areas show how blurry the image really is. To keep your pictures sharp like the example on the right, make sure you keep the camera steady (preferably with a tripod) and use lots of light!
Using props and backgrounds in your jewellery photography
When photographing jewellery, you want to make sure it steals the show! A background that's too noisy can distract people from how amazing your creations are, so try to stick to flat colours. We often use a sheet of paper for our backgrounds!
Natural backgrounds work well with gemstones, so keep your eyes out for things you can use in your pictures. Slabs of slate, marble or wood make beautiful backdrops that keep your gemstones grounded in nature.
Think about what colour your backgrounds are too. In lighter designs with materials such as silver and diamonds, they could get lost on a white background but will pop on something darker. For example, we try to shoot lighter gemstones such as some of our opals and moonstones on a slate to make them stand out a little more. It seems to highlight the colourful flash of the stone, too!
Props are great for adding some charm and giving people a good idea of size but don't go too wild with them. To keep your jewellery on centre stage, try to keep any props in the scene minimal and in the background. It needs to be out of the main focus of the image: you don't want your prop to be hogging the limelight!
Using various props, you could try using a theme for your images that fit your style. Having a common pattern running through your images gives your pictures a distinct personality.
Alternatively, you could tailor your props to the style of each piece of jewellery. For example, you may want some shells in a picture of your sea-inspired jewellery and then flowers in something forest inspired! Let your imagination run wild for your pictures as much as it does for your jewellery designs.
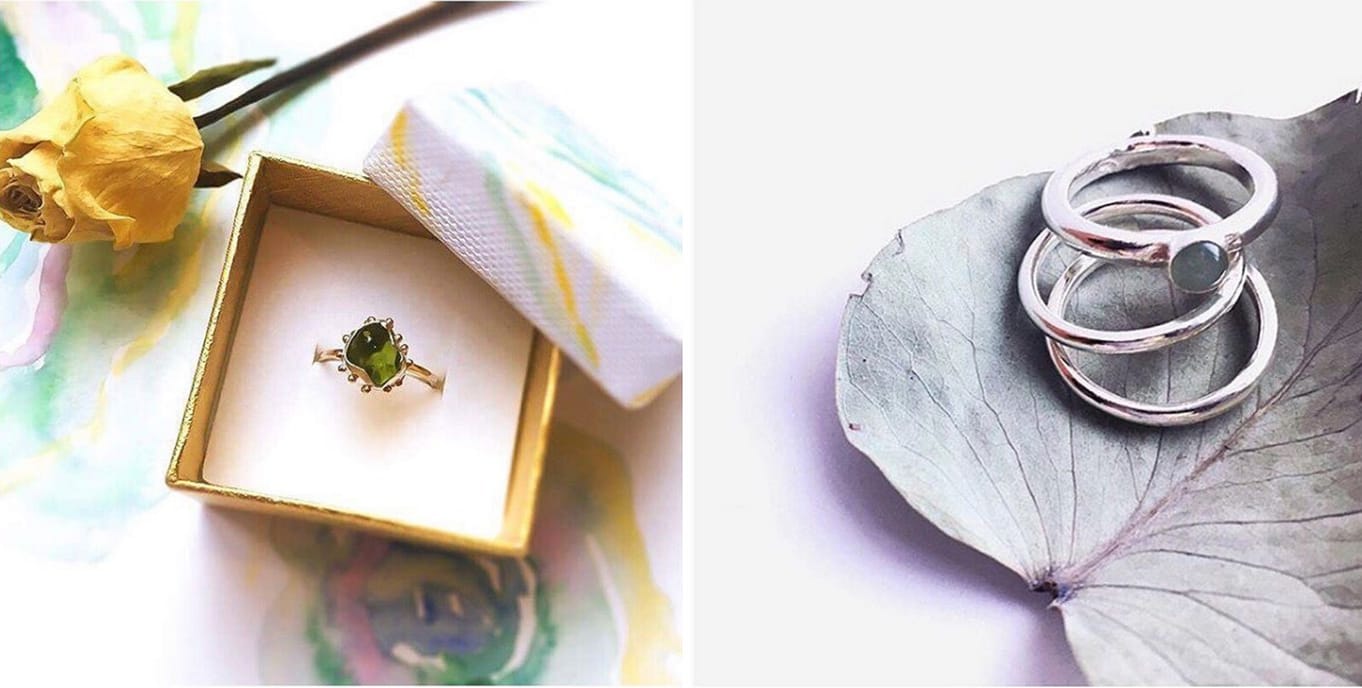
Here are a couple of our customer's pictures we've recently shared on Instagram - they both do an excellent job of using props to add some extra personality to their images and brand, whilst still keeping the main focus on their jewellery.
Great work from @bijouxdechagall and @minimojewellery!
Editing your jewellery images
Editing pictures can be a hot topic for many photographers. There seem to be two camps: those who think all images should be untouched and those who think they should be edited.
We like to fall between the two categories. We love editing the pictures, but only to show our customers how good the gemstones look in real life. You should NEVER try to make your jewellery look different than it is - that 's how you get unhappy customers!
Editing is used to make your picture look lovely, making sure it's bright enough, to crop it a little if needed and to change that pesky white balance! You can bring out the brightness and colour in your jewellery, to try and show everyone what it looks like in person!
We use Photoshop in the office, but you don't have to go all out on a great computer and fancy editing software! There's an amazing free software called GIMP which is very similar to the full version of Photoshop or you can use a simple online editor like the one from Canva. If you're using a smartphone, we can't recommend Google's Snapseed editing app enough! If you're interested in more serious editing tools, our favourite are Adobe's lightroom, photoshop, and for raw editing: Phase One's Capture One

Here's a before and after of one of our edits, we find the site looks much cleaner when our products have white backgrounds, so we brighten everything up, making sure to keep the products looking true-to-life.
Using complimentary colours in your photography
We won't get into the complexities of colour theory but some colours just look right next to each other!
Orange and blue look famously good together, as well as purple and yellow, but to make sure we're getting that perfect colour mix, we love using Adobe's colour tool, found here. You can move the colours around and it will suggest matching complimentary colours and change the type of 'match' with the menu on the left. Brilliant for planning what kind of props to use for your next shoot! (and for decorating your house!)
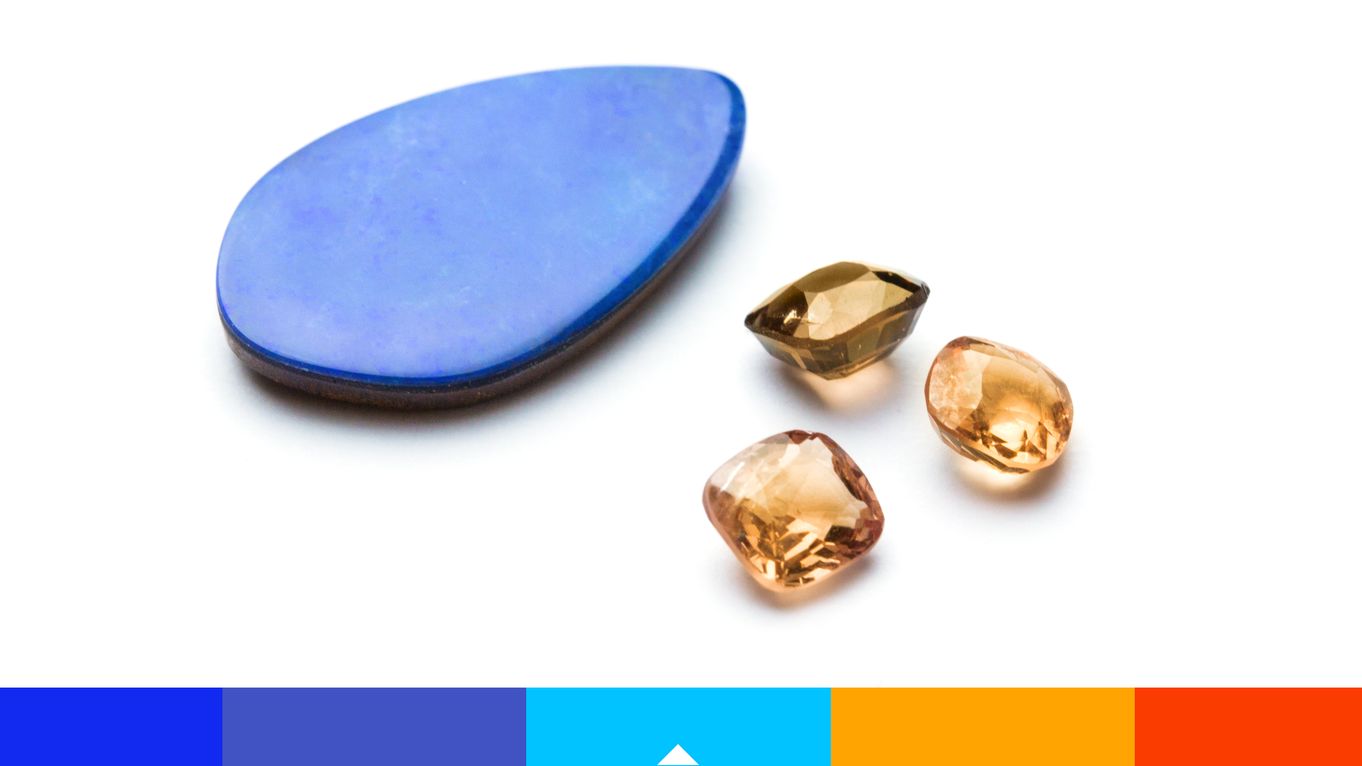
Above you can see we've created a colour theme with the Adobe colour tool and matched up some gemstones to create a perfect colour pair!
Always take more pictures!
Keep shooting! You need at least two pictures of any piece of jewellery but the more the merrier. Make sure you show it at every angle and show off all the details. If you're trying to sell your jewellery, taking more amazing pictures can only help you. Most importantly, the more pictures you take, the more you learn what works! So keep trying new things. The best thing about the digital age of photography is that if you get something wrong, you can delete the picture and nobody will know! Practice makes perfect!
I really hope this article has helped you learn something new about photography or your camera and helps you take even more beautiful pictures of your jewellery!
Also in this section:
- 8 Reasons To Do A Jewellery Making Course
- 5 Steps To Creating A Profitable Jewellery Business
- Jewellery Photography Guide
- 12 Tips When Taking Photos Of Jewellery On Your Phone
- 5 Tips for Photographing Your Jewellery
- Jewellery Packaging Ideas
- 10 Packaging Tips For Your Handmade Jewellery
- All Your Questions Answered On Hallmarking Jewellery By London Assay Office
- The Power of The Jewellery Making Community
- Jewellery Making, Copyright & Being Unique
- 6 Ways To Support A Small Business
- Running A Handmade Jewellery Business On A Budget
- Preparing Your Jewellery Craft Stall
- Jewellery Craft Market Vlog & Packing List With Mareike
- 21 Tips For A Successful Craft Stall
- 10 Reasons Your Jewellery Business Needs Social Media
- How To Use Instagram For Your Handmade Jewellery Business
- How To Set Up An Etsy Shop For Your Handmade Jewellery Business
- Creating A Brand For Your Handmade Jewellery Business
- Branding Your Jewellery Business
- 11 Marketing Tips For Your Handmade Jewellery Business
- 16 Website Tips For Your Handmade Jewellery Business
- Choosing A Brand Name For Your Handmade Jewellery Business
- Creating A Logo For Your Jewellery Business
- How To Price Your Handmade Jewellery
- Top Tips For Designing A Business Card For Your Handmade Jewellery Business
- Sending Newsletters For Your Handmade Business
- How To Run A Social Media Giveaway For Your Handmade Jewellery
- How To Work With Influencers To Sell Your Handmade Jewellery
- 3 Ways To Measure A Customer's Ring Size As A Jeweller
- The Handmade Jewellery Business Christmas Checklist
- 26 Blog Post Ideas for Jewellery Makers
- 4 Ways To Refresh Your Handmade Business
- Top Tips For Selling Handmade Jewellery Online With Carole Allen
- 15 Tips To Stay Safe In The Workshop